Bridge by Steve Becker
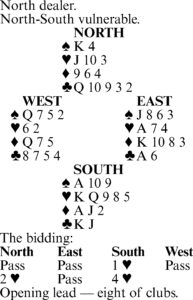
Familiarity with card combinations and how to deal with them can be helpful to the defenders as well as to declarer. Most combinations do not present much of a test, since they repeat themselves time and again, but the less frequent ones are sometimes a challenge.
Take this case where West led a club against four hearts. East won with the ace and recognized that attacking diamonds offered the best chance for the defense. So he returned the three of diamonds, West winning the trick with the queen after declarer followed low. It did not matter what West played next. Declarer later lost a trump trick and made exactly four.
However, East could have stopped the contract with a more judicious play at trick two. He had the right idea when he returned a diamond, but he chose the wrong one. He should have led the ten rather than the three.
Note the deadly effect of this play. If declarer goes up with the ace, the defenders eventually get two diamond tricks, as well as the trump ace. Equally, if he covers with the jack, West wins and returns a diamond to establish the setting trick, since East’s K-8 are strategically positioned over dummy’s 9-6. And if South ducks the ten entirely, so does West — and again the outcome is the same.
East’s play of the ten, though it looks peculiar, can easily be justified. East reasons that if partner has any two diamond honors, the ten lead can do no harm. And if West has only one diamond honor — whether the jack or the ace — the ten play is again harmless.
But if West’s honor happens to be the queen, the ten return is necessary in order to neutralize dummy’s nine. The ten is therefore the correct play.
Tomorrow: Bidding quiz.
Lifestyles
Thursday evening TV
Bridge by Steve Becker
To Your Good Health: Restarting treatment important after ONJ recovery
DEAR DR. ROACH: I’m currently in the final stages of recovering from osteonecrosis of the jaw (ONJ). Getting a ...
Dear Annie: Husband married to tube, not his wife
DEAR ANNIE: My husband is one of those people who always needs the TV on. Eating dinner? TV on. Getting dressed? TV ...
Hints from Heloise: Fun way of making magnets
DEAR HELOISE: I receive magnetic calendars from charities. After the year has ended, I carefully remove the front ...
A trip back home and memories of Father’s Day
It is Tuesday at 5:30 a.m. My husband Joe and son Benjamin left for work. Son Kevin is still sleeping. All is ...