Breaking News
Lifestyles

Bridge by Steve Becker
By STEVE BECKER 2 min read

Precisely when to win a trick is a problem that often determines the outcome of a hand. The holdup play, so often utilized in notrump contracts, might defeat its purpose unless it is applied at exactly the right time and place.

Take this case where West leads the king of hearts against three notrump. If South wins with the ace, he sooner or later goes down one. Whenever he gets around to the diamond finesse, East takes the king and returns a heart, and declarer finishes a trick short of his goal.

South should realize that there can be no advantage -- and that there might be a serious disadvantage --in taking the first heart. He should therefore duck in order to sever East-West communication in the suit.

When West continues with the queen, South is again faced with the question of whether or not to win the trick. But this time he should take the ace, as there is no reason to duck and every good reason to take it.

Winning the second heart assures the contract, while ducking it jeopardizes the contract. Declarer plans to take a diamond finesse next, not caring a whoop or a holler where the king is actually located.

If the finesse wins, he is virtually certain to finish with 10 tricks; if it loses, he is sure to make nine tricks. This is because, if East has another heart to lead, West started with at most four hearts, so the defenders cannot score more than four tricks.

Note that if South refuses to win the second heart, he subjects himself to potential defeat. West might then shrewdly shift to the queen of clubs at trick three, and down the drain the contract would go.

Tomorrow: Two shots are better than one.

(c)2026 King Features Syndicate Inc.

Lifestyles

Bridge by Steve Becker

2 min read

Some deals from the annual world championship receive only passing notice because the outcome at both tables is exactly the same. But this one from the Italy-U.S. match in 1973 deserved more publicity than it got.

Nothing much happened at the first table, where the U.S. pair bid and made four spades. West led the K-Q-2 of diamonds. South ruffed, drew trump, lost a club finesse to East's queen and eventually discarded his heart loser on dummy's fourth club to score 620 points.

At the second table, where Giorgio Belladonna was declarer for Italy, West led the K-Q of diamonds and shifted to the ten of hearts. This put an altogether different complexion on the matter. It now seemed that Belladonna would lose a heart and a club and go down one.

But Belladonna made the contract anyway. He covered the ten of hearts with the jack, losing to the king, and ruffed East's diamond return. He then played the Q-K-A of trump, producing this position (next column):

Belladonna now led the ten of spades and discarded the ten of clubs from dummy, eschewing the club finesse in favor of a squeeze.

East had no answer to this play. If he discarded a heart, South would establish an extra trick in dummy by playing the ace of hearts and ruffing the deuce; if East discarded a club instead, South would cash the A-K of clubs to establish his jack as the 10th trick. So the deal was a washout with Italy also scoring 620 points -- the hard way!

Tomorrow: There's only one right play.

Lifestyles

Bridge by Steve Becker

By STEVE BECKER 2 min read

1. You are sure to make the slam if the opposing clubs are divided 3-2, so all of your thoughts should be centered on how to overcome a 4-1 or 5-0 club division.

By far the best approach, after winning the spade lead with the ace, is to play as many trumps as necessary until the opponents have exactly one trump remaining. You deliberately do not draw this last trump, but instead next play the ace of hearts and A-K of clubs.

If both opponents follow to both clubs, you draw the missing trump and concede a club trick. If the clubs divide 4-1 or 5-0, and the ace or king of clubs gets trumped, you score the rest of the tricks because the player who ruffs is forced to return a spade or a heart to dummy.

If the clubs divide 4-1 or 5-0 and neither the ace nor king gets ruffed, you next lead the deuce of trump, hoping that the player who wins with the missing trump will be forced to return a spade or a heart.

2. Let's say you win the spade queen with the king and try a club finesse. If it loses, South will return a spade, and if North started with five spades to the A-10, you go down one.

Alternatively, you could win the spade lead, cross to the king of hearts and take a heart finesse through South. If this lost, you'd still be in trouble because you'd have only eight sure tricks. You could then try a club finesse but again would go down if it lost.

The safest line of play, though, is to let South win the first trick! This assures the contract whether North has four or five spades. Let's say South returns a spade at trick two. When you play the jack, North may or may not take his ace, but the contract is safe either way.

Assume he ducks. You next try the club finesse, confident that if it loses, South cannot harm you. If he has a spade to play, it means North started with only four of them, and you finish with nine tricks. If South has no more spades, you also have at least nine tricks.

Tomorrow: Club play saves the day.

(c)2026 King Features Syndicate Inc.

Lifestyles

Bridge by Steve Becker

2 min read

Suppose you had to make three tricks in a suit where dummy held J-x-x and you, as declarer, held A-K-9.

There would be only two practical ways to handle this combination. One would be to cash the A-K, and if either opponent had the singleton or doubleton queen, you would be home free.

The other way would be to lead low from dummy and, if the next player followed low, finesse the nine. This approach would succeed if your right-hand opponent had both the ten and queen.

The mathematics of the situation dictate that it is significantly better to try the double finesse than to cash the A-K. Playing the A-K will drop the queen in only one deal out of 10, while the double finesse will succeed in one deal out of four.

Jean Besse, the late Swiss star, played this hand in a match against Italy many years ago. He finessed the club lead, losing to East's king, and won the club return. After drawing trump, he cashed the king and ace of hearts and trumped a heart.

Next he ruffed a club, on which West showed out, and he was then faced with the proposition of making all three diamond tricks with the combination discussed above.

He led a low diamond from dummy, and East played the four. Besse thereupon played the ace, continued with the king, caught the queen and so made the slam.

Why did Besse abandon the percentage play? The answer is that he knew the double finesse could not succeed in this deal, and that the only chance he had was to drop the doubleton queen.

During the play, Besse had learned that East started with two spades, three hearts and six clubs. Hence, East could not possibly have the Q-10-4 of diamonds, which would give him 14 cards. The only hope, therefore, was that East had started with the Q-4 doubleton.

Tomorrow: Test your play.

Lifestyles

Bridge by Steve Becker

By STEVE BECKER 2 min read

It may at times seem amazing how some declarers are able to figure out what to do when they are faced with a difficult decision. While many might attribute this to a mystical quality known as "table feel," in reality it is simply the ability to place the cards from clues gleaned during the bidding and play.

Consider this deal where South got to four hearts as shown and West led the diamond deuce. East won with the ace and returned the eight of clubs, a play that had all the earmarks of a singleton.

Given this development, declarer realized that the contract was in serious danger. East's play of the ace of diamonds had marked West with the king and simultaneously indicated that East had to have the king of hearts (as well as the king of spades) for his opening bid. There was consequently a strong possibility that whenever East gained the lead with the king of trump, he would lead a diamond to West's king and get a club ruff to defeat the contract.

But South worked out a sly solution to this problem. He took East's club return in dummy, led the four of spades to the queen and cashed the ace of spades. He then led the queen of trump to the ace and returned the jack of spades, discarding his remaining diamond when East covered the jack with the king.

By thus exchanging his diamond loser for a spade loser, declarer assured that East could no longer put his partner on lead to return a club. As a result, South lost only a diamond, a spade and a trump to make his contract.

In effect, declarer played the entire hand as though he had seen all 52 cards from the word "go." In a sense, he did -- after East's first two plays -- but that is typical of any declarer who makes the effort to read the cards from the clues he obtains. The critical information he needs is frequently right there if he simply stops to think about it.

Tomorrow: The possible vs. the impossible.

Lifestyles

Bridge by Steve Becker

By STEVE BECKER 2 min read

Deception plays a prominent role in bridge, just as it does in most other competitive endeavors. But while a declarer can practice deception with virtual impunity, the defenders run the risk of misleading their partners.

Nevertheless, there are occasions when a defender can judge that the only one who can fall victim to his ruse is the declarer. Here is a typical case.

West led the king of hearts, and East, sizing up the defense's prospects, saw that West could take two heart tricks, and that he himself had a sure trump trick. It was also clear that South had to have all three missing aces for his bidding, which meant that the defenders could not hope to take any tricks in the minor suits.

East therefore concluded that unless he could somehow score a second trump trick, South would surely make the contract. So he decided to take matters into his own hands by laying a trap for declarer.

Accordingly, at trick one he dropped the jack of hearts on his partner's king, then played the four when West cashed his ace, looking for all the world like a man with a doubleton heart. When West continued with a third heart, declarer naturally ruffed with dummy's ten to prevent East from scoring a cheap over-ruff.

South was mildly surprised when East produced the eight of hearts at trick three, but that was nothing compared with his reaction at trick four when he led the three of trump to his jack and West showed out. Declarer now realized he had been had, but there was nothing he could do about it. No matter how he continued, he had to lose two trump tricks and go down one.

Tomorrow: By the sweat of the brow.

Lifestyles

Bridge by Steve Becker

By STEVE BECKER 2 min read

The hero of today's deal is Zia Mahmood, one of the world's all-time great players. Aside from his many successes, the charismatic Pakistani is noted for his daring and imagination at the table, and his wit and charm away from it.

Today's deal is vintage Zia. After West's offbeat three-spade pre-empt and North's double, Zia, South, took a stab at three notrump.

West led a diamond, and Zia inserted the nine! This brought immediate results when the nine forced East's king, but the contract was still a long way from home.

East shifted to the spade queen, taken by the ace, and a heart was ducked to East's nine. When East returned the heart king, Zia ducked again, then won the queen continuation with the ace. The A-Q-J of diamonds were then cashed, East showing out on the third round of the suit.

With five cards remaining to be played, the opposing hands were virtually an open book. West was known to have started with six spades, five diamonds and one heart, so he had only one club. East, forced to discard a heart in order to guard clubs, was known to be holding four clubs and the heart jack.

To make the contract, Zia needed four club tricks, which might seem impossible given East's holding. But such things are child's play for Zia. He simply led a low club from dummy and finessed the nine(!), returned to dummy with the club ace and played the heart ten. East was forced to win and lead a club from the Q-10 to South's K-J, handing Zia his ninth trick.

In the post-mortem, the self-effacing Zia pointed out that he had in fact erred by ducking the second heart, which eventually forced him to risk losing a trick to the singleton ten of clubs in the West hand. Had Zia taken the second heart, he could later have played the ace and another club to the nine before exiting with his remaining heart to force East to make the same losing return in clubs.

Tomorrow: The end justifies the means.

(c)2026 King Features Syndicate Inc.

Lifestyles

Bridge by Steve Becker

By STEVE BECKER 2 min read

1. Two hearts. Partner's double indicates the values for at least an opening bid and also implies good support for the unbid suits. Because you are required to answer the double regardless of the strength of your hand, you must distinguish between a forced response based on possibly no high-card points, and one where you hold values that could potentially produce a game.

In general, you respond by bidding the cheapest amount of your longest suit with zero to eight points; jump to the next level (as in the present case) with nine to 11; and leap to game or cuebid the opponents' suit with 12 or more points. The single jump-response is highly invitational but not forcing.

2. Two notrump. This hand also has game potential -- you have 11 points and might have had none -- so again you make a jump-response. The only genuine suit you could have bid was clubs, but there's not much point in aiming for an 11-trick game when a nine-trick game offers better prospects. True, you lack strength in spades and hearts, but partner is virtually certain to have both suits well covered.

3. One spade. There's little hope for game unless partner bids again, so all you can do for the moment is bid one spade. Note that you respond in spades rather than clubs even though the clubs are much stronger. If there is a game, it is much more likely to be in spades than clubs.

4. Four hearts. The short route to game is the best route. You should expect to make at least 10 tricks, and the simplest way to express that conviction is to leap directly to game.

5. Two diamonds. Since you have an opening bid and partner has the equivalent of one, you should assume that your side can make a game. However, a jump to three notrump is risky with only one diamond stopper, and so is a jump to four spades with such a shabby suit.

You can best show your strength, and at the same time your uncertainty about where to play the hand, by cuebidding West's suit, and partner's response will very likely help you find the best final contract. There is no good reason to make the decision unilaterally when you have a partner who can light the way.

Tomorrow: Once in a lifetime.

(c)2026 King Features Syndicate Inc.

Lifestyles

Bridge by Steve Becker

2 min read

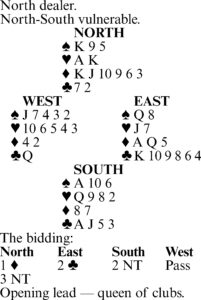
The signal is probably the single most valuable weapon available to the defense, but, like any other weapon, there is a proper time and place for its use. Take this case where a signal proved useless, partly because of a good play by declarer and partly because one defender could not obey the command of the other.

West led the queen of clubs, and East signaled for a club continuation by playing the eight. Declarer correctly ducked the queen in order to hamper defensive communications (had South won the first trick, he would surely have gone down).

West had no more clubs to lead and had no effective alternative move. In practice, he shifted to a low heart, but declarer won in dummy and led the king of diamonds. East took the ace and returned the ten of clubs, but he was fighting a losing battle. South won with the jack, led another diamond, took the next club with the ace and finished with 10 tricks.

East could have won the battle had he allowed for the possibility that West's queen of clubs might be a singleton by overtaking the queen with the king. East could then have continued clubs, dislodging one of South's club stoppers. Whenever declarer got around to leading diamonds, East would win, force out South's remaining club stopper and would thus win the race to set up his clubs before South could set up dummy's diamonds.

East should realize from the bidding that declarer might well have the A-J-x or A-J-x-x of clubs. Whatever the case, overtaking the queen guarantees establishment of the clubs before the diamonds. East should have signaled, all right, but with his highest club, the king.

Tomorrow: Bidding quiz.

Lifestyles

Bridge by Steve Becker

By STEVE BECKER 2 min read

Pinochle is a crazy, mixed-up game -- at least to anyone not familiar with it. Not only does the deck contain 48 cards instead of 52, but there are no cards lower than a nine. What's more, there are two queens of spades, two aces of hearts, and, in fact, every card has a twin --an identical twin, no less.

And, to add to the confusion, the cards rank in order from the ace down to the nine, just as in bridge, but with one exception -- the ten is higher than the king!

Now, my friend John, an inveterate pinochle player who never had a kind word to say about bridge -- though he understood the game -- was at the club one day and there weren't enough players for a pinochle game. So he consented to play bridge just for kicks.

On the very first deal, he picked up the South hand and got to six spades. John is a pretty good card player and saw right away that he couldn't make 12 tricks even though he got a club lead and ruffed East's ace. There simply was no entry to dummy to cash the clubs.

But John thought that if he ran all his trumps, the defenders might blunder and let him make the contract. So he cashed the ace of spades, continued with the ten and was about to play the king when East rudely interrupted and said, "It's my lead." You see, John had forgotten he was playing bridge, not pinochle, and that the ten was not second in rank to the ace.

But his inadvertent mistake proved to be just what the doctor ordered. After winning the ten with the jack, East was forced to return a club or lead from one of his kings, so John wound up making the slam.

Nowadays, John doesn't play much pinochle anymore. You just can't tear him away from the bridge table!

Tomorrow: Wrong signal.

Lifestyles

Bridge by Steve Becker

By STEVE BECKER 2 min read

This deal was played in a match between France and Belgium some years ago. It illustrates how a declarer who pays close attention to tiny details can reap a substantial reward for his efforts.

West led the king of clubs and continued with the ace, whereupon declarer (Georges Theron of France) made the key play of ruffing with the seven instead of the four. Theron then cashed the A-K of hearts and led a low heart, planning to ruff low in dummy and lead the queen of diamonds through East's king.

But West ruffed the third round of hearts with the eight, forcing dummy to overruff with the queen. However, the farseeing Theron was able to take this development in stride. He led the six of diamonds from dummy and played the four from his hand after East followed low. Another trump lead from dummy then trapped East's king.

So, Theron made five diamonds doubled by virtue of his thoughtful unblocking play at trick two. Had he ruffed the second club with the four instead of the seven, he would later have been unable to lead diamonds twice from dummy to pick up East's king.

It takes rare insight for a declarer to recognize the importance of trumping with the seven instead of the four at trick two, but it is little things like this that make the difference between the greats of the game and everyone else.

Tomorrow: A tactical maneuver.

Lifestyles

Bridge by Steve Becker

By Bridge by Steve Becker 2 min read

Bidding is a vocal exercise in which partners exchange messages verbally about their respective holdings in an effort to arrive at the best contract. Defensive play, by contrast, is a silent exercise wherein the defenders try to portray their holdings to each other through the play of their cards in order to score all the tricks to which they are entitled.

Consider this deal, which features good defense. South reached four spades as shown, and West led the five of hearts. When dummy came down, East realized that the contract would almost certainly be made unless West held the doubleton ace of clubs. In that case, the correct defense after winning the first heart would be to lead a low club to West's ace, win the club return with the king and play a third club for West to ruff.

But East also realized that West could have the A-Q or A-J of clubs and might win the club return at trick two with the queen or jack, unwittingly blocking the suit and handing declarer the contract.

So, in an effort to forestall this possibility, East won the opening heart lead with the ace instead of the queen, which would have been more normal. He was trying to sell West the idea that declarer had the king of hearts, and in that way influence West to think that East had to have the king of clubs to justify his opening bid.

The scheme worked out exactly as planned. When East returned the deuce of clubs at trick two, West contributed his share by winning the trick with the ace and returning the queen. East then overtook the queen with the king and returned the seven for West to ruff, and the contract went down one.

Tomorrow: Bidding quiz.

Lifestyles

Bridge by Steve Becker

2 min read

Win the queen of clubs with the king, discarding a diamond, and continue with the ace of clubs. Then:

1. If East ruffs, overruff, cash the ace of spades, and lead the queen through West's king. West must play the king of spades on this trick or the next one, whereupon you ruff in dummy and lead a trump to the ten to score the rest of the tricks.

2. If East discards a spade on the ace of clubs, trump the ace, play the A-Q of spades as before, and take a trump finesse. Then cash your remaining spade or spades, cross to dummy with a diamond to the king and ruff another club, reducing your hand to the A-K-J of trump and nine of diamonds. Now play a diamond to the ace, lead anything at all from dummy and East's Q-7-6 of trump succumb to your A-K-J.

3. If East discards a diamond on the ace of clubs, discard your nine of spades and take a trump finesse. Then return to dummy with a diamond and repeat the trump finesse. After you cash the A-K of trump, this becomes the position:

North

[S] 5

[D] A 7

[C] 8 5 4

West East

[S] K 10 [S] 8 6 4 3 2

[D] Q 10 [D] J

[C] J 10

South

[S] A Q J

[H] 4 3

[D] 9

When you now play the four of hearts, West can discard the ten of clubs as dummy also discards a club, but when you next play the three of hearts, West finds himself in dire straits. He is caught in a three-suit squeeze, and no matter which suit he discards, you make the rest of the tricks.

Tomorrow: The bidding points the way.

Lifestyles

Bridge by Steve Becker

2 min read

It is easier to sink a 2-foot putt in golf than it is to hole a 10-footer, and in bridge it is easier to make some contracts than it is to make some others. For a hand difficult to make at the table, when the lie of the opponents' cards at the outset is unknown, we cite this one.

West led the K-A and another spade. East took the queen and returned the ten of clubs. Declarer won with the ace, led a heart to the ace and another heart back to the king. When West showed out, declarer's goose was cooked. No matter how he continued, he had to lose a trump trick, and he finished down one.

After examining the East-West hands, it is, of course, easy to see that South could have made the contract by finessing the ten of hearts on the second trump lead. However, this is hindsight and can hardly be justified without peeking at the adverse cards.

Nevertheless, South could -- and should -- have made the contract. After East's club return at trick four, declarer's only real concern is the possible loss of a trump trick. This can occur only if the opposing hearts are divided 4-1 (or 5-0). He should therefore take whatever steps are necessary to overcome a potential bad break.

If West has the J-x-x-x of hearts, nothing can be done; but if East has them, a trump coup could be arranged. So, after taking the club return with the ace, South leads a diamond to the ace and ruffs a diamond. He then cashes the king of hearts and continues with a heart to the ace, revealing the trump situation.

This is where the precautions taken earlier pay dividends. Another diamond is ruffed, reducing declarer to the Q-10 of hearts and Q-J of clubs. The Q-K of clubs are then cashed. When a diamond is next led from dummy, East's J-9 of hearts succumb to South's Q-10, and declarer scores the last two tricks.

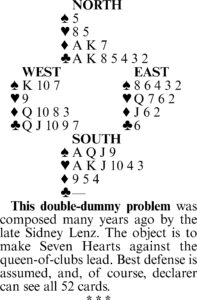
Tomorrow: Double-dummy problem.

Lifestyles

Bridge by Steve Becker

By STEVE BECKER 2 min read

This deal occurred in a regional pair championship in Los Angeles many years ago. The hand was played at many tables, of course, but our story concerns itself solely with the table where Mrs. Kelsey Petterson held the South cards.

When she first looked at her extraordinary hand, Mrs. Petterson wondered whether it would be better to open the bidding with two spades (strong in those days) or two clubs when it was her turn to bid. However, the problem became altogether academic when Mrs. Petterson thought she heard the player on her right open the bidding with seven diamonds!

Undaunted by this totally unexpected development, Mrs. Petterson bid seven spades. After two passes, East doubled, and, after three passes, West led the jack of hearts.

There was not much to the play. Declarer ruffed the heart and drew four rounds of trump, the jack obligingly falling on the second round. When she then cashed the A-K of clubs, the missing queen also fell, so the upshot was that she made seven spades doubled for a score of 2,470 points.

East-West were understandably nonplussed by this dreadful result. They realized they would get a very bad score on the deal, especially since East had elected to double the grand slam, giving North-South an optimal result that was unlikely to be duplicated at the other tables.

As the East-West pair were disconsolately putting their cards back into the duplicate board, Mrs. Petterson turned to her right-hand opponent and asked, "May I please see what an opening seven diamond bid looks like?"

"I opened the bidding with one diamond," East sadly replied.

Tomorrow: How to capture a knave.

≠≠≠

Starting at /week.