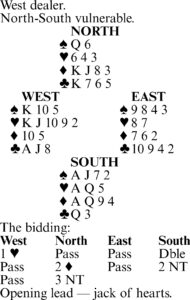
Bridge by Steve Becker
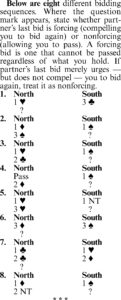
1. Forcing. A jump-shift by responder is forcing to at least game.
2. Nonforcing. If South has only six or seven points for his one-spade bid, he does not have to bid again.
3. Nonforcing. North’s failure to jump-shift limits him to at most 18 points. South therefore can pass if he has a weak hand and prefers clubs to hearts.
4. Nonforcing. Ordinarily, a new suit bid by responder is forcing, but when responder has passed originally, the change-of-suit rule no longer applies.
5. Nonforcing. South may pass with six or seven points but should continue bidding with more than that.
6. Forcing. The mention of a new suit by responder below the game level is forcing, even opposite a preemptive opening bid.
7. Forcing. Just as the one-heart response is forcing, so is a second new suit named by responder. North might be tempted to pass with minimum values, but he will have a lot of explaining to do when it costs him a game or a slam.
8. Nonforcing. A jump to two notrump by opener indicates 18 or 19 points and may be passed if responder has a very weak (five- or six-point) hand.
Tomorrow: The art of discovery.
(c) 2026 King Features Syndicate Inc.
Bridge by Steve Becker
When you’re playing a grand slam, you should be willing to devote much more time and attention to the project than when you’re playing, say, two diamonds, trying to make an overtrick. Every means of protecting and ensuring the grand slam should be investigated and pursued. It is not enough merely to adopt a promising line of play when there may be an even better one available.
Take this hand where West led the king of hearts to declarer’s ace. South saw that the contract was in serious danger from the start, but his prospects improved greatly when he cashed the Q-J of trump and both opponents followed suit.
Indeed, the hand now appeared to be a cinch, since South could play three rounds of spades, discard a heart from dummy on the third spade and then ruff his only apparent loser, a heart. But when he led a spade to the ace and another back to the jack, West showed out, and South was in deep trouble. There was only one trump left in dummy, and he could not ruff both a heart and a spade with it, so he finished down one.
A little more thought might have enabled declarer to find the winning line of play. After the trumps turned out to be divided 2-2, South should have recognized that the only remaining danger was a 5-1 or 6-0 spade break.
He could have prepared for this possibility by first cashing the king of spades and then leading a spade to the ace. If both opponents followed suit, he could claim the rest of the tricks.
But if either opponent showed out of spades, he would have still another possibility to fall back on. He could lead the king of clubs from dummy in the hope that East had the ace. In the actual deal, this added safety measure would have brought home the grand slam.
Tomorrow: Bidding quiz.
Bridge by Steve Becker
In notrump contracts, the usual defenders’ practice is to attack declarer in a suit where they think or hope he is weak. Most notrump contracts stand or fall on this principle. Today’s deal illustrates how the defenders are sometimes called upon to exploit more than one chink in declarer’s armor in order to accomplish their goal.
West saw no virtue in leading his own longest suit, hearts, which would have required East to have exceptional length or strength in the suit. Accordingly, West chose the queen of clubs as his opening salvo, hoping to hit partner with moderate length or strength that suit.
East endorsed the lead enthusiastically by signaling with the ten as declarer followed low. When West continued with the jack of clubs, East overtook with the king as South again played low.
Recognizing that his side had gotten as much mileage out of the club suit as possible, East now shifted his attention to spades in the hope of finding West with a productive holding in that suit.
Declarer thus found himself under attack from a new quarter when East returned the ten of spades at trick three. South did the best he could when he ducked the spade ten and took the next spade with the ace. He then led a heart to dummy’s king and finessed the ten of diamonds, but West took the ten with the king and cashed the king of spades to put the contract down one.
The hand dramatically demonstrates the benefits that can sometimes accrue from trying to develop the combined assets of the defenders rather than the assets of one defender only.
Tomorrow: Handle with care.
(c)2026 King Features Syndicate Inc.
Bridge by Steve Becker
Let’s say you’re declarer in four spades and West leads a heart. You win with the king and draw three rounds of trump. Since you have an inevitable heart loser, you must now try to avoid losing three club tricks.
If you play the ace and a low club — hoping the suit divides 3-3 or that either opponent has the doubleton king — you go down one against proper defense.
But if you play the clubs more carefully, you make the contract. After cashing the ace of clubs, you should continue with the queen rather than the deuce. This slight modification in the play yields a much more satisfying result. West’s king and East’s ten fall on the same trick, so you lose only two clubs instead of three.
It might be argued that playing the queen is right if you see all four hands, but that there is no justification for playing the queen if you see only two hands.
It is not difficult to refute this argument. Obviously, if the opposing clubs are divided 3-3, it makes no difference whether you lead the deuce or the queen.
But if the clubs are divided 4-2, the card you play will frequently make a difference. Since the player holding the doubleton will be dealt J-x or 10-x twice as often as K-x, it is clearly better to play the queen than the deuce.
Finding the correct percentage play of the queen is by no means a complicated mathematical proposition. It’s simply plain common sense.
Tomorrow: It’s a partnership game.
Bridge by Steve Becker
Bridge is basically a game of probabilities. Whenever you’re faced with a choice as to whether to make this or that bid, or this or that play, you try to choose the one that is likely to work out best in the long run.
Consider this deal where Raymond Chow, Hong Kong movie magnate and former president of the Far East Bridge Federation, got to six hearts doubled on the sequence shown. West’s opening club bid was artificial, showing at least 17 high-card points, and North’s five-notrump bid asked South to bid either six hearts or six diamonds.
West led the king of clubs against six hearts and shifted to the ace of spades. Chow ruffed and quickly concluded that West, having bid for 11 tricks all by himself, very likely had at most two red-suit cards.
So, acting on the high probability that East had both missing red jacks, Chow ruffed a club in dummy at trick three, led a heart at trick four and finessed the ten!
When the ten held, Chow ruffed another club in dummy, returned a low diamond and again finessed the ten! When this likewise succeeded, Chow was home free. He cashed the A-K-Q of trump, then the Q-K-A of diamonds, and scored his 12th trick with dummy’s nine of diamonds.
West’s magnificent hand thus wound up costing him the princely sum of 1,210 points. It also taught him that you don’t take movie moguls or presidents of bridge federations too lightly.
Tomorrow: There’s only one right play.
Bridge by Steve Becker
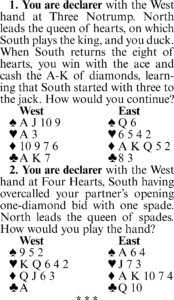
1. The diamonds are blocked, preventing you from collecting five tricks in the suit. However, it would be wrong to take a spade finesse at this point, because if it lost to the king in the North hand, you could go down one, losing four hearts and a spade. A far better plan is to lead a heart from dummy at trick five and discard a diamond! This allows you to unblock the diamonds so you can eventually score five diamond tricks.
The first two tricks revealed that North started with at most five hearts, so there is no way you can lose more than four tricks on the suggested line of play.
2. There is a possibility of losing an extra trump trick on top of the obvious two spade losers and the trump ace. Your best chance to make the contract lies in winning the spade queen with the ace and returning a low trump from dummy.
Let’s assume South follows low and that you win with the king, which is very likely in view of the bidding. The correct play now is the queen of trump. If the trumps are divided 3-2, all your worries are over. South can take the ace of trump and cash two spade tricks, but you will then have the rest of the tricks regardless of what South does next.
The key play is the queen of trump at trick three, rather than leading a low trump to dummy’s jack. Leading the queen guards against South having started with something like [S]KJ1083 [H]A8 [D]92 [C]K854, in which case he would take dummy’s jack of trump with the ace, cash two spade tricks and then lead another spade, promoting North’s ten of hearts into the setting trick. Preserving the jack in dummy to overruff the 10 if need be, protects against this possibility.
Tomorrow: The power of a long suit.
Bridge by Steve Becker
There are basically two ways for declarer to play this hand. One is right and the other is wrong.
Let’s say West begins by leading three rounds of diamonds, declarer ruffing the third. South sees that he has two likely club losers and that his best chance for the contract is to try to arrange an elimination play, which may or may not succeed.
He therefore cashes the A-K of trump, followed by the A-K of spades and a spade ruff. With all the spades and diamonds eliminated from both the dummy and his own hand, South then plays the ace and another club. After West wins with the queen, he is forced to return a spade or a diamond. This allows dummy to ruff as South sheds his club loser, and the contract is made.
That’s one way to play the hand. It’s good, but it has a flaw: When South cashes the ace of clubs at trick nine, West, who has been observing the developments to this point, may be shrewd enough to drop his queen under the ace. Declarer then loses two club tricks and goes down one.
However, declarer has a far better way to play that is almost certain to succeed. Instead of telegraphing his plan of action so clearly, which allows an alert West to counteract it, South should disguise his intentions so that it will not be so easy for West to realize what is going on.
At trick four, declarer should lead a trump to the king and then play a club to the ace. It would be next to impossible for West to drop his queen on the ace at this stage. He is not in position, so early in the play, to read declarer’s intentions.
From West’s viewpoint, South may be planning to take a club finesse later in the play, so dropping the queen of clubs under the ace might appear suicidal to him. He is therefore far more likely to play low on the ace. If he does, he becomes subject to the elimination play and cannot later wriggle out of it.
Tomorrow: Test your play.
Bridge by Steve Becker
Bridge is a partnership game, as everyone knows, but in some deals it may seem that the partners are pulling in opposite directions. Obviously, when partners are communicating on different wavelengths, almost anything can happen — and frequently does.
Take this deal where East-West were out of tune. The bidding went as shown, with East doubling North’s final three-notrump bid.
East’s double in this sequence carries a special meaning. It states that East thinks the contract can be defeated if West leads the suit he opened the bidding with — in this case, hearts. Indeed, had West led a heart, the defenders would have scored four heart tricks and a club, and South would have gone down one.
But West led the king of diamonds instead, and South made the contract. He won the diamond with the ace, established dummy’s clubs and finished with an overtrick after West cashed the Q-J of diamonds.
It is easy to sympathize with West, who naturally was more inclined to lead a diamond from a solid suit than a heart from a broken suit. We’ve all witnessed worse leads that worked out successfully.
But here West had no one to blame but himself. Once partners agree that a double in a given sequence — such as the one here — is lead-directing, the player on lead has no choice but to obey his partner’s wishes. It must be assumed that partner is not doubling just to hear himself speak.
Bridge is a partnership game.
Tomorrow: The art of camouflage.
Bridge by Steve Becker
It did not take North-South very long to arrive at their best contract. South’s five-notrump bid was the Grand Slam Force, asking North to bid seven spades if he held two of the three top trump honors, and North, of course, complied.
Though South’s bidding was first-rate, his play of the hand was not. After giving the matter only superficial thought, he won the club lead with dummy’s ace and discarded the six of hearts. He then drew two rounds of trump and cashed the ace of diamonds. When West showed out, South had no way to avoid a diamond loser and so went down one.
Declarer’s downfall occurred when after dummy was tabled, he assumed there was nothing at all to the play. He did not follow the tried-and-true procedure of stopping to ask himself whether there was any lie of the cards that could jeopardize the contract. Had he done so, he would have realized that if either opponent held all four missing diamonds — a 10% chance — he would have a serious problem.
To cater to that possibility — slim as it was — South should have discarded a diamond on the ace of clubs at trick one. After cashing the A-Q of trump, he would then cash a high diamond. If both opponents followed suit, the battle would be over, since the heart loser could then be discarded on one of dummy’s good diamonds.
But if, as in the actual case, either opponent showed out on the first diamond, declarer could next cash his other two top diamonds, cross to dummy with a trump and ruff a diamond. He would then re-enter dummy with a trump to discard his heart loser on the ten of diamonds and so make the grand slam.
Tomorrow: What does the double mean?
King Features Syndicate Inc.
Bridge by Steve Becker
The margin between victory and defeat in a given hand is often razor-thin. For example, take this deal from the 1983 Vanderbilt Team championship.
When Norman Kay and Edgar Kaplan held the North-South cards, they wound up in five hearts doubled on the sequence shown, and West led the queen of spades, ruffed by declarer.
Kaplan played a low diamond to the jack at trick two, won by East with the queen. East returned a trump to South’s ace, and another diamond was won by East’s eight. Back came a second trump to the king, and Kaplan ruffed the diamond seven with dummy’s last trump. Next came a spade ruff followed by two more trumps, producing this position:
Kaplan now played his last trump, forcing West to part with a club. Declarer thereupon discarded dummy’s jack of spades, forcing East to also discard a club in order to keep the ace of diamonds. Kaplan then led a club to the queen and took the last three tricks with the Q-A-7 to make the contract.
Of course, all the cards had to be perfectly placed, and the timing also had to be precisely right for the double squeeze to succeed. But coincidences like this seem to occur quite often when there’s a good helmsman at the wheel.
Tomorrow: What can defeat me?
King Features Syndicate Inc.
Bridge by Steve Becker
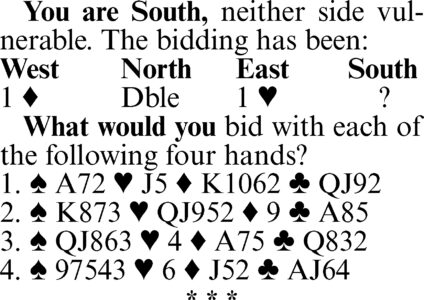
1. Two notrump. When partner doubles for takeout at his first turn to bid, he implies support for the unbid suits and at least the values for an opening bid. In replying to the double, you should attempt to show the degree of strength you have in much the same way as you would if he had opened the bidding.
While East’s one heart bid relieves you of the obligation to respond, this 11-point hand might produce a game opposite a double, so a jump to two notrump (invitational) is in order. The absence of a heart stopper should not deter you from bidding notrump, as partner is virtually certain to have some heart strength for his double.
2. Double. Something is rotten in the state of Denmark. East is probably fooling around, and the best way to expose this is by doubling. If the bidding now takes a new turn, which is highly likely, you can next show your spades. Partner will thus learn that you have heart and spade length as well as the high-card strength necessary for such bidding.
3. Two spades. This hand offers a good chance for game opposite a typical takeout double, and you should let partner know this by jumping to two spades (invitational). Partner’s double implies spade support, so the only question is how strong his hand is. If you evaluate your hand on a point-count basis, you have nine points in high cards and three more points for your singleton heart. Some players might even jump directly to four spades, which is certainly a reasonable alternative.
4. One spade. You have ample strength for a voluntary response, so you should speak up right now. Though your spades are nothing to brag about, you have to make do with what you were dealt. Remember that you are leaning on an opening bid and implied spade support from partner. To pass at this point, in effect telling partner that you are perfectly happy to let the opponents play in one heart, is inconceivable.
Tomorrow: A precautionary measure.
Bridge by Steve Becker
The expert declarer runs into just as many difficult guessing situations as anyone else, but usually manages either to guess right or to somehow avoid the guess altogether.
For example, take this deal where West leads the four of diamonds against three notrump. Declarer wins East’s jack with the queen, bringing his total to eight sure tricks. The question remaining is how he can give himself the best chance to develop a ninth.
One possibility is to lead a club to the king at some point in the play, hoping that East has the ace. Another possibility is to rely on a spade finesse against the queen. The trouble with this is that South has to guess which way to take the two-way finesse.
But declarer’s best approach by far is to make no effort whatsoever to guess where any of the missing key cards are located. Instead he enlists West’s aid by forcing him to break one of the two critical suits.
After winning the diamond lead, South cashes the K-Q-J of hearts and then plays the ace and another diamond. This allows West to cash his three diamond tricks as South discards two clubs from dummy and a heart and a club from his hand. Whatever West plays next, however, whether a spade or a club, presents South with his ninth trick.
Note that in setting the stage for the endplay, South must be careful to cash only three heart tricks, not four. If he cashes all four hearts before putting West on lead with a diamond, he may have trouble discarding on West’s last diamond and might go down one against best defense.
Tomorrow: Bidding quiz.
Bridge by Steve Becker
Harry Fishbein, one of New York’s early experts, liked to tell the story about the unfortunate player who was dealt seven diamonds and six clubs and, naturally, found his partner with the same distribution, but in the major suits.
The bidding zoomed merrily along until the seven-level was reached, at which point the unfortunate player had to choose which of his partner’s two suits to support — and he guessed wrong.
Fishbein had a somewhat similar experience when he held the South cards in today’s deal and his partner bid and rebid hearts opposite his void. Fishbein tried three spades next, hoping his partner would either bid three notrump or raise clubs.
But North next cuebid the ace of diamonds, and Fishbein was reluctantly obliged to bid four hearts, despite his void, reliving the story he had told so often.
Fortunately, matters took a turn for the better when his partner belatedly showed club support, prompting Fishbein to bid six clubs. He then proceeded to make the slam by careful play.
Fishbein won the spade lead with the ace, played a club to the queen and discarded the 10-5 of spades on the A-K of hearts. Now, instead of drawing trump, as many players might have done, he ruffed a heart before cashing the A-K of clubs.
Next, he led a diamond, losing the nine to East’s king, ruffed the spade return and tried a second diamond finesse. When the jack held, Fishbein was home. He ruffed a heart to establish dummy’s ten, and in that way overcame the 4-2 diamond division. Had he neglected to ruff a heart at trick five before drawing trump, he would have gone down.
Tomorrow: A tough nut to crack.
Bridge by Steve Becker
Some of the simplest plays are, despite their simplicity, difficult to perceive. Take this case where South was in four hearts and West led a trump. After winning with the queen, South led a low spade toward the jack, hoping to find West with the king and in that way finish with 10 or 11 tricks.
But East won the jack with the king and returned a trump, holding South to nine tricks. Dummy’s ace of clubs thus withered on the vine, and South eventually lost two diamonds and another spade to go down one.
All declarer had to do to guarantee the contract was to play the queen of spades at trick two instead of the deuce! Barring exceptional distribution, this play was likely to produce at least 10 tricks.
In the actual layout, what could East do if he took the queen of spades with the king? His best return, a trump, would leave South with 10 tricks consisting of two spades, six hearts, a diamond and a club.
If East refused to take the queen with the king, South would next play the ace of spades, ruff a spade, discard a loser on the ace of clubs and finish with 11 tricks.
The outcome would be essentially the same if West held the king of spades. He would run into the same dead end as East.
Admittedly, it is not easy to think of leading the queen of spades at trick two, because it is not customary to lead the queen initially with A-Q-x-x facing J-x. However, that is hardly a good reason for failing to make that play in this particular case.
Tomorrow: A bridge player’s nightmare.
Bridge by Steve Becker
This deal occurred in the final of the 1992 U.S. Women’s Team Championship to select America’s representative to the 1992 Women’s Team Olympiad.
When the deal was first played, Nancy Passell and Nell Cahn reached four spades as shown against two members of the eventual winning squad, Amalya Kearse and Jacqui Mitchell. Cahn, South, won the opening diamond lead with dummy’s ace and led a spade to the jack and king.
West’s club shift was taken by dummy’s ace, and Cahn led a second spade, winning the queen when East followed low. Declarer then conceded a spade to East, who exited with a club to dummy’s king.
Cahn now had to guess how to attack the heart suit, and she solved the problem immediately by leading the queen, covered by the king and ace. West’s jack of hearts took the next trick, and declarer claimed the remainder, making four.
At the second table, Tobi Deutsch and Mildred Breed ended up in four hearts with North the declarer after a transfer sequence. The seemingly stronger eight-card trump fit came with a built-in flaw, however, and the opponents were quick to exploit it.
Sue Picus, East, led a club to declarer’s ace, and Deutsch misguessed how to initiate the trump suit by leading the nine and letting it ride.
Sharon Osberg, West, won with the jack and quickly shifted to the K-10 of spades. Picus took the ten with the ace and returned a spade for Osberg to ruff, and the contract was down one.
Note that if declarer had led the queen of hearts rather than the nine at trick two, or had simply played the ace and another heart, West could not have obtained a ruff, and North would have gotten home unscathed with 10 tricks.
Tomorrow: Steppingstone to success.
Bridge by Steve Becker
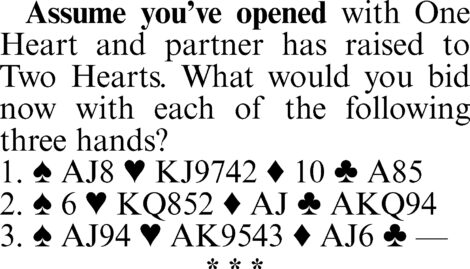
1. Three hearts. Although you have only 13 high-card points, there is a reasonable chance of making 10 tricks, so you should not throw in the towel by passing. Also, for those optimists who see the world through rose-colored glasses, it would be wrong to leap straightaway to four hearts.
Whether you can make a game depends on the size and shape of partner’s two-heart bid. If you bid three hearts and he holds a maximum raise such as [S]Q4 [H]A853 [D]9643 [C]K72, he will gladly accept your invitation and carry on to four.
But if partner holds something like [S]K95 [H]Q863 [D]J82 [C]964, he will pass, and you might have trouble making even nine tricks.
Alternatively, you could bid two spades or three clubs (forcing) as a way of inviting game. The point is that you are not in position to decide unilaterally whether there’s a game in the combined hands, so you should enlist partner’s help.
2. Four notrump. Slam is a distinct possibility, and the best way to investigate it is via Blackwood. You plan to bid six hearts if partner shows one ace by bidding five diamonds. If partner’s ace is in the trump suit, you should have an excellent chance to make six; if it’s in spades, you might still have a shot at the slam.
Despite the fact that you might not make 12 tricks even if partner has an ace, you should go for the slam because, opposite most of the hands partner could hold, you’d be a favorite to make six.
3. Two spades. There is no question about making a game; the question is whether there’s a slam. Two spades (forcing) is the first move in that direction.
Partner does not necessarily need a maximum raise for a slam to be made. If he has no values in clubs, you probably do have a slam. Thus, partner could have only the king of spades and king of diamonds and a slam would be feasible. Or partner could have [S]5 [H]QJ82 [D]K843 [C] 9762, and a slam would be virtually unbeatable. In any case, if partner cooperates in any way after your planned cuebids in spades and diamonds, you should undertake a slam.
Tomorrow: Search for a missing damsel.
(c)2026 King Features Syndicate Inc.
Bridge by Steve Becker
Signaling is the main method by which defenders communicate with each other during the play. Properly transmitted, the messages conveyed help the defenders decide when to stop, start or continue playing a suit.
Signals are not given automatically, however. Instead, a defender should first assess all the pertinent aspects of a deal before deciding which approach offers the best chance to defeat the contract.
Consider this case, for example. West led the club king and, after East played the encouraging eight, continued with the ace and another club. East ruffed, but that was the end of the line for the defense. Declarer won East’s heart return, drew trump and discarded his diamond loser on the club queen to finish with 10 tricks.
East’s defense left something to be desired. He should not have signaled for a club continuation by playing the eight at trick one, even though it is normal to do that to indicate a doubleton. He should have realized that it was more important to suggest a diamond shift than to get a club ruff since he already had a guaranteed trump trick that did not require a club ruff to ensure it.
East therefore should have played the club three at trick one to discourage partner from continuing the suit. Forced to direct his attention elsewhere, West presumably would have found the killing diamond shift, since that was the only suit that offered any real hope of defeating the contract.
South could not have prevailed against this defense. Whether he elected to finesse the queen of diamonds or not, the defenders sooner or later would have scored four tricks — two clubs, a diamond and a trump — before declarer could come to 10.
Tomorrow: Bidding quiz.
Bridge by Steve Becker
Declarer would surely play more accurately if he could see the defenders’ cards. In some deals, though, it is not necessary to see the adverse cards; declarer can visualize them just as if he were looking directly at them, because the bidding or plays already made tell him everything he needs to know.
Consider this case where West leads the jack of hearts against three notrump. South wins with the queen and can credit West, who opened the bidding, with every one of the missing 11 high-card points. So all declarer has to do is to utilize this information to assure scoring nine tricks.
This should not be difficult once South puts his mind to the task. At trick two, he leads the spade deuce toward the queen. If West goes up with the king, South has nine tricks consisting of three spades, two hearts, and four diamonds.
If West plays low at trick two, dummy’s queen wins, giving South eight tricks: two spades, two hearts and four diamonds. He then leads a club to get his ninth.
A lazy declarer who makes no effort to diagnose where the missing high cards are located could easily misplay the hand. For example, he might cross to dummy with a diamond at trick two in order to try a spade finesse.
West would then win with the king and force out the ace of hearts, and South would eventually go down one as a consequence of his failure to think things out at the beginning.
Tomorrow: Planning the play.
Bridge by Steve Becker
France won the 1992 World Team Olympiad, handily defeating the United States in the 96-board final.
Oddly enough, the deal that contributed most to the French cause came not in the final, but in its quarterfinal match against Denmark. Going into the last hand of that 64-board match, the Danes led by 2 IMPs. The deal shown then occurred, and the outcome hung in the balance.
When a Danish pair held the East-West cards, they reached three spades and made nine tricks, seemingly an excellent result. The auction shown occurred at the other table, with Knut and Lars Blakset of Denmark seated North-South.
The Blaksets bid aggressively to reach three hearts. If South made three hearts or went down one, the Danes would win the match. Even if declarer went down two for a loss of 2 IMPs, the match would be tied, with a short playoff to follow. Only if he went down three could the match be lost.
West cashed two spades and then shifted to the king of diamonds. At this point, declarer could have made the contract by taking the ace, crossing to dummy with a club, leading a heart to the queen and cashing the A-J of hearts. South could then run clubs until West ruffed in, losing only that trick and a diamond to go with the two spades already lost.
But Lars Blakset let the diamond king hold, after which West reverted to spades. Declarer ruffed in dummy, discarding a club, and led the heart jack, covered by the king and ace. If he had now cashed the heart queen and then started running clubs, he would have gone down one and won the match.
Instead, Blakset played a club to the ace and led a heart to the nine. Curtains! West won with the ten and returned a spade, forcing declarer to ruff and lose control of the hand. When the smoke cleared, Blakset was down three and the French had scored a 2-IMP victory.
Tomorrow: The art of visualization.
Lifestyles
DEAR ANNIE: Odd one out needs to get out into the world
DEAR ANNIE: I’m 29, living in New York City, with a job I love and a great group of friends — none of whom are ...
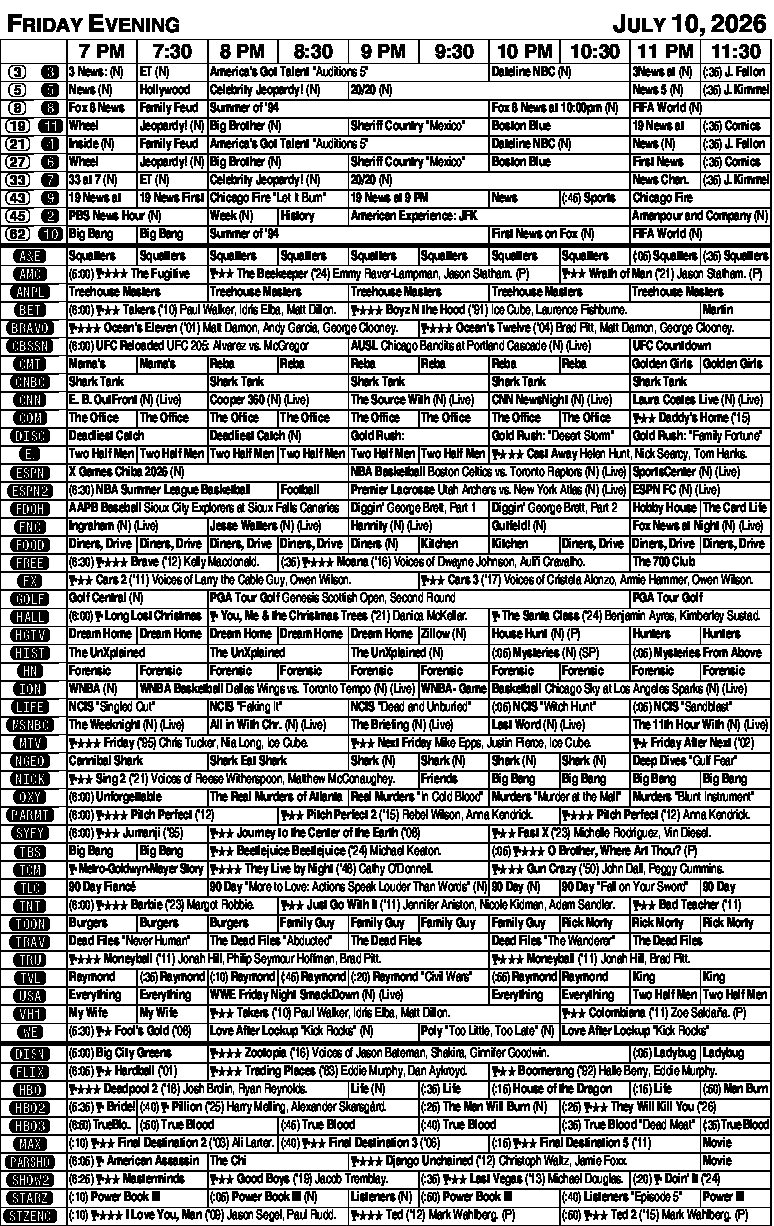
FRIDAY EVENING TV LISTINGS
HINTS FROM HELOISE: Grammar skills fall by wayside
DEAR HELOISE: As a retired high school English teacher, I read with interest the letter concerning how written and ...
TO YOUR GOOD HEALTH: Treating crashes in blood pressure
DEAR DR. ROACH: My mother lives with me. She’s 88 and on hospice. She’s totally bedridden. Her brain is fine, ...
To Your Good Health: Looking at plasma exchange for MS
DEAR DR. ROACH: I was diagnosed with relapsing-remitting multiple sclerosis (RRMS) at the age of 46. The course of ...
Dear Annie: She’s hoping to heal a hurting blended family
DEAR ANNIE: I’ve been married for 35 years and have four children and seven grandchildren. We are a blended ...