Bridge by Steve Becker
Let’s say you’re declarer at three notrump and West leads a heart. Your first problem is whether to play the queen or the four from dummy — but this is not really a difficult choice. It’s better to play the queen, but let’s see why.
If the queen wins, which means that West has the ace, you’re on absolutely firm ground. At trick two, you lead the nine of diamonds and finesse. Win or lose, the contract is safe. If West has the king of diamonds, he can’t stop you from scoring nine tricks, while if East has the king, you’re sure of at least 10 tricks.
Now let’s assume that East has the ace of hearts. He takes the queen with the ace and returns a heart, which you duck. You win the next heart and must then choose between a diamond or a club finesse.
Again, the choice is not difficult. Because West’s remaining hearts pose a threat to the contract, you take the club finesse instead because East can do you no harm if he has the queen. In the actual deal, the club finesse loses and East does not have a heart to return. When he returns a diamond, you rise with the ace and scamper off with nine tricks.
Finally, if East does have a heart to return, it means the hearts were originally divided 4-4, so you still make the contract, losing three hearts and a club.
Note how straightforward logic dictates why you should play the queen of hearts at trick one, and also which suit — diamonds or clubs — to attack next, depending on who turns up with the ace of hearts. Bridge is a logical game.
Tomorrow: Silence is golden.
Bridge by Steve Becker
Many years ago, B. Jay Becker, the former editor of this column, received a letter from a reader who expressed his admiration for the way Becker bid Hand No. 30 in the world championship match between Sweden and the United States in 1953!
Bursting with curiosity, Becker looked up Hand No. 30. When he reviewed the bidding (he was East), it turned out that his entire contribution consisted of passing four times in a row!
His partner, John Crawford, opened the bidding with one club. Becker had no reason to respond, so he did what most players would do — he passed.
The Swedish South couldn’t bring himself to sell out for one club, so he bid one spade. Crawford doubled for takeout, and North helped Becker out of an unpleasant predicament by bidding two diamonds. Becker passed, of course, but Crawford persisted by doubling again.
Becker naturally assumed that Crawford wanted him to bid hearts or clubs, but he found the thought of naming either suit revolting. So, he decided to pass and take his chances against two diamonds doubled.
This proved to be a lucky shot when South ran to two spades. Again, Crawford doubled, but this time when Becker passed, he was on much firmer ground.
When the smoke cleared, South had gone down four (700 points in those days). At the other table, the Swedish East-West pair landed in three notrump and went down one, so the U.S. team gained 750 points on the deal.
Tomorrow: Bidding quiz.
Bridge by Steve Becker
This deal occurred during a national team championship played in San Francisco in 1981. The distribution of the four hands was certainly unusual, with two voids and three singletons scattered around the table. And, as one might expect, the bidding reflected the peculiar nature of the hand.
At the first table, South opened the bidding, after two passes, with a perfectly normal one-spade bid. West doubled for takeout, whereupon North jumped directly to five spades!
This was not intended as an effort to get to a slam; on the contrary, North was simply doing as much as he could to make it difficult for East to enter the bidding. From North’s viewpoint, it seemed likely that East-West could make either a game or a slam in hearts or diamonds, and he was trying to make things as difficult as possible for them.
Both East and South passed five spades, and West doubled again. Everyone passed, and when the smoke cleared, South had made five spades doubled with two overtricks!
He ruffed the club lead and cashed the ace of spades and ace of diamonds, discarding dummy’s heart. He then crossruffed diamonds and clubs until dummy’s last two clubs became established and so finished with 13 tricks for a score of 1,250 points. All this was accomplished with a total of only 13 high-card points in the combined North-South hands!
Remarkably, at the second table the bidding, the play and the outcome were exactly the same, and the deal proved to be a washout!
Tomorrow: It’s a very logical game.
Bridge by Steve Becker
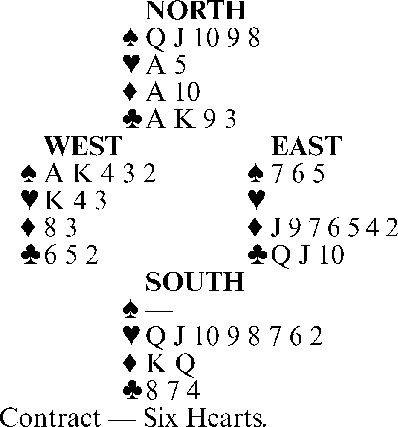
This remarkable hand, played many years ago by Clagett Bowie of Baltimore, features an extraordinary endplay.
Bowie had bid six hearts fully aware that if his partner had a spade void, his ace would be of doubtful value. However, he also thought that his six-heart bid might induce the opponents to bid six spades.
The slam seems impossible to make, even if you see all four hands. Declarer has a certain trump loser and also a loser in both diamonds and clubs. But Bowie made the contract and, furthermore, could not be defeated!
He ruffed the lead in dummy and led a heart to the ace. Then, to set the stage for the endplay he visualized, he trumped the ace of spades in dummy!
Bowie next led a trump, and after winning with the queen, West had no safe return. If he led a spade, declarer would ruff in dummy, discard the club five and then establish an extra club trick in dummy by ruffing the third round. If West instead returned a club or a diamond, South would score four tricks in that suit and simultaneously avoid a loser in the other suit.
If, for example, West led a low club and East played the queen, West’s jack could then be overcome via a finesse. Or if West led the club jack instead, East’s queen could then be trapped by going up with dummy’s ace. The same was true if West shifted to a diamond. All roads thus led to 12 tricks.
Note that if Bowie had discarded a club or a diamond from dummy instead of ruffing the ace of spades at trick three, the slam would have failed. After being thrown on lead with the trump queen, West would have returned whichever suit Bowie had discarded from dummy. The setting trick would then have come from the other suit.
Tomorrow: Bidding a lot with a little.
(c)2025 King Features Syndicate Inc.
Bridge by Steve Becker
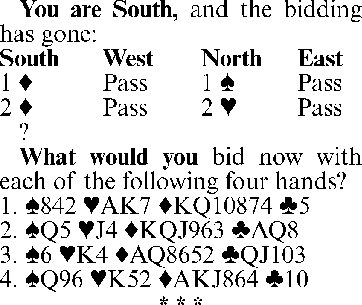
1. Two diamonds. It is true that this is a slight underbid, which could cost you a game (in notrump) that partner might bid if you elected to bid three diamonds instead.
Despite this, the winning bid in the long run is two diamonds. You need a fairly decent hand from partner to make a game, and you should assume that if he has it, he will bid again. It is a good idea to remember that your partner is just as anxious as you are to make a game rather than a part score.
2. Three hearts. You should certainly apprise partner of a possible game in hearts, and you do this by making a double raise (16-18 points) in his suit. If your hearts were, say, Q-9-8-6, you could jump to four.
You are not likely to miss a game if partner passes three hearts, which he is permitted to do. If he is so weak (six or seven points) that he has to pass, he might have his hands full just trying to make nine tricks.
3. Three diamonds. This time, as distinguished from the first problem where your partner could have only six points, you can afford to jump to three diamonds to show your extra values. Partner’s two club bid promised 10 points or more, and since this, in conjunction with your values, adds up to a probable game, you should make a jump-rebid (forcing once partner has indicated at least 10 points).
4. Four clubs. About all you can do is to tell partner, by cuebidding the ace of clubs, that your hand is not a minimum and that you have first-round control of clubs. Whether you make a slam, or even a game, depends on how well partner’s hand fits with yours. If he has, say, [S]62 [H]AK [D]J9632 [C]KQJ5, you have an easy 12 tricks, while if he has [S]AQ3 [H]Q5 [D]J9765 [C]QJ4, you might not even make 11 tricks.
Tomorrow: Look for the silver lining.
Bridge by Steve Becker
Let’s say you’re declarer at three notrump and West leads the jack of hearts. You count your sure tricks and see you have seven. If the spades are divided 3-3, you’ll have an eighth, and a successful club finesse would then give you nine.
However, these possibilities, though real, are not as promising as the chance of developing two tricks in diamonds. Besides, if the spades are going to break evenly and the club finesse is going to succeed, there’s no hurry about testing them yet, since you can do that later.
So, you win the jack of hearts with the queen, lead a spade to the ace and return the ten of diamonds. You are hoping East will play low and that West will win the trick. If this happens, you’re on Easy Street, because regardless of what West returns, you can win and force out the remaining high diamond to assure nine tricks.
Unfortunately, when you lead the diamond from dummy, East smartly puts up the ace and, even worse, returns the jack of clubs. You were hoping this wouldn’t happen, which was one of the reasons you led diamonds from dummy instead of your own hand. However, it has happened.
You reason that you’d be taking an unnecessary risk if you finesse the queen, so you play the ace. The reason for refusing the finesse is that if East has the king of clubs, nothing can defeat you if you play the ace, while if West has the king, you could (and in this case would) be defeated by a club return after the queen lost to the king.
Now you play a diamond, and, since West has the king, you make the contract. Your queen of clubs is not subject to attack with West on lead. Whatever he returns after taking the king of diamonds, you are sure to score at least nine tricks.
Tomorrow: Two wrongs make a right.
Bridge by Steve Becker
The Blackwood convention, correctly used, is extremely valuable in bidding or avoiding slams. It is especially important in hands where the number of aces is the key to how many tricks can be made.
Assume you’re South in this deal, which occurred in a tournament, and partner opens one club. The question of whether there is a slam depends almost entirely on how many aces partner has.
Without Blackwood — or a similar convention — you’d be totally in the dark as to how high to go. North might have an 18-point hand containing one ace, or a 13-point hand containing three aces. In the latter case, you’d make a grand slam; in the former case, your limit would be 11 tricks.
It therefore makes perfect sense to find out exactly where you stand by using Blackwood directly over one club. In the actual case, partner responds five hearts, indicating two aces, so you quickly put an end to the proceedings by bidding six spades, knowing that the opponents hold an ace.
That’s how the auction went at most tables where six spades was reached. But at one table where the bidding began this way, North decided to try for a top score by bidding six notrump over six spades.
East led the ace of diamonds, continued with the three after West signaled with the seven, and North went down three, losing 300 points.
It was only after the play ended that North-South realized East had led out of turn. South had bid notrump first, so West should have made the opening lead.
If South had realized that East’s diamond lead was out of turn, he could then, as declarer, have prohibited West from leading a diamond. In that case, South would have made all 13 tricks, and North would have had his top score.
Tomorrow: Bidding quiz.
King Features Syndicate Inc.
Bridge by Steve Becker
Entry problems are a critical factor in the play of many hands. To be in the right place at the right time may be the key to the outcome, and a declarer who ignores this is bound to fail more often than he should.
Take this case where declarer might easily go wrong — and, in fact, did. He got to five diamonds as shown, and West led a heart.
South won, drew trump, played a spade to the king and continued with a spade to the jack. The finesse succeeded, but declarer went down one. He could not repeat the spade finesse for lack of a further entry to dummy. and he eventually lost two clubs and a spade.
South would have made the contract had he led a low spade from dummy at trick two and finessed. After drawing trump, he could then have crossed to the king of spades to repeat the finesse, and so would not have lost a spade trick.
The hand demonstrates the importance of planning the play. South’s only problem from the start is to avoid a spade loser, and this should dominate his thinking from the moment dummy appears. How best to attain this goal is something to solve at once and cannot be postponed until after the opposing trumps are drawn.
Percentagewise, it is best to assume that East has the queen of spades. To play West for the queen and finesse through him will be successful only if the spades are divided 3-3, while finessing against East will win whenever East has three, four or five spades to the queen.
Once the decision is made to play East for the queen, it is clear that a first-round finesse should be taken at trick two to guard against the possibility that East has four or five spades.
Tomorrow: A stitch in time saves nine.
(c)2025 King Features Syndicate Inc.
Bridge by Steve Becker
This deal occurred in an early match between Norway and the United States at the 1993 world team championship. When Peter Weichsel and Bobby Levin of the U.S. held the North-South hands, they reached four spades as shown. It might appear that with the spades dividing evenly and the king of clubs favorably located, Levin was certain to make his contract.
But this did not take into account the inspired defense of then-23-year-old Geir Helgemo, who, with his youthful Norwegian teammates, finished second to the Netherlands for the world title that year. For his opening lead, Helgemo selected the diamond ten!
Barring a defensive slip, there was now no way for Levin to make the contract. But the Norwegians demonstrated in this, their very first match, that they had not come to the world championship to settle for anything less than perfection.
Levin took the opening diamond lead in his hand and led a spade to the queen. East, Tor Helness, won with the ace and returned a diamond to his partner’s ace. Helgemo then carefully led the diamond deuce for Helness to ruff, giving the defenders their third trick.
Had Helness returned a heart, certainly tempting in view of dummy’s club holding, declarer could have gotten home safely by playing low from his hand, trapping West’s king. But Helness obeyed the suit-preference signal carried by the diamond deuce and returned a club. After Helgemo’s ten forced dummy’s queen, there was no way for Levin to avoid losing a heart, and he finished down one.
At the other table, Norway’s Glenn Grotheim and Terje Aa stopped in three spades and made four for plus 170, giving the Norwegians a 6-IMP pickup on the deal.
Tomorrow: Look before you leap.
Bridge by Steve Becker
Here is a curious hand, the likes of which you’ve probably never seen. It was not actually dealt, but was composed by Bruce Bell, well-known New Zealand expert.
It seems that declarer must ultimately lose a heart and a club to go down one, but careful play brings the slam home.
South ruffs the opening spade lead with the six and returns the deuce of hearts, finessing dummy’s five after West follows low. Declarer next ruffs the nine of spades, cashes the king of diamonds, continues with the queen to dummy’s ace and ruffs a third spade.
Now a club to dummy’s king and another spade ruff are followed by a club to dummy’s ace and the fifth and final spade ruff. As a result of these maneuvers, this is now the position, with the lead in the South hand:
North
[H] A
[C] 9 3
West East
[H] K 4 [D] J 9
[C] 6 [C] Q
South
[H] Q J
[C] 8
Declarer exits with the eight of clubs, won by East with the queen, and East is forced to return a diamond. South ruffs with the jack, and West’s apparently certain trump trick is trapped whether he elects to overruff or underruff.
Note that declarer must arrange to trump all five of dummy’s spades in order to achieve the position where he can obliterate West’s seemingly certain trump trick. Smother plays, of which this is an example, are so rare that they’re practically nonexistent, but they’re great fun — even if only on paper.
Tomorrow: Reducing the luck factor.
(c)2025 King Features Syndicate Inc.
Bridge by Steve Becker
There are times when a defender must absolutely falsecard. The chief purpose of this tactic is to create an impression in declarer’s mind that the cards are divided differently than they actually are. Though the falsecard might not always succeed, it is much better than the alternative, which leaves declarer no choice but to find the winning line of play.
Consider this deal where the defenders started by taking three heart tricks, East winning the third with the queen. East then exited with a club to dummy’s queen.
Declarer had to score the rest of the tricks to make his contract. With the K-10-7-5-3 of trump missing, South knew his prospects were not very good. However, although he didn’t know it yet, he was about to encounter great success when he led a low trump from dummy toward his A-Q. And had East followed suit with the ten, which seems normal, declarer would have coasted home after finessing the queen.
But East threw a monkey wrench into the works by playing the king on the first spade! South won with the ace and, on the natural assumption that East had started with the singleton king, returned a low trump, finessed dummy’s nine and went down one.
It is hard to fault South for failing to guess the actual trump position, since most declarers probably would have fallen into the same trap. But observe that South could not have gone wrong if East had woodenly followed to the first trump lead with the ten.
East’s play thus qualifies as a mandatory falsecard, since it could do no harm and might do some good. It is surely better to have some chance than to have no chance at all.
Tomorrow: Double-dummy problem.
Bridge by Steve Becker
Declarer frequently holds up an ace in notrump play, but there are times when it is much wiser to take the ace at once. The issue can be resolved only if declarer carefully weighs the merits of each case before acting.
Consider this deal where West leads the spade six against three notrump. Should South play low from dummy at trick one, or should he play the ace?
When the deal occurred, declarer played low, and East won the trick with the queen. Back came a spade, covered by the nine and ten, and declarer ducked again. A third spade then drove out the ace.
South had no choice but to try the diamond finesse, and when West won the ten with the king and cashed his remaining two spades, the contract went down one.
Subsequent analysis revealed that declarer would have made the contract had he played the ace of spades at trick one and then tried the diamond finesse. With the spades blocked, East-West could not have run the suit, and South would have scored nine tricks. The question, therefore, is whether South erred by holding up the ace initially.
The answer lies in which play — going up with the ace or ducking it — offers the best chance for the contract in the long run.
South should reason that, assuming West’s six is his fourth-best spade, East has only one card higher than that — the seven, ten, queen or king. Presumably it is not the seven, since with a combination including the K-Q-10, West would have led the king rather than the six. Therefore, East’s high spade is either the ten, queen or king.
Declarer can gain by ducking at trick one only if East’s high spade is the ten. But if East has either the queen or king, playing the ace assures the contract. The odds are thus 2-1 in favor of playing the ace, making it by far the better choice.
Tomorrow: Sylvia learns how to finesse.
Bridge by Steve Becker
The outcome of most deals depends on a combination of luck and skill. Sometimes the two come in equal measures, but on other occasions one factor far outweighs the other. In this deal from the 1991 world team championship, luck played a much greater role, but a certain degree of skill was required to take advantage of it.
The bidding shown took place in the semifinal match between Iceland and Sweden. The Icelandic North-South pair reached six clubs, and West led a spade in response to his partner’s lead-directing double.
The spade lead would seem to doom the slam, since it establishes a second winner for the defense before the ace of diamonds can be driven out, and the opposing hearts are not divided 3-3. But declarer didn’t panic. He won the ace of spades and cashed all seven trumps, keeping the ten of spades and A-Q-8-2 of hearts in dummy.
This left East in a hopeless position. Unable to keep all four hearts, the high spade and the ace of diamonds, he elected to discard the diamond ace. South then cashed the diamond king to make the slam, losing dummy’s last heart at the end.
Not to be outdone, in the other semifinal match between Brazil and Poland, the Polish declarer wound up at the same contract — and made all 13 tricks!
At this table, due to the vagaries of the Polish bidding system, North became declarer at six clubs, and East led the king of spades. After taking dummy’s ace, declarer also ran seven clubs, but here East could not see the ten of spades in declarer’s hand and decided to keep four hearts and the ace of diamonds. When North next cashed the spade ten, East could not guard both diamonds and hearts, and declarer scored the rest of the tricks.
Tomorrow: Quantitative analysis.
Bridge by Steve Becker
1. Two spades. Partner’s two-heart bid, a new suit by responder, is 100% forcing, and you should now make the most descriptive bid possible. You can do this by bidding two spades. Partner already knows that you started with minimum values because of your two-diamond rebid, and it’s now time to let him know that you have modest support for spades.
It would be wrong to raise two hearts to three hearts, which would indicate greater length in hearts than spades. The high-card disparity between the two suits is not a decisive factor. It is far more important to find the longest combined trump suit. Partner should have at least five spades (if he had four spades and four hearts, he would have responded with one heart initially), in which case spades will almost surely be the better trump suit.
2. Three notrump. Your two-diamond bid was a slight underbid, but there was no better alternative at the time. You can now compensate for this by jumping to three notrump. The chance of making three notrump opposite a partner who has made two forcing bids is excellent.
Two notrump would be inadequate, because that’s what you’d bid if your queen of clubs were the deuce. Since it isn’t, you bid three notrump to show that your two-diamond bid was based on maximum values.
3. Three clubs. It is better to bid three clubs than two notrump, which might seem the more normal thing to do. The failure to bid two notrump is a warning to partner that your cards are mostly in the minor suits, leaving you very few in the major suits. At the same time, you are telling partner that you don’t have a notrump type of hand. Once you’ve bid three clubs and described your hand properly, you can leave the rest to partner.
4. Three spades. It would be wrong to bid only two spades, which would indicate values similar to those shown in the first hand above. With reasonable support for both of partner’s suits, and a singleton club besides, you should happily give partner a jump-preference in spades.
Tomorrow: The end justifies the means.
Bridge by Steve Becker
There are plays that are relatively simple and yet are frequently overlooked because they are somewhat out of the ordinary. Usually, the reason for missing the play is that it is so far removed from normal procedure that it does not enter the player’s mind. Yet when the play is later called to his attention, he wonders how he could have missed it.
For a typical case, consider this deal furnished by Bruce Bell, New Zealand expert. He was West and led a diamond against four spades. Declarer won with the ten, cashed the A-K-Q of trump and A-K-Q of diamonds, then led a heart from dummy.
East followed low, and South played the jack, hoping East held the queen — which would have assured the contract. But West took the jack with the queen and continued with the ace of hearts. Declarer ruffed in dummy but then had to lose three club tricks and so went down one.
All of South’s plays were correct except the last one. Had he resisted the temptation to trump West’s ace of hearts at trick nine and discarded a club from dummy instead, he would have made the contract. West, still on lead, would have had no choice but to play a club or a heart next, and either return would have handed declarer his 10th trick.
It is true that South, by refusing to ruff the ace of hearts at trick nine, loses a trick he does not have to lose and to that extent it is an unnatural play to make.
But it is equally true that losing two hearts to West, instead of only one, ensures the contract — and making the contract is always the first consideration.
Tomorrow: Bidding quiz.
Bridge by Steve Becker
In general, a slam should be bid whenever there appears to be a better-than-even chance of fulfillment. It is in this area that a partnership’s bidding skill is most severely tested.
The main question to be resolved in bidding a slam is whether the combined hands will offer a good chance to make at least 12 tricks. Bids devoted to finding out the number of aces held, such as Blackwood, all too often bypass this basic question.
South’s three-club rebid in today’s deal announces a hand containing 16 to 18 points. It asks North to continue bidding unless his first response was a dead minimum (six or seven points). A four-club response by North would indicate a hand such as the one he has, less the ace of diamonds. North’s five-club response described his additional values very precisely.
South’s six-club bid is automatic. North is bound to have strong diamonds and club support for the two bids he has made, and South has excellent control of the unbid side suits.
Twelve tricks can be made by taking ordinary care. South has two potential heart losers. He can avoid one of them in three possible ways: the diamonds may break 3-3; the heart finesse may succeed; an endplay may be arranged.
After winning the opening spade lead, declarer should cash the Q-J of trump and then ruff dummy’s remaining spade. Next, the A-K-Q of diamonds are taken, revealing that West started with four of them.
The six of diamonds is then led, on which South discards the seven of hearts. West wins but has no satisfactory exit. A heart return would be into declarer’s A-Q, while a spade return allows declarer to trump in dummy as he discards the queen of hearts.
Tomorrow: A giveaway plan.
(c)2025 King Features Syndicate Inc.
BRIDGE BY STEVE BECKER
It isn’t easy to see how South can make four hearts after West starts out by leading the ace and another diamond. Declarer apparently must lose a spade, a heart, a diamond and a diamond ruff and go down one against best defense.
But the late Albert Dormer, British expert and one of the most prolific writers on all facets of the game, managed to make the contract after reaching four hearts on the bidding shown.
Moreover, he found the way to make 10 tricks in a rather simple fashion. He led the heart jack from dummy at trick three and, when East’s queen of hearts appeared, won with the ace. However, instead of continuing with a trump, which seemed the natural thing to do and would have been fatal, he first cashed the A-K of clubs and ruffed a club.
Dormer then led a trump to East’s king, and the remarkable effect of this sequence of plays was that East was on lead in a helpless position. If he returned a spade, declarer would finesse, losing to the king, but South’s only losers in that case would be a spade, a heart and a diamond.
If East returned a diamond instead of a spade, the outcome would be the same. After ruffing, West would find himself on lead, also in a no-win position. With only spades remaining in his hand, he would have had to return one, and Dormer would then lose only a diamond, a heart and a diamond ruff.
By playing three rounds of clubs before leading the second round of trump, declarer had left West with no safe exit card if he got the diamond ruff he was looking for.
Tomorrow: Brilliant defensive play.
Bridge by Steve Becker
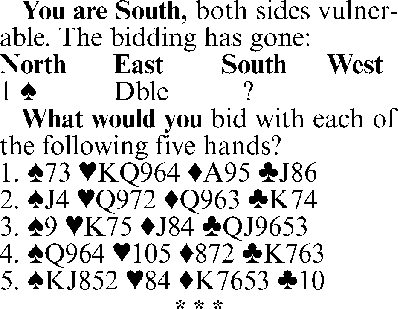
1. Redouble. The redouble of a takeout double after partner opens the bidding with one of a suit indicates 10 or more high-card points. The purpose of the redouble is to alert partner to the possibility of either making a game or exacting a penalty from the opponents. The redouble does not imply support for partner’s suit.
2. One notrump. Over a takeout double, this shows a balanced hand of six to nine points, after which partner can carry on as he sees fit. Passing is inadvisable because it may become more difficult to show your scattered values at your next turn to bid.
3. Two clubs. Bidding a new suit over a double denies the ability to redouble and therefore indicates a hand with less than 10 points in high cards. The two-club bid is not forcing and warns partner that spade support is either negligible or nonexistent.
4. Two spades. This denotes a relatively weak hand with spade support. It offers the advantage of making it more difficult for the next player to respond to his partner’s double.
5. Four spades. The best way of dealing with hands of this type is to leap right to game. There is no way of knowing whether partner can make four spades, but you bid it just the same.
Partner doesn’t need much of a hand to make 10 tricks opposite yours — for example, he might have as little as
and finish with 10 or 11 tricks.
But equally important is the possibility that the opponents can make 10 or 11 tricks with clubs or hearts as trump. If so, they might find it extremely difficult to contest the bidding over four spades. The immediate leap to game thus serves as a double-edged sword from which you can gain in two different ways.
Tomorrow: Think first, play later.
King Features Syndicate Inc.
Bridge by Steve Becker
Some plays are so well-known that when the opportunity to use one of them arises, there is a tendency to make the play automatically, without pause for thought. This is a somewhat dangerous practice, since what is right on most occasions might easily be wrong on a particular deal.
Take this case where West led the king of hearts against three notrump. Recognizing the chance for a “Bath Coup,” declarer allowed West’s king to hold the trick, hoping West would continue with a heart into the A-J. Unfortunately, this was a case where the cure proved worse than the disease.
Warned against a heart continuation by partner’s discouraging deuce, West switched to the spade queen. South ducked, but when West continued with the jack, covered by East with the king, declarer was well on his way to irreversible defeat. If he ducked the king, East would return a heart through the A-J, while if he won the trick, the defenders would finish with three spades, a heart and the diamond king for down one.
South should have realized that ducking the heart king in this case was wrong for two reasons. First, West was very likely to shift to a spade; second, South was in a position to guarantee a minimum of nine tricks if he took the first trick with the ace. He would then cross to dummy with a club and lead the diamond queen.
If East had the king and did not cover, the finesse could be repeated to yield at least three diamond tricks. And if the finesse lost to West, declarer, with the J-5 of hearts serving as a stopper, would have nine ironclad tricks consisting of three diamonds, four clubs and the two major-suit aces.
All of which goes to prove once again that a little knowledge can sometimes be a dangerous thing.
Tomorrow: Bidding quiz.
Bridge by Steve Becker
Good defense is mostly a matter of good partnership understanding. When play begins, the defenders have only a vague idea of their combined values. As the play progresses, they must try to clarify their respective holdings to each other in order to make the most of their assets.
Consider this deal where West led the king of diamonds against four spades, East signaling with the eight. South ruffed the diamond continuation, drew trump and tried the club finesse. East took his king and returned a heart, but South went up with the ace, ran the clubs and finished with an overtrick.
However, the defenders should have beaten the contract, and East was the player at fault. He should have overtaken the king of diamonds with the ace at trick one and shifted to the deuce of hearts at trick two.
Declarer could not have prevailed against this defense. If he goes up with the ace, he later loses a club and two hearts to go down one; if he ducks the heart, West wins with the jack and returns a heart to produce the same result.
With dummy’s threatening clubs in plain view, East should base his defense on the hope that his side can score two heart tricks. He should realize that his partner almost surely has six diamonds for his vulnerable overcall, leaving declarer with only one diamond. West then simply follows his partner’s chosen line of defense to achieve the desired result.
This type of partnership rapport constitutes the backbone of good defense. The defenders cannot actually see each other’s cards, but by working carefully together, they can usually achieve the same result as if they did.
Tomorrow: A case of self-delusion.
(c)2025 King Features Syndicate Inc.
Bridge by Steve Becker
In many deals, one defender poses more of a threat to declarer than the other does. Whenever possible, therefore, declarer should shape his play so that the danger hand is avoided.
An unusual illustration of the kind of effort sometimes needed to achieve this objective occurred in today’s deal from a team contest.
At both tables, the final contract was four hearts, and both Wests led the queen of spades. The first declarer took the spade with the ace, drew trump in two rounds, then led the queen of diamonds and finessed. East won with the king and shifted to the jack of clubs, and the defenders collected three club tricks for down one.
At the second table, declarer saw what could happen to him if East had the diamond king and West the club ace, so he took steps to prevent East from ever gaining the lead. After winning the spade lead, he cashed the A-Q of hearts and king of spades, led a diamond to the ace, then played the ten of spades and discarded the queen of diamonds on it!
West won and was stymied. A spade return would allow South to ruff in dummy while discarding a club from his hand, and a club return would hand declarer a trick with the king. Similarly, a diamond return would establish a trick in that suit after South ruffed East’s king.
In practice, West returned a diamond, and declarer eventually lost only two clubs to make his contract.
South’s well-conceived line of play was guaranteed to work no matter where the ace of clubs and king of diamonds were actually located. He found a way to establish his 10th trick without ever running the risk of losing the lead to East.
Tomorrow: Teamwork on defense.
Bridge by Steve Becker
This celebrated hand occurred in the Spingold team championship played in Miami Beach in 1958. It features a brilliant defensive play by Sidney Lazard, which contributed greatly to his team’s victory that year.
At the first table, Lazard’s teammates were North-South and reached six notrump on the bidding shown. South won the heart lead with the ace, cashed three more hearts, crossed to the jack of spades and led a diamond to the king, losing to West’s ace. Declarer later took a winning club finesse to make the slam for a score of 990 points.
At the second table, where Lazard sat West, the bidding went:
At this table, West also led a heart. Declarer put up dummy’s ace, came to his hand with a heart and returned to dummy with a spade. He then led a diamond to the king, but Lazard, smooth as silk, followed with the deuce!
With 11 tricks already assured and the ace of diamonds apparently situated on his right, declarer saw no reason to risk a club finesse for his 12th trick.
So, he played the ace and another spade and then led another diamond toward his hand. Lazard took the queen with the ace and returned a diamond to East’s jack, and South went down one for a combined loss of 1,040 points on the deal.
Tomorrow: Killing two birds with one stone.
King Features Syndicate Inc.
Lifestyles

Let’s take another look at mayapples

MONDAY EVENING TV LISTINGS

Often overlooked gardening tool
TO YOUR GOOD HEALTH: Weight-loss drugs can help heavy drinkers
DEAR DR ROACH: My brother-in-law is a lovely man, but for years, he’s suffered from obesity. He also gambles and ...
Valley Grows Calendar
Here are upcoming gardening events through the Ohio State University Extension Office. For more information and a ...
HINTS FROM HELOISE: Repurpose ice trays to hold jewelry
DEAR HELOISE: I recently read a letter from someone who suggested using a tackle box as an earring holder. I have ...