Bridge by Steve Becker
1. Two spades. The partner of a player who passed originally is not bound by the same rules that govern many other bidding sequences. For example, if South responds with only one spade after passing initially, North is not forced to bid again, since he knows South lacked the values for an opening bid. North may therefore decide that game is impossible and pass.
For this reason, it is best to jump-shift to two spades with the given hand to inform partner that there is a good chance for game despite your previous pass. A one-spade response would be correct if partner had opened with one diamond, which would diminish the value of your hand, but opposite a one-heart opening, your chances for game rise tremendously. The two-spade bid, which can be passed if partner has minimal values, shows five very good spades and implies some heart support, since with poor heart support your hand could not have improved enough for a jump-response. Partner then does whatever his hand calls for.
2. Four notrump. The number of tricks you can make depends solely on how many aces partner has, so this is an ideal time for Blackwood. If partner bids five hearts, showing two aces, you will pass. If he bids five spades, showing three aces, you’ll bid six hearts. And if he happens to bid five clubs, which in this sequence would indicate all four aces, you’ll bid a grand slam.
Partner’s actual point count (or yours, for that matter) is not the critical factor in unbalanced hands. Once he indicates four-card support by jumping to three hearts, the number of aces he has will tell you just how far to go.
3. Three notrump. Partner has 18 or 19 points with balanced distribution, so there is a game in the combined hands. It is not necessary or desirable to show your diamond support by now bidding three diamonds. You have a notrump type of hand and partner has one also, so the best thing to do is to take the short route to game in notrump. Five diamonds would probably be harder to make than three notrump, and a slam is very unlikely, so no effort in that direction should be made by bidding three diamonds.
Tomorrow: Silence is golden
BRIDGE BY STEVE BECKER
Most hands played by declarer are of a simple sort. They do not require specialized knowledge or heavy thinking for the best result to be obtained. Since these types of hands are so numerous, the player who consistently fares well on them, avoiding potential pitfalls along the way, is well on the way to becoming a first-rate declarer.
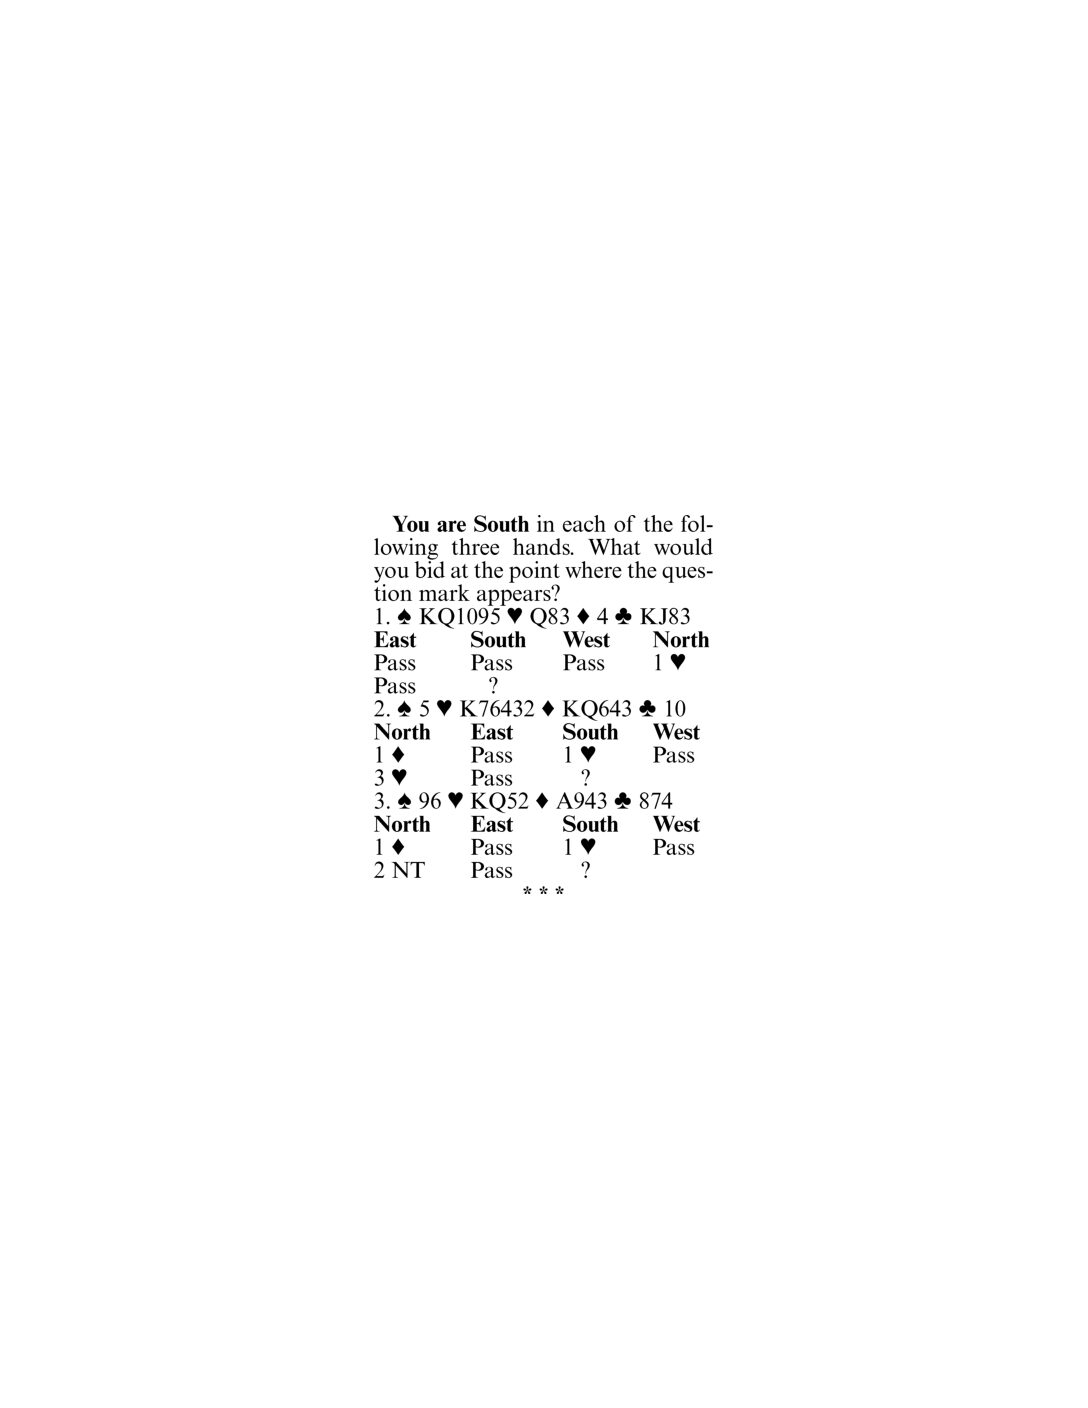
Consider this deal where South went down in a contract he should have made. West led a club and continued with a second club, ruffed by declarer.
South then drew three rounds of trump, hoping the opposing trumps were divided 3-3. When East showed out on the third heart, the jig was up. West ruffed the third diamond lead and cashed three club tricks, and declarer finished down two.
What South had done, in effect, was to pin all his hopes on a 3-3 trump division, about a 1-in-3 proposition. Instead of settling for such a low-percentage probability, declarer should have sought a way to add to his chances by catering to a possible 4-2 trump division, which occurs in about 48 deals out of 100.
To this end, South should refuse to trump the second club lead, and also the third club lead if the defenders continue the suit. On these clubs, declarer discards two spades, at which point the defense collapses. South takes the next ten tricks regardless of what the defenders do.
By adopting this method of play, South makes the contract whenever the opposing trumps are divided 3-3 or 4-2. He increases his chances of making four hearts from 36% to 84%, and goes from being a 2-1 underdog to a 5-1 favorite.
Tomorrow: Bidding quiz.
Bridge by Steve Becker
When all is said and done, bridge is essentially a game of probabilities. You make a certain bid because you think it has a better chance to succeed than any other bid. You make a certain play because you think it is better, percentagewise, than any other play.
But probability, by definition, is not a certainty. All you can do in bridge is rely on the percentages and hope for the best. You might be wrong in a particular case, but in the long run you’ll be right more often than not.
All of which leads us to the play of today’s hand, which is strictly a matter of percentages. Let’s say you win the spade lead with the king and play the king of hearts. West takes the ace and returns a spade, which you win with the ace as East follows with a second spade.
There are now two ways to proceed. You can cross to the king of diamonds and take a club finesse. If the jack wins, you have nine tricks. This approach offers about a 50-50 chance to make the contract. (In the actual deal, though, this line of play would fail.)
The alternate approach is to play the A-K-J of clubs. This will succeed if the clubs are divided 3-3 or if either the queen or ten falls as the A-K are led. The diamond king provides the entry to dummy if the nine of clubs becomes a trick.
The second approach is significantly better. The clubs will break 3-3 about 36% of the time, and a singleton or doubleton queen or ten will occur in approximately one out of every three deals.
The combined chance of the clubs breaking 3-3 or being otherwise favorably divided comes to about 70%. Playing the A-K-J of clubs thus has a much better chance of succeeding and is therefore the superior line of play.
Tomorrow: Just a little white lie.
Bridge by Steve Becker
There’s no doubt that duplicate bridge reduces the luck factor of the game to a great extent, but it certainly doesn’t eliminate it altogether. Today’s hand aptly demonstrates that point. The deal occurred in a playoff match to determine which of two teams would represent the United States in the 1973 world championship.
It was the first deal of a 128-board match, and it was a harbinger of things to come. At one table, North-South got to seven hearts as shown and unluckily went down one when Jeff Rubens, partnered by B. Jay Becker, led a spade, which Becker ruffed.
Rubens reasoned that, based on the bidding, there was a good chance that North-South held nine spades, so he chose the spade lead as the best shot to stop the grand slam.
At the second table, where Rubens’ teammates Andy Bernstein and Becker’s son Mike held the North-South cards, the bidding went more quickly:
Bernstein, North, naturally started to think in terms of a slam after his partner doubled East’s preemptive bid for takeout, and he backed his appraisal with a cuebid of four clubs. When Mike showed more than a fair-to-middling double by cuebidding in return, Bernstein jumped to seven spades.
Strictly speaking, seven spades was not as good a contract as seven hearts — mathematically, there was a greater chance of a heart ruff with spades as trump than a spade ruff with hearts as trump — but seven spades was the winner, while seven hearts was the loser.
Sometimes luck, rather than skill, can be the key component in the outcome of a deal.
Tomorrow: Playing according to the odds.
Bridge by Steve Becker
1. Four notrump. Partner can be expected to have from 13 to 16 points for his three-diamond bid, which puts you in the 33-point zone usually required for 12 tricks. A small slam is thus practically certain, while a grand slam is a possibility. The number of aces partner holds is the key to how far to go, so you invoke the Blackwood convention.
If partner responds five diamonds, showing one ace, you pass; if partner bids five hearts (two aces), you bid six diamonds; and if partner responds five spades (three aces), you bid five notrump, asking for kings. If the response to this is six diamonds, showing one king, you bid seven diamonds.
2. Four diamonds. Here your opening bid is a minimum, and you indicate this by rebidding in minimum terms. If partner next bids five diamonds, you pass.
However, if partner indicates interest in a slam by bidding four hearts or four spades over four diamonds, you should bid five clubs. This cannot be construed as strong bid because your previous four-diamond bid announced a minimum hand. Five clubs in this sequence simply shows first-round control of clubs.
3. Three notrump. This is not a pleasant rebid, considering your weakness in hearts, but three notrump offers a better chance for game than any other contract.
It is possible that the best spot is five diamonds, but there is no sensible way of finding out whether an 11-trick contract is superior without going past three notrump. If partner passes three notrump, the odds favor making it.
4. Four clubs. A slam is definitely possible, despite your minimum high-card values, and is surely worth investigating. Partner might have something like: [S]83 [H]AJ5 [D]AK106 [C]Q652, and this typical three-diamond response would provide an excellent shot for six.
If partner responds to four clubs with four diamonds, you would be entitled to make still another slam try by bidding four spades. If partner then retreats to five diamonds, ignoring both invitations to slam, you would have to respect his signoffs and abandon the effort.
Tomorrow: A matter of priorities.
Bridge by Steve Becker
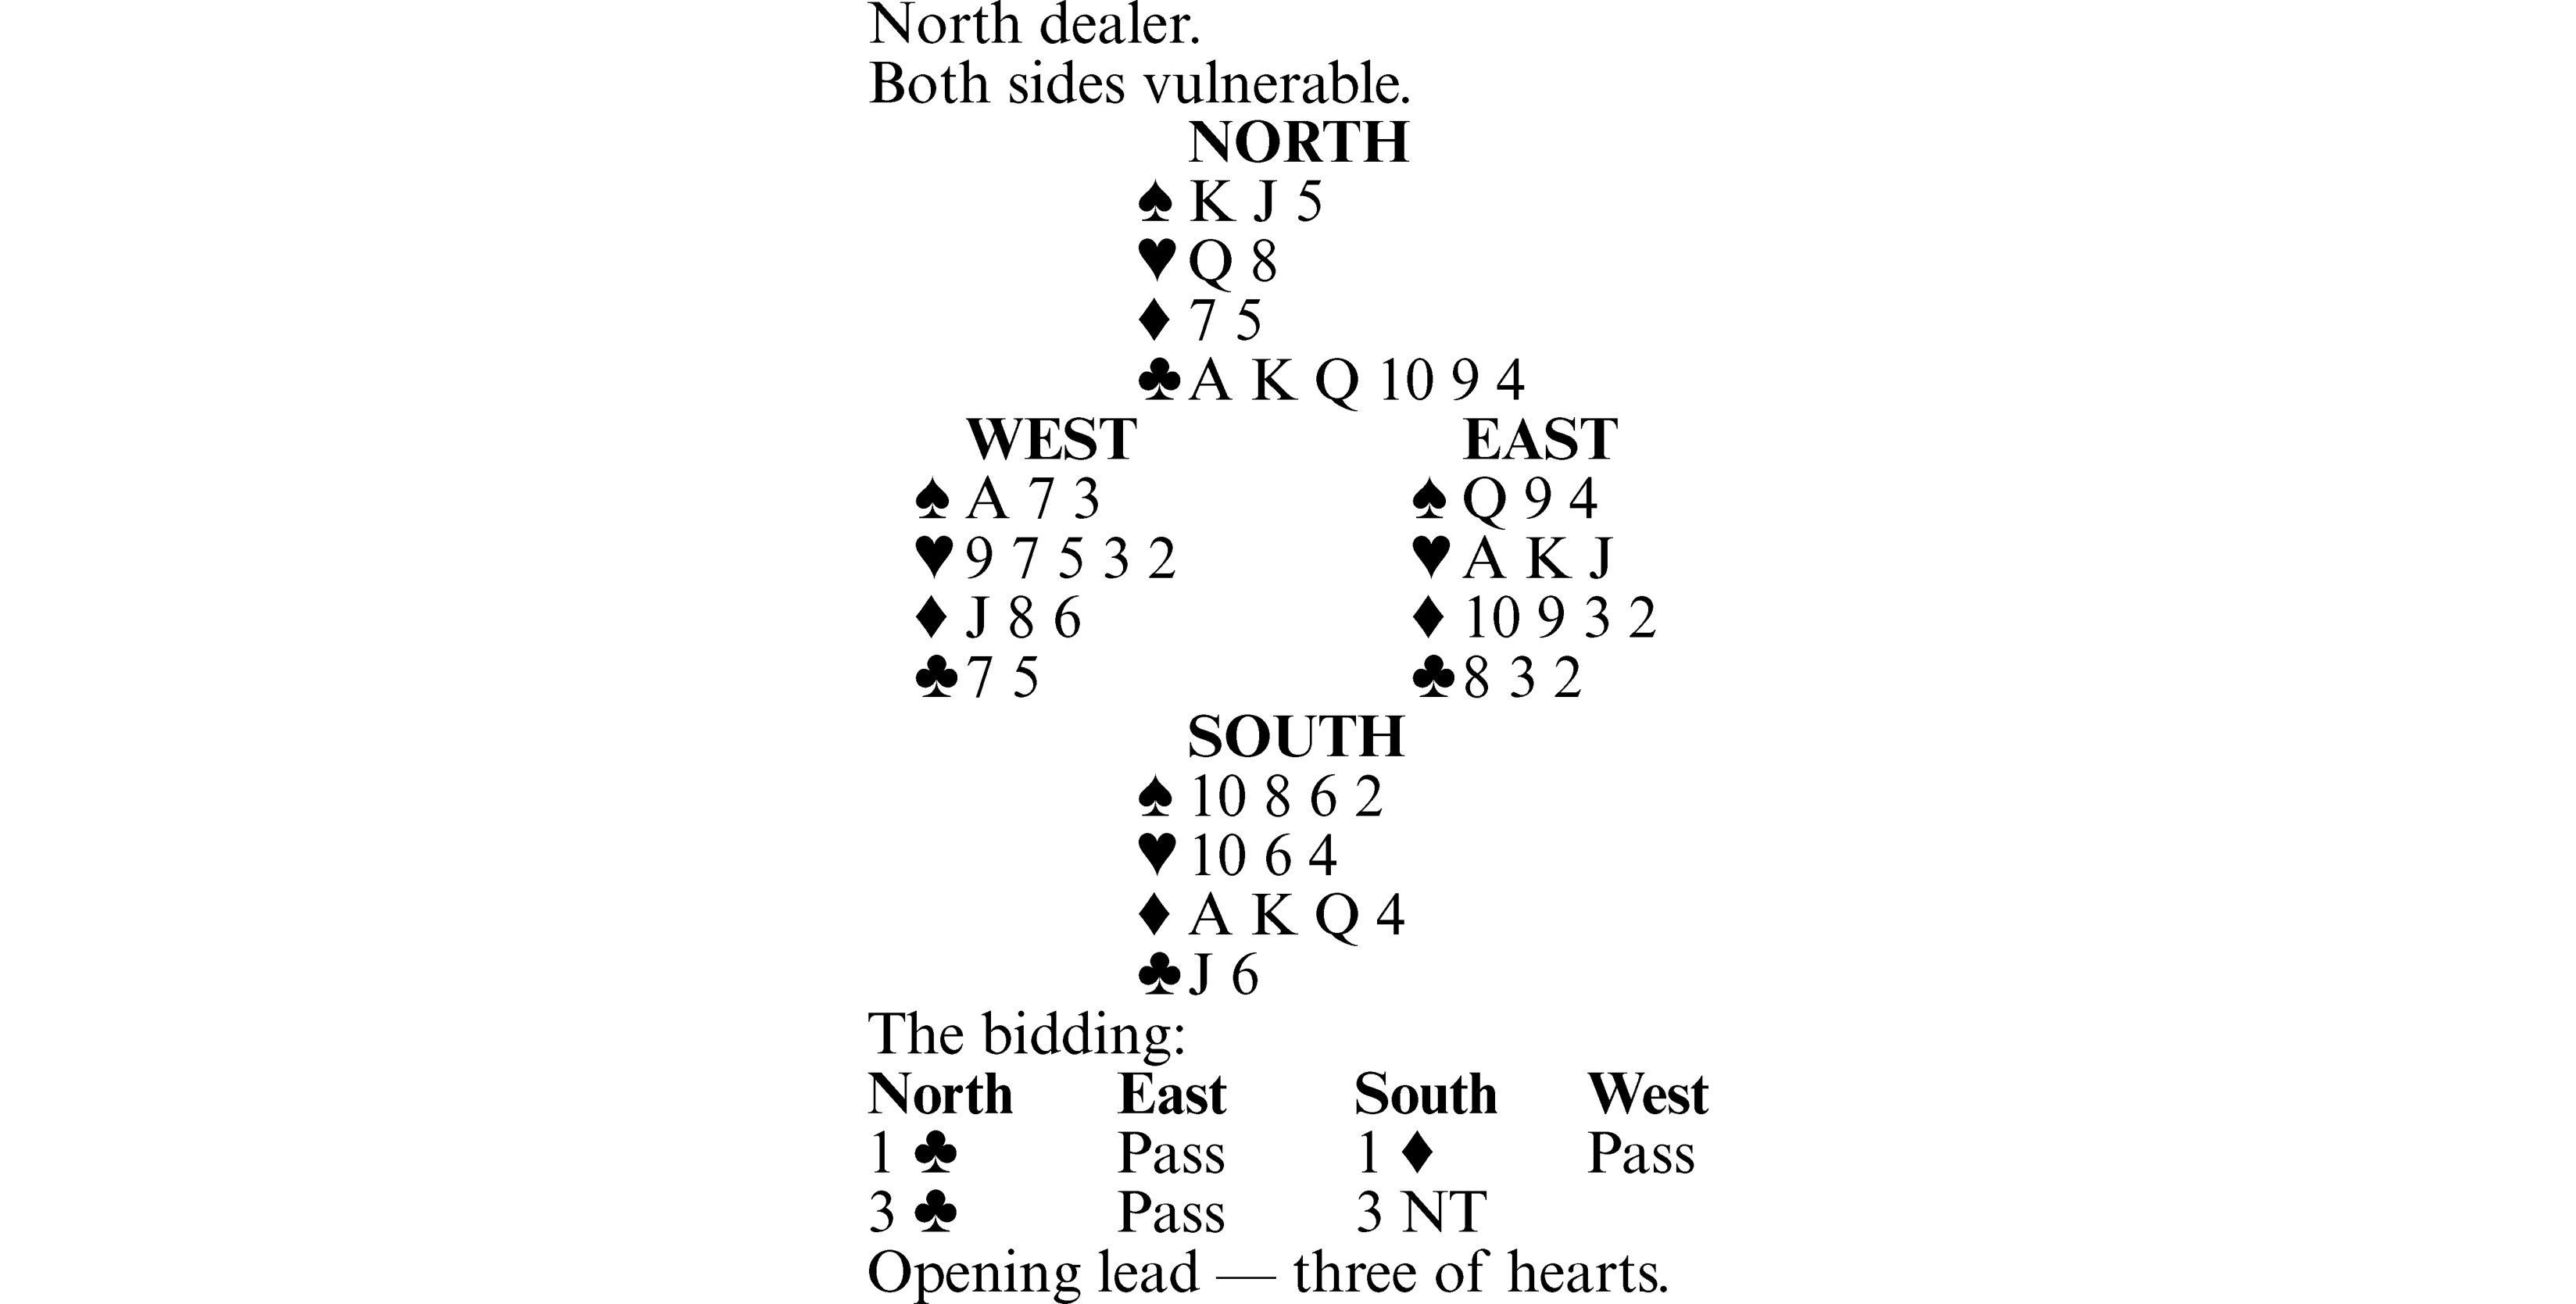
In many cases where declarer starts out as a strong favorite to make his contract by adopting an obvious line of play, he should seek a way to elevate his chances even further before embarking on the straightforward approach. For example, take this deal where South is in six hearts and West leads a club.
Declarer sees that the only danger is the possibility of losing two spade tricks. One way of playing the hand, after winning the club lead with the king, is to draw trump, lead a spade from dummy and finesse the ten. If this loses to the jack, declarer wins West’s club or diamond return and tries a second spade finesse.
In the actual deal, both finesses would lose, and declarer would wind up down one — even though he was a 3-1 favorite to make the slam on this line of play.
However, a more cautious declarer would make the slam by adopting an approach designed to overcome the possibility of West’s holding both the king and jack of spades. He would not settle for a 75% probability of success without first making an effort to raise his chances to 80, 90 or even 100%. This could be accomplished as follows:
After taking the king of clubs, declarer plays the ace of diamonds, ruffs a diamond, leads a low heart to the nine, ruffs a diamond with the ace, cashes the ace of clubs, ruffs a club with the king and leads a low heart to the queen. This reduces the dummy to three spades and the J-5 of trump, while declarer has four spades and the ten of trump.
A spade to the ten then endplays West. After he wins with the jack, he has to return a spade, a diamond or a club, and whichever he chooses, South scores the last four tricks.
Tomorrow: Bidding quiz.
Bridge by Steve Becker
Perfect defensive play is extremely difficult, and it would be next to impossible without the aid of many useful conventions that have been devised over the years.
One key defensive weapon, the suit-preference signal, is not used nearly as often as it should be. Although suit-preference signals are utilized mostly in suit contracts in a ruffing situation, there are times when this signal can be profitably applied to notrump play.
Take this case where West leads a heart against three notrump. Declarer hopefully plays the queen from dummy, but East wins with the king and continues with the ace, West playing the deuce to indicate that he led from a five-card suit.
When East next cashes the jack of hearts, catching South’s ten, West has a chance to use a suit-preference signal. Since his 9-7-5 are all equals at this point, the card he plays on the jack is, or should be, a signal to East.
If West were to play his lowest heart, the five, he would be asking his partner to return the lower-ranking side suit, in this case, diamonds. (A club shift is obviously out of the question.) If West were instead to play his highest heart, the nine, he would be asking his partner to return the higher-ranking side suit — in this case, spades.
Note that without a suit-preference signal to guide him, East would probably choose the safer-looking diamond return at trick four, allowing declarer to escape with nine tricks.
But after West signals for a spade return by playing the nine of hearts on the jack, East has no trouble shifting to a spade to defeat the contract two tricks.
Tomorrow: Probability becomes certainty.
Lifestyles
How to water African violets
DEAR HELOISE: African violets often look droopy and tired without the right light or amount of water. If your plant ...
Cosmetic results of surgery for a fatty tumor can vary greatly
DEAR DR. ROACH: I was diagnosed with a large fatty tumor on my left thigh. It’s very ugly. What can I do to get ...
A big birthday with an even bigger price tag
DEAR ANNIE: My younger sister is turning 30 and has planned a birthday dinner at a trendy rooftop restaurant where ...
Bridge by Steve Becker
An elimination play can save many a contract. Its purpose is to force a defender, usually near the end of play, to ...
HINTS FROM HELOISE: Get rid of mold smell in purses
DEAR HELOISE: I have a black leather purse, which I stored in its fabric bag. But when I pulled it out this year, ...