Bridge by Steve Becker

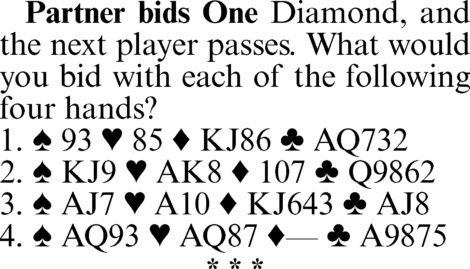
1. Six spades. There is the distinct aura of a slam when partner opens one spade and next jumps to three spades without knowing you have three aces. The one thing certain is that you should not stop short of six.
Alternatively, you could bid four hearts — a cuebid of West’s suit to suggest the possibility of a grand slam as you wend your way to six spades. Partner could have either of these two hands for his three-spade bid:
and six spades is odds-on to make on both.
2. Four diamonds. Partner’s four-club bid is a slam try; if he was interested only in game, he would have bid four spades. Since you have the ace of diamonds and about as good a hand as you could be expected to have, you must cooperate with partner by bidding four diamonds. Partner could have either of these hands:
and you would certainly want to be in six spades in both cases.
3. Three notrump. It’s true that you have only six high-card points, that you don’t have notrump distribution and that declarer ordinarily needs 26 points or more to have a good play for three notrump. Nevertheless, the winning bid is three notrump because the odds heavily favor making that contract.
In hands of this type, where there’s an excellent chance you’re starting partner off with seven diamond tricks, you can well afford to short-change him in high-card points because you have lots of tricks to take their place. You shouldn’t bet your life that partner will make three notrump, but over the long haul you’ll gain much more than you’ll lose by leaping directly to the notrump game.
Tomorrow: Let’s find out where we stand.
Bridge by Steve Becker
An elimination play can save many a contract. Its purpose is to force a defender, usually near the end of play, to make a play disadvantageous to his side.
Here is a simple illustration. South is in four spades, and West starts by leading three high hearts, declarer ruffing the third.
South now leads the queen of spades, on which West plays the five. It would be wrong to finesse the spade in view of West’s weak two-bid, which he would scarcely make if he had the guarded king of spades as well as the A-K-Q of hearts.
So South goes up with the ace of spades, hoping to catch the singleton king, and also planning to develop an endplay against East if the king does not fall.
When the king does not appear, South proceeds with his second plan. He cashes the A-K of diamonds, eliminating that suit from the dummy and his own hand, and then throws East on lead with a spade.
East cannot afford to lead a diamond, which would allow South to ruff while discarding a club from dummy, so he returns a club. Declarer wins the club in dummy (with the nine or jack, depending on what West plays) and then takes another club finesse to make the contract.
Note that if South takes the spade finesse, he goes down. East would be able to exit safely with a spade or a diamond, and East-West would eventually score a club trick with proper defense.
Oddly enough, the contract can be defeated by an unusual play. If East foresees the impending endplay, he can thwart it. All he has to do is to trump the third heart lead with the king of spades — even though he is trumping his partner’s high heart — and then return anything but a club. Against this defense, declarer is helpless.
Tomorrow: Bidding quiz.
Bridge by Steve Becker
Trump management is an integral part of the play of any suit contract. It includes the frequently crucial decision of whether to draw all, some or none of the opposing trumps at the outset. It might also include the question of whether to ruff high, low or not at all in situations where declarer has an opportunity to trump.
Consider this deal where South mismanaged his trumps and as a result failed to make four hearts. He ruffed West’s second spade lead and played the K-Q-A of trump.
When the suit broke 4-2, South next tried to run dummy’s diamonds. But East ruffed the third round and returned a spade, forcing declarer to use his last trump. After that, the only trick South could score was the ace of clubs, and he finished down two.
The deal illustrates how important it is for declarer to decide at the outset how to handle his trumps. In this case, South did not give adequate thought to what he could do to protect against a 4-2 trump break — mathematically 12% more likely than a 3-3 division. Had he taken the appropriate measures, he could have assured the contract against both a 3-3 and a 4-2 split.
The correct play is to discard a club on the second spade lead! This allows declarer to retain all of his trumps and leaves him in full control.
Another spade lead can be ruffed in dummy, after which South cashes the king of hearts, crosses to the queen of diamonds and plays the A-Q of hearts. When the suit fails to divide evenly, he concedes a trump to East’s ten and takes the rest of the tricks.
The contract is equally certain if West leads a trump or a diamond at trick three. Declarer is sure to score four hearts, five diamonds and the ace of clubs for 10 tricks in all.
Tomorrow: The bidding points the way.
(c)2026 King Features Syndicate Inc.
Bridge by Steve Becker
1. Two clubs. You don’t quite have the values for a jump to three diamonds (forcing to game) and are too good for a single raise to two diamonds (which would indicate six to 10 points). As usual when faced with this dilemma, you bid a side suit initially — in this case, clubs — planning to show diamond support at your next turn without jumping.
By combining these two bids, you indicate a hand of 11 or 12 points that was worth a raise to two and a half diamonds. Partner may then go on or not, depending on his hand.
2. Two notrump. With a hand so well-suited for notrump play, there is no good reason for responding two clubs. Ordinarily, a five-card suit is not suppressed, but when it is a minor and an 11-trick game contract is only a distant hope, while a nine-trick game in notrump is very promising, the minor suit can be concealed. Two notrump shows 13 to 15 points and is forcing to game.
3. Three clubs. You can’t settle for less than a slam with a holding of 18 high-card points, excellent trump support and controls in every suit. In such cases, it is normal to start with a jump-shift in another suit in order to alert partner to the possibility of a small or grand slam.
However, here you have no genuine side suit in which to jump-shift. So, at the risk of temporarily deceiving partner (you plan to support diamonds strongly from here on in), you manufacture a suit because that is the only way you can apprise him of the potential for slam. Clubs are chosen rather than spades because it is dangerous to make a jump-shift in a suit higher in rank than the one you plan as the eventual trump suit.
An immediate jump to four notrump (Blackwood) is also acceptable, but you might find yourself guessing whether to bid a grand slam if partner shows up with, say, an ace and two kings. Keeping the bidding lower may allow you to get a better picture of partner’s hand, and you can always use Blackwood later on.
4. Two clubs. This is a fine hand to have opposite an opening bid, but it loses much of its luster when partner starts with one diamond. A jump-shift would be out of order because it is not wise to eat up valuable bidding space when you have no idea where you’re going. The best approach is to respond in your longest suit first, planning to bid spades and hearts later (if necessary) and thereby describe your 4-4-0-5 distribution.
Tomorrow: A necessary assumption.
(c)2026 King Features Syndicate Inc.
Bridge by Steve Becker
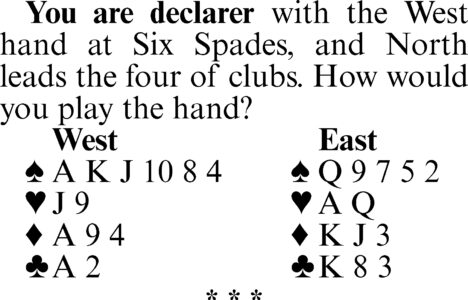
Declarer’s first obligation is to make his contract. At times he must exercise extreme care to meet this obligation, but when these efforts pay off, he has good reason to feel highly gratified.
Consider this deal where South is in four notrump and West leads a heart. East takes the ace and returns the nine, declarer winning with the jack.
South leads a diamond, West producing the eight, and declarer must now invoke an extraordinary safety play or go out of business.
First, let’s say he makes the normal safety play of the jack. He doesn’t mind losing the finesse, which would assure him of six diamond tricks and the contract. Indeed, by playing this way he’ll make seven diamond tricks if the finesse wins and East follows suit.
But observe what happens in the actual deal when declarer finesses the jack. East shows out, after which South must go down at least one. The “safety play” proves to be a mirage when the suit breaks 4-0.
However, declarer can make the contract by invoking a super safety play. When West plays the eight on the diamond lead, South should let him win it in order to cater to every possible division of the diamonds. If he does, he guarantees the contract absolutely.
Note that a clever West can make matters more difficult for declarer by playing the queen on the first diamond lead. South may impulsively win with the king on the assumption that the queen is a singleton. But if South stops to remind himself that his primary goal is to make the contract, he should conclude that it is better to duck the queen and not yield to temptation.
Tomorrow: Bidding quiz.
Bridge by Steve Becker
Many hands offer declarer a choice of two or more lines of play. Declarer’s job in these cases is to try to find the method of play most likely to succeed –in other words, the percentage play.
In considering his options, declarer should examine all the possibilities and not just the obvious ones. Unfortunately, the best line of play is often camouflaged by alternatives that are much easier to see.
For example, take this deal where South, encouraged by partner’s positive response to his forcing two-bid, contracted for a grand slam and discovered he had a potential diamond loser. Making the slam seemed to depend on guessing whether to take a finesse in diamonds or in spades — each a 50% proposition. As can be seen, neither finesse would have worked as the cards lie.
But South saw a third option that offered a substantially better chance than either finesse — the possibility of establishing a spade trick in dummy by trumping spades in his own hand. Furthermore, he could pursue this possibility without relinquishing the 50% chance of relying on a finesse to bring the slam home. If the spades failed to divide favorably, he would still have the diamond finesse in reserve.
So, after winning the heart lead with the queen, declarer cashed the ace of spades and ruffed a spade high. Next, he led a low trump to dummy’s nine and ruffed another spade high. Then came a low trump to dummy’s ten, which drew West’s last trump and allowed South to ruff the fourth round of spades, felling East’s king.
Declarer now ruffed the ace of hearts with dummy’s deuce of trump and discarded the diamond queen on dummy’s queen of spades to put the finishing touch on a well-played hand.
Tomorrow: A super safety play.
(c)2026 King Features Syndicate Inc.
Bridge by Steve Becker
The suit-preference signal has many applications. In its classic form, it is used by a defender on lead to tell his partner which of two side suits to return after the lead has been ruffed.
The mechanism is quite simple: If the leader prefers to have the lower-ranking side suit returned, he leads his lowest card for partner to ruff; if he prefers the return of the higher-ranking side suit, he leads a high card for partner to ruff.
This concept can be extended to a variety of situations that might arise during the play. Today’s deal provides a typical case.
South opens four spades in fourth seat, and West leads the ten of clubs. Declarer wins with dummy’s jack, leads the nine of spades and finesses. West takes his king but is faced with a dilemma. He would like to reach his partner’s hand in order to obtain a club ruff, but he does not know whether to lead a heart or a diamond. Both leads appear to have an equal chance of success — and an equal amount of risk.
In the actual deal, if West leads a heart at trick three, declarer finishes with 11 tricks, while if West returns a diamond, the defense scores two diamonds, a spade and a club ruff for down one.
However, thanks to the suit-preference signal, West does not have to operate in the dark. East, fully aware that his partner’s lead might be a singleton, can play the deuce of clubs at trick one to request a diamond return should West regain the lead. West, for his part, should be on the lookout for just such a signal from East at trick one.
Alternatively, if East had the heart ace rather than the diamond ace, he would play the nine of clubs at trick one to ask for a subsequent heart return. The suit-preference signal takes all the guesswork out of the game!
Tomorrow: Maximizing your chances.
(c)2026 King Features Syndicate Inc.
Bridge by Steve Becker
This is strictly a percentage problem. There is no way to guarantee the slam, but there is one approach that gives you the best chance for the contract. Three different lines of play stand out, and they all start the same way. You win the club lead with the ace, draw trump, cash the king of clubs and ruff a club.
Line No. 1: You take a heart finesse. If the queen loses to the king and a heart is returned, you next lead a diamond to the ace and a diamond back, finessing the jack.
This approach wins if North has either the king of hearts or queen of diamonds and offers about a 75% chance of success.
Line No 2: You cash the A-K of diamonds. Assuming the queen does not fall, you then continue with the jack of diamonds.
If South has the queen, school is out because he must return a heart or yield a ruff-and-discard. But if North has the queen of diamonds, he wins and returns a heart. You take the finesse, and the outcome depends on who has the heart king.
This line of play succeeds if either opponent has the singleton or doubleton queen of diamonds, if South has the queen of diamonds, or if North has the king of hearts. The overall chance of success is about 78%.
Line No.3: You play the ace of hearts followed by the queen. If South has the king, it’s all over, because he must lead a diamond or yield a ruff-and-discard.
If North has the king of hearts, he is forced to return a diamond. If he has either the queen or ten, or both, you make the contract by playing low from dummy. Thus, if North has 10-x-x and leads a low diamond, South’s queen is trapped. If North returns the ten instead, you cover with dummy’s jack to make the contract.
If North has the queen of diamonds, the outcome is the same. You follow low from dummy, take South’s ten with the ace and then finesse the jack.
This line of play succeeds if South has the king of hearts or North has either the ten or queen of diamonds, or both. It offers about an 87% chance of success, failing only when North has the heart king and South the queen and ten of diamonds.
Tomorrow: A delectable concoction.
Bridge by Steve Becker
Declarer’s objective in most deals is to make the contract, and if, in attempting to reach this goal, he goes down an extra trick while trying to do so, it should not really bother him.
Take this case where South is in four spades and West leads a club. East cashes the A-K and shifts to the queen of hearts. Declarer ducks the queen and wins the next heart with the ace.
South is now at the crossroads of the hand. He has a heart loser and must formulate a plan to get rid of it. The only way this can be done is to try to establish an extra diamond trick in dummy, which necessitates ruffing three of dummy’s diamonds and the suit being divided 4-3.
There is also another hitch. Dummy’s fifth diamond will be of no value to declarer if there is no entry to dummy to cash it. For this reason, declarer must adopt a somewhat unusual line of play.
At trick five, he leads a diamond to the ace, then ruffs a diamond high. He next leads the spade deuce and finesses the seven! When this wins, South ruffs another diamond high, then finesses the eight of spades. This is followed by a third diamond ruff high, after which dummy’s ten of spades provides the entry to cash the jack of diamonds and make the contract.
It is true that declarer risks going down an extra trick — 100 points — by finessing the spade seven on the first round of the suit. But it is also true that if the finesse succeeds and the diamonds are divided normally, he scores 620 points for making a vulnerable game. Since the finesse can gain a lot and lose only a little, it is clearly the right play.
Tomorrow: Test your play.
Bridge by Steve Becker
A shortage of entries to dummy is usually just as apparent to the defenders as it is to the declarer. When such a situation exists, the defenders should try to tailor their play so as to take advantage of declarer’s limited communication with dummy.
Take this case where South made three notrump, although proper defense would have defeated him.
West led a club, and South won East’s ten with the king. Hearts was obviously the suit to attack, so declarer led a heart to the jack, East taking the queen. East returned a club, taken by declarer with the queen. South then forced out the ace of hearts and wound up making four notrump, scoring two spades, three hearts, two diamonds and three clubs.
However, the contract would have been defeated had East allowed the jack of hearts to win at trick two! Presumably, declarer would next have taken a spade finesse. West would win and return a club. Regardless of how South proceeded from then on, he would finish a trick short, scoring just two spades, one heart, two diamonds and three clubs.
The advantage of ducking the first heart is that declarer scores only one heart trick instead of three. This represents a difference of two tricks, or the difference between making eight tricks and 10.
East should reason that if declarer has only two hearts — a virtual certainty given West’s play of the three at trick two, indicating an odd number of hearts — refusing to take the queen immediately will ultimately cut South off from dummy. He can see that dummy is critically short of entries and should defend accordingly.
Usually, the holdup play is utilized by the declarer, but there are many cases — and this is one of them — where the defense can successfully adopt the same strategy.
Tomorrow: Win a lot, lose a lot.
Bridge by Steve Becker
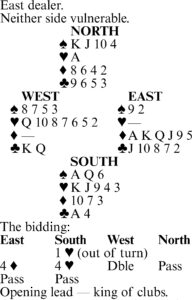
A player seldom gains by making an opening bid out of turn, but here is a case where the offender reaped the harvest.
East was the dealer, but South opened the bidding with one heart before East had a chance to act. In accordance with the Laws of bridge, the out-of-turn bid is canceled, and the player whose turn it was to call may then open the bidding or pass. Subsequent penalties may apply, depending mostly on the action taken by the player whose turn it was to bid in the first place.
In this case, East elected to open with four diamonds. South, aware that his partner, in accordance with the Laws, would have to pass at his first turn to bid, boldly bid four hearts, which West of course doubled.
Everybody passed, and West led the king of clubs. It is true, in a sense, that West had five trump tricks and East had three diamond tricks. But despite that, South wound up making the contract!
He won the club lead with the ace and played a trump to dummy’s ace, learning that West had all seven missing trumps. South then cashed four spade tricks, discarding his remaining club as West helplessly followed suit. After ruffing a club at trick seven, South’s last six cards were the K-J-9 of trump and 10-7-3 of diamonds, while West held the Q-10-8-7-6-5 of trump.
Declarer now led a diamond, forcing West to ruff and return a trump into South’s K-J-9. Declarer then led another diamond, forcing West to ruff and lead still another trump into the K-J for tricks nine and ten.
The lasting effect of the deal was that South vowed not to tempt fate ever again by bidding out of turn, while poor West promised to be a little more cautious with his penalty doubles in the future!
Tomorrow: Duck soup.
Bridge by Steve Becker
There are times when declarer must do something extra-special to accomplish his mission. Usually, the required play is well off the beaten path, and the difficult part lies not so much in executing it, which might be easy, but in recognizing it in the first place.
Take the present case where South was in five diamonds and West led the king of hearts. Declarer won with the ace and played the ace and another trump to the jack. He then led a low club from dummy, planning to play the nine if East followed low. But East put up the jack, and South had to take it with the ace.
Declarer next tried the king and another club, hoping West would have to win the third club. But East won with the queen and returned the queen of spades, and South went down one.
Declarer was very much on the beam in trying to establish dummy’s clubs without allowing East to gain the lead for the killing spade shift, but his thinking did not go far enough. There was a way to establish the clubs without losing the lead to East, but it was not easy to see. The winning play is to refuse to take West’s king of hearts lead at trick one!
Let’s say West continues with a heart to the ace (he has no more effective play). In that case, South discards a club, cashes the A-K of trump, then plays the A-K of clubs and ruffs a club. A diamond to the ten allows South to discard two spades on dummy’s 8-7 of clubs, and he winds up losing only one spade trick.
By willingly surrendering the first trick to West, declarer ultimately gets two tricks in return. Instead of losing a club and two spades, he loses a heart and only one spade, and that is a profitable transaction no matter how you look at it.
Tomorrow: Bidding quiz.
Bridge by Steve Becker
Declarer is not expected to play every hand as though all 52 cards are exposed, but, despite this, he should only rarely fail to get the most out of a hand.
The nature of the game is such that sound reasoning is usually well-rewarded. If declarer realizes after a hand is over that he went down in a contract he could have made, he should review his plays objectively to see whether he could reasonably have found the winning line of play.
Take this case where South failed in a slam after winning the spade lead with the ace, drawing trump and finessing the jack of clubs. East took the king and returned a spade to put a quick end to the proceedings.
It might seem unfair to condemn declarer for having lost a trick to East’s singleton king, but, just the same, South should have made all the tricks!
As soon as dummy comes down, declarer can see that a successful finesse in either diamonds or clubs would allow him to discard his spade loser and make the slam.
Choosing one finesse over the other is not a matter of luck, even though theoretically there’s a 50-50 chance that West has either king.
The deciding factor is that opting to take the diamond finesse is better because it can be preceded by the play of the ace of clubs, which has a chance of catching the singleton king in either opponent’s hand.
This possibility should not be ignored because, mathematically, when four to the king of suit are missing, the king will be singleton about one time in eight.
Of course, if the king does not fall on the ace, declarer has the diamond finesse in reserve, and in that way, he gets two chances to make the slam instead of just one.
Tomorrow: You too can be a genius.
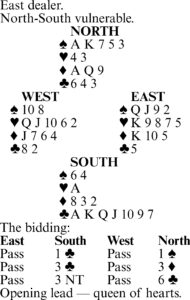
Bridge by Steve Becker
Anyone can take tricks with aces and kings; the real challenge lies in taking tricks with lower-ranking cards. Consider this deal where declarer made four spades. West started with the K-Q-A of clubs, South ruffing the third club as East discarded a heart. Declarer drew trump, lost a heart and made 10 tricks without breathing hard.
The outcome seems normal, but in fact better defense would have stopped the contract. Upon viewing the dummy, West can place South with the A-K of spades and ace of diamonds for his opening bid. After the queen of clubs holds at trick two, West should conclude that the only chance for the defense lies in scoring a trump trick that does not exist naturally.
West should therefore lead a low club instead of the ace at trick three to force East to ruff dummy’s jack. As it happens, East is able to ruff with the eight, after which South must go down one, whatever he does. Declarer’s best play is to overruff with the king, hoping the remaining trumps are divided 2-2, but when West turns up with the J-10-x, the contract is down one.
Note that West does not lead the K-A and a low club, since East might make the mistake of ruffing the third club low, thinking South has the queen. Instead, West leads the K-Q of clubs, announcing that he has the ace, and then continues with a low club to emphasize the need for East to ruff with his highest trump.
Tomorrow: Spectacular but reasonable.
Bridge by Steve Becker
This deal occurred in the final of the 1992 U.S Bridge Championship. The declarer was Michael Rosenberg, who reached three notrump after his partner had used a variation of Stayman.
West, Norman Kay, who knew by inference that each opponent held a major suit, elected to lead a low club, which proved quite helpful to declarer. Even so, it still left Rosenberg with a lot of guessing to do.
Rosenberg took East’s jack with the king and led the four hearts to dummy’s jack. East, Edgar Kaplan, won with the queen and returned a club to Kay’s ace. Kay exited with the club nine to South’s ten.
Rosenberg now led his remaining heart and misguessed again when West followed low, losing the nine to East’s ten. Declarer won Kaplan’s club return with the eight as Kay discarded a spade.
Still in search of his ninth trick, Rosenberg cashed the spade ace and then played the K-Q-A of diamonds, hoping for a 3-3 division. But when Kay discarded a heart on the third diamond (reducing himself to the heart ace and Q-10 of spades), Rosenberg was at the crossroads. With the K-J-4 of spades in his hand and the spade eight and K-5 of hearts in dummy, he had to decide whether to try a spade finesse or attempt an endplay.
Rosenberg reviewed what he had learned to this point. Kay had led from a three-card club suit and had started with two diamonds, marking him with eight cards in the majors. Kay was thus a favorite to have started with four (or five) spades, increasing the likelihood that he held the queen, so the spade finesse was not likely to work.
So, Rosenberg led a heart from dummy, forcing Kay to win with the ace and lead a spade into the K-J, and the game was home.
At the other table, North became declarer at three notrump. Without the helpful club lead, he had little chance, and he finished down one, losing 10 IMPS.
Tomorrow: High-class defense.
(c)2026 King Features Syndicate Inc.
Lifestyles

Tuesday evening TV listings for July 21
Antibiotic ointment cures foot odor
Q. It was suggested that I apply a thin coat of antibacterial ointment on my feet when they get smelly. One ...
TO YOUR GOOD HEALTH: When your legs are 2 different lengths
DEAR DR ROACH: I’m an 80-year-old female who sustained a right femur fracture in February. I had surgery within ...
Bridge by Steve Becker for July 21
Health notes
To include or update items in the weekly Health News list, email information to tmunnell@tribtoday.com or ...
DEAR ANNIE: Kids’ sports have squashed their summer fun
DEAR ANNIE: I always pictured summer as the one time of year when our family could finally slow down. During the ...