
Trending
From time to time, a hand occurs where it seems declarer must fail, and yet he somehow or other gets home safely. Surprisingly, the solution often turns out to be fairly simple.
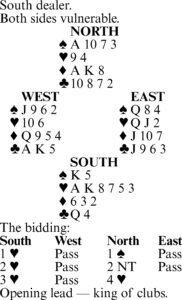
Consider this deal where West led the K-A and another club against four hearts. Declarer ruffed East's nine of clubs and appeared to be faced with a hopeless task, since he had to lose a diamond and also at least one trump trick.
But South was not the type of player to give up without a fight. He saw that if the opposing cards were favorably distributed, he would able to score 10 tricks before the opponents could score four.
Accordingly, after cashing the A-K of trump, declarer led a diamond to the king and ruffed dummy's ten of clubs. He then cashed the king and ace of spades and ruffed a spade.
With everything going smoothly thus far, South now had only one more hurdle to clear. At this point he was down to only three cards -- two small diamonds and the eight of trump, while dummy had the ten of spades and A-8 of diamonds, and East the queen of trump and J-10 of diamonds.
At trick 11, declarer crossed to the ace of diamonds and returned dummy's ten of spades, placing East in a hopeless position. If he ruffed, South would discard his diamond loser and score his 10th trick with the eight of trump; if East discarded instead, South would ruff with the eight to score the game-going trick.
Either way, declarer would cross the finish line with 10 tricks -- two spades, two diamonds and six trumps -- before the defenders could collect their four seemingly impregnable tricks.
Tomorrow: A play fit for a king
(c)2026 King Features Syndicate Inc.