Bridge by Steve Becker
A defender should assume, as a matter of course, that the contract he’s defending against can be defeated. If he does not cultivate this attitude as a regular habit, many opportunities to defeat opposing contracts will pass him by.
Let’s say you’re East on this deal and partner leads the heart four against three notrump. Should you take the ace or withhold it? If you do take the ace, is it better to return a heart, or should you shift to another suit? If you do shift, should it be to a spade or a club?
To find the answers to these questions, you must start by assuming that the contract can be defeated. The next step is to count the number of tricks declarer is sure to make. A quick survey reveals that there are eight of them in dummy consisting of five diamonds, a club and two hearts whether you take the heart ace now or later.
This, in turn, should lead you to conclude that if declarer has the ace of spades, he cannot be defeated. You therefore credit partner with the ace. Once you’ve reached this point, it becomes much easier to answer the questions posed above.
First, you must win the heart at trick one, because if declarer has the K-Q of clubs, he can score a heart, five diamonds and three clubs before your side regains the lead. Second, you should not return a heart for the same reason.
Third, since partner needs to have the spade ace for the contract to be defeated, you must shift to a spade. But you can’t lead just any spade. If you return a low spade and South has Q-x-x, as in the actual deal, he can make the contract by playing low from his hand.
To cater to this possibility, you must return the spade jack to trap South’s queen. Regardless of how declarer proceeds once the jack is led, he cannot stop you from collecting four spade tricks, and the contract is defeated.
Tomorrow: Bidding quiz.
Bridge by Steve Becker
Whenever declarer is playing a suit contract, he is faced with the questions of whether or not to draw trump, whether or not to take certain finesses, whether to try to establish a long suit, and so on.
Some or all of these things might have to be done, but the order in which they take place is often of prime importance. Timing frequently spells the difference between the success or failure of a contract.
Take this case where South was in four hearts and West led a spade. He won with the ace and immediately led the jack of trump and finessed, losing to the queen. Back came a spade to South’s king. Eventually, he lost four tricks — a spade, two hearts and a diamond — and went down one.
Declarer failed to make the contract because he did not get his priorities in order. By tackling the trump suit first, he in essence pinned all his hopes on limiting himself to one trump loser.
South should have seen that he could afford to lose two heart tricks and still make the contract, provided he escaped the loss of a spade. This could have been achieved by leading the king of diamonds at trick two. After the defense took the ace, dummy’s third diamond would provide a parking place for South’s spade loser.
Even if the king of diamonds was allowed to win, a diamond continuation would establish dummy’s third diamond as a trick. In that case, the queen of clubs would serve as the entry to dummy for the critical discard.
In most suit contracts, declarer plays trump at once. But when there is more urgent work to be done, as in this deal, declarer should delay trump extraction until a more propitious time.
Tomorrow: Step-by-step reasoning.
(c)2026 King Features Syndicate Inc.
Bridge by Steve Becker
In many deals, declarer may find it more dangerous to have one opponent on lead than the other. In such cases, he should try to shape his play so as to keep the dangerous opponent out of the lead.
Consider this deal where West leads the king of spades against five clubs. If South proceeds without giving the matter much thought, he wins with the ace and either leads a heart right away or attempts to establish dummy’s diamonds. Either way, assuming best defense, he goes down at least one.
But a really careful declarer winds up making the contract by doing a most peculiar thing. He ducks the king of spades at trick one!
This unusual play places declarer in a much more comfortable position. West can do no better than lead another spade at trick two. Declarer discards a diamond on the ace, cashes the ace of diamonds and ruffs a diamond.
South then leads a low club to the eight and ruffs another diamond, establishing dummy’s three remaining diamonds. The missing trumps are then drawn, ending in dummy, and three hearts are discarded on the J-9-8 of diamonds. Declarer thus loses only a heart and a spade and so makes the contract.
The reason the spade duck at trick one is so effective is that it allows declarer to establish dummy’s diamonds without East ever gaining the lead for a killing heart return.
It costs declarer virtually nothing to duck the first spade, because in so doing he merely substitutes a spade loser for an otherwise inevitable diamond loser. But the duck permits declarer to retain control over which opponent gains the lead, and it is therefore the correct play.
Tomorrow: First things first.
Bridge by Steve Becker
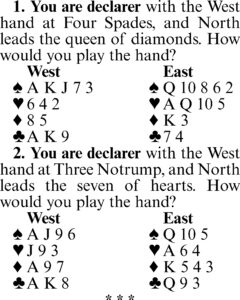
1. On the surface, it might seem that it doesn’t matter whether you cover the queen of diamonds with the king or not. But to make certain of the contract, you should duck the queen.
Assuming that South has the ace — certainly a reasonable supposition — the contract is cold if you let North’s queen hold the first trick. The trouble with the king play is that South can win with the ace and return a diamond, allowing North to win and shift to a heart. If South then turns up later with both the king and jack of hearts, you will eventually lose two hearts and two diamonds and go down one.
But if you duck the diamond, you are safe against any attack. If North continues the suit, you can win any return by South, cash the A-K of clubs and ruff a club in dummy, draw trump, then lead a heart to the ten. Even if South wins with the jack, you have the rest of the tricks against any return.
If instead North shifts to a heart at trick two, you rise with the ace, draw trump, play the A-K and ruff a club, then lead the king of diamonds. South wins with the ace, but whatever he returns, you are home, losing only two diamonds and a heart.
2. You start by assuming that North has the king of spades, since if South has it you will make at least 10 tricks via a spade finesse. You also assume that North’s seven is his fourth-best heart, which means he might have led from K-Q-8-7-x, K-10-8-7-x or Q-10-8-7-x. (With K-Q-10-7-x, he presumably would have led the king.)
The best way of dealing with these three possibilities — which constitute the only real threat to the contract — is to go up with the ace at trick one. This play fails in the first case but succeeds in the other two even when North has the spade king.
The reason for rising with the ace is that it blocks the defenders’ hearts when South started with the K-x or Q-x, while ducking the opening heart lead allows South to win and return a heart, unblocking the suit.
Tomorrow: A tantalizing problem.
(c)2026 King Features Syndicate Inc.
Bridge by Steve Becker
The idea of paying a small premium for insurance to guard against disaster has its bridge counterpart in the safety play, wherein declarer risks losing a trick he might not have to lose in order to safeguard his contract.
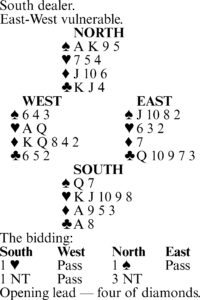
Today’s deal provides a typical example. South arrives at three notrump, and West leads a heart. Declarer takes the jack with the king and has to find the approach that offers the best chance of scoring nine tricks.
If he makes the mistake of assuming that 10 tricks are just there for the taking, he will end up a very unhappy individual. All he has to do is to cash two top diamonds in any order, and he is certain to go down one.
Before tackling the diamonds, South should count his tricks and realize that he doesn’t need to score five diamond tricks to make his game. With eight tricks already assured and only one more needed, he can afford to lose a diamond, provided East is not permitted to gain the lead for a potentially killing heart return.
Accordingly, at trick two South leads a diamond to the ace, on which West’s nine appears. A diamond is returned, and when East follows low, the eight is played.
If West is able to win with the ten or jack, declarer will have lost a trick he didn’t have to lose, but then he is certain to finish with no less than nine tricks. In the actual case, though, the eight holds, and South ends up with 10 tricks.
Note that East cannot thwart declarer by putting up the ten or jack at trick three. In that case, South simply wins the trick, re-enters dummy with a spade or a club and picks up East’s remaining honor via a finesse.
Once West’s nine appears on the first round of the suit, all roads lead to at least nine tricks, provided South applies the rule of safety first.
Tomorrow: Choosing the right line of play.
Bridge by Steve Becker
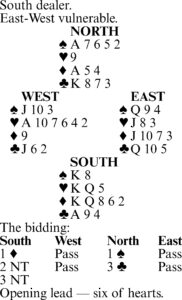
This deal was played in the 1978 World Women’s Pairs Championship. When Elizabeth Havas and Barbara McDonald of Australia held the North-South hands, the bidding went as shown. The opening two-notrump bid, as played by them, indicated a weak hand containing at least five cards in each of the minor suits. With her 23 high-card points and excellent clubs, South naturally carried on to six clubs, which East doubled.
East’s double was very questionable. As a general rule, it is unwise to double a slam voluntarily reached when the double might make the play of the hand easier for declarer.
West led a spade, won by East with the ace, and it didn’t matter what East did next. In practice, East returned the eight of hearts, ruffed by declarer in dummy. Next came the queen of clubs, and after West showed out, declarer had no difficulty scoring the rest of the tricks.
McDonald continued with a trump from dummy at trick four, taking East’s ten with the king. She then ruffed the queen of hearts and led dummy’s last trump, gobbling up East’s J-6 with her A-9 to make six clubs doubled for a top score.
Although East should not have doubled, McDonald undoubtedly would have made the slam anyway. The only threat to the contract from the start was the possibility that the trumps were divided 4-0.
If West had all four trumps, the slam could not be made, so McDonald would have had no choice but to start the trumps by cashing the queen first.
Tomorrow: The principle of safety first.
Bridge by Steve Becker
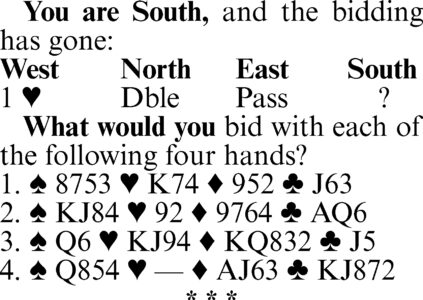
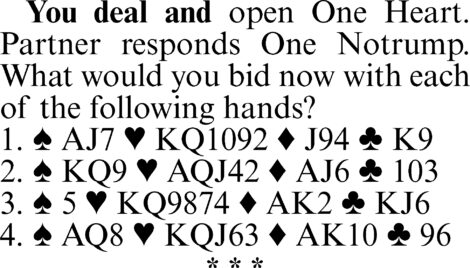
1. One spade. You might not like the looks of your spade suit, but you are not responsible for the quality of the suit you bid when you respond to your partner’s takeout double. The doubler is expected to tread gingerly after a forced response unless responder makes a strength-showing bid.
It is better to bid one spade than one notrump, which would show a hand of about seven to nine points in addition to at least one stopper in the opponent’s suit.
2. Two spades. This hand is obviously much stronger than the preceding one, so you must inform partner of that fact by making a jump-response. If you were to bid only one spade, partner would have no way of knowing that you have 10 high-card points and a decent suit. He might pass one spade, which could cost you a game. In general, the responder to a takeout double makes a single jump-response in his best suit with nine to 11 points, inviting but not forcing the doubler to bid again. (With 12 or more points, responder must make some stronger bid.)
3. Three notrump. Here, it’s highly likely that there’s a game in the combined hands. With 12 high-card points facing at least an opening bid, you must make a jump response to identify your values.
The best game contract is probably in notrump, which is why it’s better not to respond with three diamonds, an invitational bid that partner might pass. With hearts double-stopped, it seems to make more sense to aim for the nine-trick game rather than an 11-trick one. The hand is a bit too strong for an invitational jump to two notrump, which partner might pass.
4. Two hearts. You ought to feel very bullish about game prospects with this layout opposite a takeout double. However, at this point it is uncertain where the best game lies. Instead of trying to guess which suit should be trump, you can force partner to make the choice by cuebidding West’s suit.
You intend to go to game in whichever suit partner chooses. It is also possible that the combination of your cuebid and subsequent jump-raise to game will cause partner to consider slam possibilities.
Tomorrow: Swapping horses in mid-stream.
(c)2026 King Features Syndicate Inc.
Bridge by Steve Becker
It’s easy enough to see that with a low diamond lead, the declarer has the suit doubly stopped. It is far less obvious, though, that after a low diamond lead the suit is triply stopped with proper play. South failed to recognize this and, as a result, lost the contract.
He covered the diamond four with dummy’s six and won East’s seven with the nine. After playing a spade to the king, he finessed the jack of hearts, losing to West’s queen.
Back came the king of diamonds, which declarer ducked, followed by the queen. South won but could do no better than lead another heart. West took the ace and cashed the 8-2 of diamonds to set the contract.
South should have made four notrump, however. His only real concern was to establish his hearts before West could establish his diamonds, and he should have concentrated all his efforts on this one goal.
By applying the Rule of Eleven (assuming that West’s diamond lead is fourth-best), declarer can tell that East has only one diamond higher than the four. (South deducts four — the card led — from 11, leaving seven cards higher than the four in the North, East and South hands. With six of those cards in plain view, East can have only one card higher than the four.)
South should therefore play the ten from dummy on the opening lead. If East’s diamond is the seven or eight, the ten wins, and South is certain of a triple stopper. If East’s diamond is the king or queen, South wins with the ace and is again sure to have the suit triply stopped.
By playing high from dummy at trick one, South makes certain of winning the race for the establishment of his long suit. He starts out a step ahead and makes sure he stays there the rest of the way.
Tomorrow: From bad to worse.
(c)2026 King Features Syndicate Inc.
Bridge by Steve Becker
This deal occurred in the very first Bermuda Bowl world championship, way back in 1950, in the match between Great Britain and the United States. Despite the fact that the North-South hands contained only 20 points in high cards, both the English and American pairs arrived at four spades after identical auctions.
At the first table, with a U.S. pair North-South, the British West led the ace and another heart. Declarer (Sam Stayman) ruffed the second heart and played the ace and another spade. West rose with the king and led a third round of hearts.
Stayman ruffed and led a spade to the queen followed by a club to the ace. When West’s queen appeared, Stayman could claim 10 tricks — five clubs, four spades and the ace of diamonds — for a score of 620 points.
At the second table, with a British pair now North-South, the play differed considerably. West (John Crawford) chose the singleton queen of clubs as his opening lead. Declarer won with the ace and also played the ace and another spade. Crawford went up with the king and then made the dramatic — but absolutely necessary — lead of a low heart. East won with the jack and returned a club, ruffed by Crawford, and declarer eventually lost a diamond trick for down one.
Thanks to Crawford’s inspired defense, the U.S. team gained 720 points on the deal.
Tomorrow: Battle for survival.
Bridge by Steve Becker
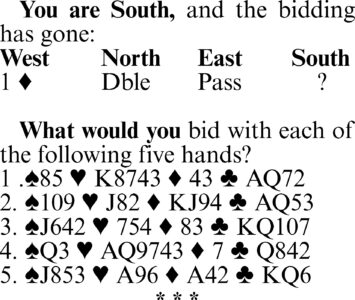
1. Partner’s one-notrump response shows six to 10 points, so you know immediately that the 26 points normally required for game are lacking. It might be tempting to bid two hearts, but that would not be the winning bid in the long run. This is a partscore hand, and the only question is whether one notrump will be easier to make than two hearts.
Granting that there are hands partner could hold where two hearts would be safer than one notrump, the fact remains that such hands are in the minority. Partner’s six to 10 points, added to your 14, should offer a good chance of producing seven tricks in notrump. The fact that you have an honor in every suit should also influence you to pass.
2. Two notrump. This is an invitational bid showing 16 to 18 points and a relatively balanced distribution. It asks partner to pass with six or seven points, but to carry on to three notrump with 9 or 10. With eight points, partner exercises his judgment.
3. Three hearts. This is also an invitational bid, but here the emphasis is on suit play rather than notrump. Partner should pass three hearts if he is in the lower end of the range for his notrump response. If he does pass, you are unlikely to miss a game.
4. Three notrump. With 19 high-card points facing at least six, you can’t afford to simply invite a game by bidding two notrump, since partner might pass.
Given partner’s failure to support hearts, three notrump is the obvious choice for game. An alternative possibility is to jump-shift to three diamonds (forcing to game), but this runs the risk of partner’s raising diamonds and could lead to disaster. Three notrump is the natural choice, and that’s what you should bid. Simplest is best.
Tomorrow: Between the devil and the D.B.S.
Bridge by Steve Becker
It is said that in the long run, good bidding is more important than good card play. This is probably true enough, but even good contracts sometimes run into bad luck, and when the play is over, it might be wise to re-examine the bidding to see whether a still-better contract could have been reached.
Consider this deal from a team-of-four match. At the first table, the bidding went as shown, and West led a heart against six diamonds. East took the ace, and West later scored a trump trick, so the slam went down one.
This was an unfortunate outcome, since South would have made the slam without a heart lead, and even with it he was a favorite not to lose a trump trick. Oddly enough, the bidding went exactly the same way at the second table, except that over five hearts South bid six notrump instead of six diamonds.
South thought he could probably make either contract. But he also felt there were more hands where he could make six notrump and not six diamonds than there were where he could make six diamonds and not six notrump.
South’s reasoning was greatly influenced by East’s lead-directing double of five hearts. South expected to make 12 tricks in notrump with a heart lead, even if it turned out that he could not make six diamond tricks.
In this he was dead right. West led a heart, and South collected five spades, one heart, two diamonds and four clubs for a total of 12 tricks and a score of 1,440 points.
Tomorrow: Bidding quiz.
Bridge by Steve Becker
This deal occurred in a team-of-four match. At both tables, South was declarer at three notrump and West led a club.
At the first table, declarer ducked East’s queen and ten of clubs and won the third club with the ace. He then led a heart to dummy’s eight, losing to the queen, and won East’s diamond return with the king.
Another heart lead to dummy’s jack lost to East’s king, but declarer had the rest of the tricks and so made exactly three notrump.
At the second table, however, South went down two, a result which came about in a perfectly reasonable manner. Here also, East won the opening lead with the queen of clubs and returned the ten, ducked by declarer. But West, recognizing the futility of persisting with clubs, overtook the ten with the jack and shifted to the queen of diamonds.
Declarer was helpless against this attack from a new quarter. He took the queen with the king and finessed the eight of hearts, losing to the queen. Back came a low diamond, West’s jack forcing dummy’s ace. When South now crossed to his hand with a spade and tried another heart finesse, East won with the king and cashed two diamond tricks to put the contract down two.
Certainly, the defense at the second table was much more sensible than it was at the first. West saw no future in clubs and shifted to a diamond at trick three, hoping East held either the king or ten.
It is true that East might have held a different hand that would have made a diamond shift ineffective. But in that case, it was likely that every other method of defense would also fail.
Tomorrow: Sophisticated bidding.
Bridge by Steve Becker
The two-way finesse is usually associated with a missing queen, but sometimes declarer finds himself faced with guessing which opponent has a crucial jack or ten.
If the North-South diamonds in today’s hand are examined, it can be seen that declarer must lose tricks to the missing ace and king. But he may also lose a trick to the ten, unless he successfully guesses which opponent has that card.
When the deal occurred, declarer won the spade lead with the king, drew trump, led a spade to the ace and ruffed a spade. Next came a club to the ace, followed by a club to the jack, losing to the queen. West exited with a club to South’s king, bringing declarer face to face with the diamond suit and a critical guess for the ten.
He started by leading a low diamond toward dummy, on which West followed low. Had South played the eight, he would have made the contract. But when he played the jack instead, East won with the king and returned a diamond, and South had to go down one.
Though one may sympathize with declarer’s misguess, the degree of sympathy should be tempered somewhat, since he missed a sure way to make the contract. Had he played correctly, he could have avoided the diamond guess altogether.
The proper play after drawing trump and ruffing a spade is to lead the A-K-J of clubs, declining the finesse in that suit. This leaves the opposition in a hopeless position.
Whichever defender wins the trick must yield a ruff-and-discard or return a diamond. In the latter case, declarer simply plays low from the next hand, guaranteeing that either the queen or jack will become a trick.
Guessing is quite often unavoidable, but why guess when you don’t have to?
Tomorrow: A switch in time saves nine.
Bridge by Steve Becker
If you’re a good bridge player and are lucky besides, the combination might make you well-nigh invincible.
For an example of what these two ingredients, properly mixed, can produce, we present this deal from the 1956 Masters Pair championship, won by Alvin Roth and Tobias Stone. Stone wound up in six spades after the somewhat optimistic sequence of bids shown.
The contract seems impossible to make, since declarer has a diamond loser and a long string of clubs to take care of. True, declarer’s last club can be established by ruffing three clubs in dummy, but since one ruff would be with dummy’s queen, this would establish a trump trick for the defense.
Despite these hazards, Stone made the slam by timing his plays perfectly and finding a way to avoid the diamond loser. He trumped the club lead in dummy and cashed the ace of hearts. He then ruffed a heart, ruffed a club and cashed the spade queen before ruffing another heart.
After playing the A-K of trump, his remaining cards were the A-9 of diamonds and A-9-8 of clubs, while East had the K-J-2 of diamonds and K-Q of clubs. Stone then led the A-8 of clubs, forcing East to win
and return a diamond to dummy’s queen, and the slam was home.
Observe that if East had been farsighted enough to drop his K-Q on the early club plays, he would have averted the endplay and defeated the contract. That, plus the favorable distribution of the opposing cards, was where the luck element came in, but it still took a substantial degree of skill to take advantage of the situation.
Tomorrow: Simple solution to a quandary.
(c)2026 King Features Syndicate Inc.
Bridge by Steve Becker

One of declarer’s greatest enemies is complacency, which frequently develops when, after viewing dummy, declarer decides there’s really nothing to the play.
Consider this deal where South is in four hearts. He wins the spade lead with dummy’s ace, and, without giving the matter much thought, next leads a heart to the ace, planning to draw trump and later discard a club on one of dummy’s high diamonds for an overtrick.
But if declarer leads a trump to the ace at trick two, he goes down one. After discovering the 3-0 trump break, the best he can do is play a diamond to the queen and East’s ace. East then cashes a spade and shifts to a club. Declarer takes his A-K of clubs and exits with a club.
After East takes the queen and returns a diamond, declarer, reduced to nothing but trumps, has to ruff and concede a trick to East’s queen of trump for the setting trick.
A more cautious declarer would adopt a different approach, however. Before leading a trump to the ace at trick two, he would stop and ask himself what, if anything, might jeopardize the contract. After concluding that the only threat was a 3-0 trump division, he would then channel all his thoughts into guarding against that possibility. This, in turn, might lead him to the winning line of play.
To protect against a 3-0 distribution with East holding all three trumps, the correct play is to lead a trump from dummy at trick two and finesse the jack after East follows low! If the jack wins, the battle is over then and there.
And what if the finesse loses? In that case, the best West can do is to cash a spade and lead a club. Declarer wins, draws the one missing trump and concedes a diamond to the ace. South takes the club return, crosses to the nine of trump and disposes of his club loser on dummy’s high diamond to make the contract.
Tomorrow: The road to winning defense.
(c)2026 King Features Syndicate Inc.
Lifestyles

Girard church organist plays her last note
Religion news
CHURCH HOSTS CONCERT: Cortland Nazarene Church, 293 E. Main St., Cortland, will have a concert with Dan Schall at ...
Vance writes of journey to Catholicism in ‘Communion’
Vice President JD Vance, a convert to Catholicism whose faith has been central to his adult life, writes about his ...
TO YOUR GOOD HEALTH: Value of RFA for pain in shoulder
DEAR DR. ROACH: Could you please comment on radio- frequency ablation (RFA) for chronic shoulder pain with ...
Bridge by Steve Becker
How caring for aging parents brings families back together
In spite of burnout and exhaustion, most Americans who are caring for an aging parent said it has healed their ...