Bridge by Steve Becker
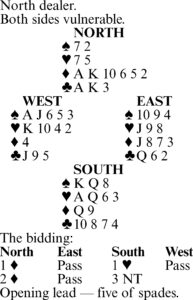
Here is the solution. Win the spade lead with dummy’s king and play a diamond to your king. Then lead a low trump and finesse the eight.
Ruff the six of diamonds with your queen and return a low heart to dummy’s ten. After ruffing the eight of diamonds with your king, cash the ace of clubs, then lead a trump to dummy’s ace and cash the ace of diamonds, discarding a club.
This is now the position:
North
[S] A
[D] Q
[C] Q 5
West East
[S] 10 9 [S] Q 4
[C] J 9 [C] K 3
South
[S] 7 3
[H] 7
[C] 10
Cash the queen of diamonds, discarding your ten of clubs. East cannot afford to discard a club on this trick since you could then ruff the five of clubs, felling the king, to make the contract. So let’s assume East discards a spade.
West also cannot find a satisfactory discard on the diamond queen. First, let’s assume he discards a spade. In that case, you would cash the ace of spades and score your 13th trick with the seven of spades.
So let’s say West discards the nine of clubs in the diagrammed position. You would then counter by leading the queen of clubs from dummy, collecting East’s king and West’s jack at the same time and establishing dummy’s five. Thus, whether East elects to cover the queen or not, you score an extra club trick to make the contract.
Tomorrow: Clubbed into submission.
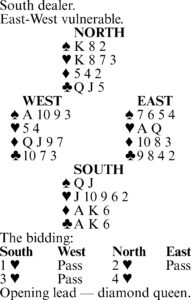
Bridge by Steve Becker
The race for the establishment of tricks is a key feature of notrump contracts. Given enough time, each side would be able to develop and win more tricks than it might in the ordinary course of events.
In this deal, for example, South starts with eight tricks and would have no trouble making 10 if he could get the opponents to cash the A-K of diamonds right away. He would in the process acquire two diamond tricks, which he does not have ready-made, and the play would essentially be over.
But if the defenders function efficiently, they can win the race against time and defeat the contract. Assume West leads the four of diamonds and East wins dummy’s queen with the ace. (The purpose of the queen play by declarer is to get East to return a diamond, which East might not do if the queen remained in dummy.)
But if East is alert, he does not return a diamond. He views the queen play with a jaundiced eye. With the deuce and three of diamonds in view in his own hand and dummy, he concludes from the lead of the four that West has at most four diamonds and South therefore also has four. So East shifts to the spade three instead.
The spade shift does declarer in. South plays the six, whereupon West takes the king and returns a spade. East ducks, of course, and South wins with the ace. Declarer can cash eight tricks but is then finished.
Finding declarer with only two spades might be viewed as a lucky shot by East, but actually it is not that unlikely on the bidding. Since South has four diamonds and opened with one club, there is a good chance he might have five clubs. Declarer’s other four cards are then almost certain to be divided two-two, giving him exactly two spades.
Tomorrow: Test your play.
Bridge by Steve Becker
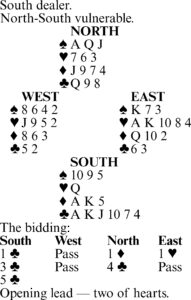
The ability to choose a line of play that will yield the maximum chance for the contract is one of the key prerequisites for good declarer play.
Consider this deal where West leads a heart against five clubs. East takes the king and continues with the ace, ruffed by South. Declarer may still lose a spade and a diamond, and if he loses both, he goes down one.
There is a strong temptation to rely on the spade finesse and, if it fails, to fall back on playing the A-K of diamonds in the hope of felling the queen. Although there’s a very good chance that one of these possibilities will succeed, declarer shouldn’t settle for this approach before checking to see if he can elevate his chances even further.
Accordingly, he should start by cashing the A-Q of trump, hoping for a 2-2 division. When this occurs, he ruffs dummy’s last heart, setting the stage for a possible endplay. He then plays the A-K-5 of diamonds.
These preliminary maneuvers are well-rewarded when East wins with the queen and finds himself up against the proverbial stone wall.
If he returns a spade, declarer wins with dummy’s jack and gets rid of his other spade loser on the jack of diamonds. If East returns a heart instead, South discards a spade from his hand as he ruffs in dummy and then discards a second spade on the jack of diamonds. Either way, South makes the contract without risking the spade finesse.
Tomorrow: Timing is everything.
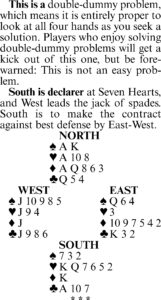
Bridge by Steve Becker
There are times when the outcome of a contract depends on whether or not declarer makes his plays in the right order. This factor is called timing.
Today’s hand provides a typical example. South got to four hearts as shown, and West led the queen of diamonds.
Declarer won with ace and led the jack of trump, West following low. South stewed a while — what he did made no difference in the actual hand — and then played low from dummy. East won with the queen and returned a diamond. Declarer eventually went down one, losing a spade, two trumps and a diamond.
South should have made the contract, however. The fault lay in the order of his plays. Instead of leading a trump at trick two, he should have led a spade, preferably the jack. The best West can do in that case is to rise with the ace and lead another diamond.
South wins with the king and cashes the queen of spades. He then crosses to dummy with a club and discards his diamond on the king of spades. The only tricks declarer loses on this line of play are a spade and two trumps.
Note that the critical difference between the two methods of play is the question of timing. The recommended line of play allows declarer to establish a spade winner before the defenders can establish a diamond winner, allowing declarer to win the race against time.
While it is true that in the majority of deals, declarer tackles the trump suit as soon as possible, it would be wrong to do so in the present case, as it unnecessarily jeopardizes the contract.
Tomorrow: Weighing the risk factor.
Bridge by Steve Becker
What happens when two players with a great deal of imagination collide with one another? Something’s got to give, and it did in this hand from a tournament many years ago.
West opened as dealer with four hearts. It was certainly a well-timed preemptive bid, since North-South had the balance of strength. North doubled — most partnerships these days play this as takeout — and South had far too good a hand to bid a mere four spades.
South thought there might be a slam in spades if North had the right hand, but he had no way of knowing whether a slam could be made, particularly since he had two losing hearts. So he consulted partner about it by jumping to five spades, and North, of course, bid six.
West led the ace of hearts, and as anyone can plainly see, making six spades should be no problem. But South ended up down one!
On the ace-of-hearts lead, East (Jack Ehrlenbach) played the king! West continued with a heart, and declarer, assuming that West had a nine-card suit, trumped with dummy’s king.
Declarer then led the seven of spades from dummy, East playing the six. South’s imagination now started working overtime. He had seen East follow to the second heart lead, which led him to wonder why East had played the king at trick one.
South concluded that the only explanation was that East had started with the J-10-6 of spades and was trying to develop a trump trick for himself by panicking South into ruffing the second heart with the king. So declarer finessed the seven, lost to West’s singleton jack and went down one.
We offer no opinion about South’s play, which might have turned out right, but you have to hand it to Ehrlenbach for concocting a scheme that gave South a chance to go wrong.
Tomorrow: First things first.
Bridge by Steve Becker

1. Pass. Hands containing 14 high card points are mandatory opening bids, even though they might contain no attractive suit to name. Here, you had no choice but to start by bidding a three-card club suit.
When partner raises to two clubs, indicating six to 10 points, it is obvious that there is no game in the offing. Since partner has guaranteed at least four clubs for his raise and at the same time denied possession of a four-card major, you have no better alternative than to settle for a partscore with clubs as trump. To bid again at this point would indicate game-going aspirations and would probably result in a minus score.
2. Three diamonds. You can’t be certain whether the best game contract is in hearts, diamonds or notrump, so you jump to three diamonds (forcing) to compel partner to help make the choice. You plan to bid four hearts over three hearts, five diamonds over four diamonds, and to pass if partner bids three notrump.
3. Two hearts. The jump-shift tells partner there is a game in the combined hands and forces partner to bid again, which you can well afford to do even though partner might have only six points. Game, and possibly a slam, is very likely, but you have no idea whether it is in clubs, diamonds, hearts or notrump. If you were to bid only one heart (not forcing) and partner passed, you’d almost surely have missed a game in hearts or some other denomination.
4. Three diamonds. You have values well above a minimum opening bid, and it is now time to let partner know. Although you have the high-card values for a jump to three notrump, you don’t have the balanced distribution that this would indicate.
Three diamonds strongly suggests a 6-4-2-1 pattern and might pave the way to a good slam. You might still wind up in three notrump, if that is what partner bids next, but at least he will know the type of dummy to expect when it appears.
Tomorrow: Planning the play.
Bridge by Steve Becker
This hand occurred in a multiple team-of-four match. At most tables, West opened with a spade despite holding only 10 high-card points. Most of the North players doubled one spade rather than overcall with two diamonds, and the bidding then took off in different directions at the various tables.
At one table, the auction went as shown, South taking a blind stab at six clubs, which proved to be laydown. At other tables the contract was four or six hearts, or five or six clubs, and in each case — except one — declarer scored the obvious 12 tricks.
Our story concerns itself with what happened at this one table, where South became declarer at six hearts rather than six clubs. Here West decided that, on the bidding, the chances of stopping the slam with normal defense were virtually nonexistent. And so, instead of leading the king of spades, he led the four!
No truer arrow was ever shot! Declarer followed low from dummy, on which East played the six, and West died a thousand deaths before South produced the deuce.
It did not take long for East to figure out why West had underled the A-K-Q of spades. He dutifully returned a club, and West’s ruff sank the slam.
Had West made the more normal lead of a high spade, South would have made the slam easily. But with West’s imagination working overtime, South had to pay off to a well-reasoned opening lead.
Tomorrow: Bidding quiz.
Bridge by Steve Becker
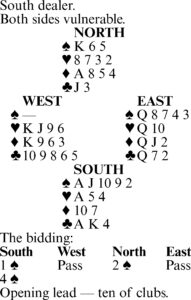
At first glance, it might seem that South must go down one in four spades on this deal from a team contest. Because of the 5-0 spade split, he appears destined to lose two hearts, a diamond and a spade. But declarer made his contract with careful play, and there wasn’t anything the defenders could do about it after West made the normal lead of the club ten.
South covered the ten with the jack and took East’s queen with the ace. Declarer then played the king of clubs, ruffed a club in dummy and cashed the king of spades, disclosing the horrendous trump break. After pausing to catch his breath, South took stock.
He could count five tricks in the side suits, including the club ruff already taken in dummy. If he could score all four of the spades remaining in his hand, he would have 10 tricks. Accordingly, he adopted a line of play that virtually assured this objective.
At trick five, he led dummy’s last spade to his jack and then made the key play of ducking a diamond. East won with the jack and switched to the queen of hearts, but declarer was in full control.
He won the heart with the ace, led a diamond to the ace, ruffed a diamond with the spade nine and exited with a heart. Regardless of who won the heart or what was returned, South could not be stopped from eventually scoring his A-10 of spades, and the contract was home.
Note that if declarer plays the ace of diamonds on the first round of the suit, he goes down against best defense. At some point, he will be forced to ruff a diamond or a heart in his hand after the defenders have collected three tricks in the red suits, and he will then have to lose a trick to East’s queen of spades.
Tomorrow: Imaginative defense.
King Features Syndicate Inc.
Bridge by Steve Becker
Bridge is essentially a game of logic. The more keenly a player reasons, the better he will do. General rules can be memorized and are certainly helpful, but they can easily be misapplied.
Take this case where it is easy to go wrong. South wins East’s nine of spades with the king and obviously must attack diamonds, his most promising suit. But when he makes the normal play of the queen and another diamond, West shows out, and South is in deep trouble. He can now do no better than continue the suit, and after East takes the jack and returns a spade, the defenders collect four spade tricks for down one.
Correct play produces 10 tricks. In the given circumstances, declarer should not impulsively attack diamonds in the usual fashion but should first consider the possibility of a 4-1 division and try to protect against it.
To that end, South should lead a club to the king at trick two and return a low diamond, planning to finesse the nine. He does not mind if the nine loses to the jack, because with West on lead, the queen of spades is impervious to attack, and no other return by West can do him any harm.
As it happens, the nine wins, and South coasts home with at least 10 tricks. But note that even if the finesse loses to the jack, he is still sure of nine tricks — five diamonds, two clubs, a spade and a heart — whatever West returns.
To start the diamonds by cashing the queen first is a bow to normal procedure that is not justified in the present case. The safety play in diamonds virtually assures a favorable outcome.
Tomorrow: Vanishing act.
Bridge by Steve Becker
Nearly all the attention to the U.S. victory over Italy in the 2003 world championship was focused on the last two deals, which saw the U.S. overcome a 21-IMP deficit to win by 1 IMP.
But another deal that made a critical difference in the outcome occurred earlier in the 128-board match. Italy’s Norberto Bocchi and Giorgio Duboin held the North-South cards in the auction shown. North’s two-club response was artificial, after which a series of relay bids ended with North-South in six spades redoubled.
Bob Hamman, West, led a diamond, the suit his partner had doubled. Duboin put up dummy’s ace, led a heart to the ace and played a second heart, planning to ruff a third round of hearts in dummy, if necessary, and so make the slam.
Hamman won the heart with the jack and, knowing what Duboin did not know — that the trumps were divided 4-0 — cleverly continued with the king of hearts. Duboin ruffed with dummy’s jack to forestall a potential overruff by East and then cashed the ace, discovering that he now had to lose a trick to Hamman’s ten for down one.
Had Duboin cashed the ace or jack of spades before starting to play the hearts, he would have uncovered the trump situation and then easily made the slam.
At the other table, the U.S. North-South pair stopped in four spades, making five, to give the U.S. a pickup of 12 IMPs. Had Duboin played a high trump from dummy at trick two, however, Italy would have gained 15 IMPs and won the title by 26.
Tomorrow: Abnormal procedure.
Bridge by Steve Becker
1. One spade. Your spades are admittedly weak, but there are other factors to consider besides the strength of the suit. You can’t bid two diamonds because that would promise 10 or more points, and you can’t bid one notrump because you might miss a spade fit.
The one-spade response allows a spade fit to be found and also makes it possible to play the hand in one notrump if that is partner’s next bid. One spade promises no more than six points, though it might, of course, be based on many more.
2. Four spades. This is clearly the most descriptive bid you can make. It indicates a hand with which you might have opened four spades preemptively as dealer and thus has a completely different meaning than two spades, which would be a jump-shift implying a possible slam.
Four spades also gives partner the best picture of what might be needed to make a slam if he happens to have a hand containing sufficient strength in the other three suits.
3. Two diamonds. Here the problem is how to deal with a hand too good for one notrump or two hearts, which would indicate six to 10 points, and not good enough for two notrump, which would show enough points for game, or three hearts, which would promise better hearts.
When confronted by this problem, it is necessary to bid a side suit first, intending to follow partner’s assumed minimum rebid with a further bid that invites, but does not commit, the partnership to game.
4. Two hearts. It is far better to raise partner at once than to misrepresent your strength by responding with two clubs. The heart raise shows six to 10 points, which is exactly what you have. A two-club bid followed by a raise in hearts at your next turn would imply more in the way of points than you have — as in the preceding problem. Whenever possible, it is best to limit yourself to a specific point-count range at once and let partner carry on from there.
Tomorrow: The vanishing trick.
Bridge by Steve Becker
It happened in Dead Man’s Gulch many years ago. Twelve good men and true listened attentively to the evidence. It seems that East — in a fit of rage in the middle of a hand — suddenly pulled out his six-shooter and let his partner have it. East was promptly hauled into court before judge and jury and tried for murder.
The facts were not disputed. The defendant told his story, which was confirmed by the two other surviving players as well as two kibitzers.
It was agreed that South got to six notrump as shown. The fact that six diamonds was laydown was not even discussed.
The deceased led the queen of hearts. Declarer won with the king and saw that he could not make the slam without making use of dummy’s diamonds. So he led a diamond and finessed the queen.
The defendant smoothly played the eight, and dummy’s queen won the trick! East had concluded that he could not defeat the slam unless South could be induced to take another diamond finesse, in which case dummy’s diamonds would become useless.
It is not possible to state definitively whether East’s ingenious play would have succeeded. After the diamond queen held, South cashed five club tricks. The deceased followed to three rounds of clubs, next discarded a heart and then — a diamond!
South immediately led a diamond, but even before he could play the ace and catch East’s king, three shots rang out.
Now, if you were in the jury box and had to cast a ballot, how would you vote? Guilty? Or would you say it was justifiable homicide?
Tomorrow: Bidding quiz.
Bridge by Steve Becker
First, you should conclude that the slam cannot be made if the trumps are divided 4-1. This is because if either defender had four trumps and you drew them, you’d have no more trumps and would automatically go down two. You therefore start by assuming a 3-2 trump division.
You next consider how the missing five hearts might be divided. Again, you make an assumption before proceeding. Oddly enough, this time you assume that the hearts are not divided 3-2 because, if they are, you are sure to succeed.
It’s not that you don’t want the hearts to be divided 3-2 –you’d be delighted if they were — but that you would like to arrange your play so as to guard against a 4-1 division, if possible (you have no chance against a 5-0 break).
Once you assume the 4-1 heart division, you have to decide how to handle the case where North has four hearts, and then the case where South has them.
At trick two, you cash the ace of hearts, on which South plays the ten. Next you cross to dummy with a diamond and lead another heart. If South ruffs, you later play two rounds of trump, cash the king of hearts, ruff a heart in dummy and so make the slam. If South does not ruff, you win the heart with the king, concede a heart to North and later ruff a heart high in dummy to produce 12 tricks.
If North has the singleton ten, jack or queen of hearts, the play is even simpler. After cashing the heart ace and seeing the ten, jack or queen appear on your left, you draw three rounds of trump ending in dummy and then lead a heart.
If South follows low, you finesse the nine; if South produces one of the two missing honors, you win with the king and return the nine to establish your two remaining hearts.
Finally, if both defenders follow low on the ace of hearts at trick two, your best chance is to cross to dummy with a diamond and return a heart toward your K-9-8-5, playing the king if South follows suit.
Tomorrow: The right road to follow.
Bridge by Steve Becker
This deal occurred years ago in a high-stakes rubber-bridge game. Looking at only the North-South cards, it is hard to believe the eventual outcome.
Certainly, North had a tough choice of responses after his partner opened with a game-forcing two-heart bid and West cramped the bidding by leaping to five clubs. It seemed likely, from North’s viewpoint, that there was a slam somewhere, and he elected to go for it in his partner’s suit. East interjected a jarring note by doubling, and West made the killing lead of a club, selecting the three rather than the queen to direct a diamond return if his partner won the first trick.
Ordinarily, declarer would have made six hearts easily, but in the actual case he suffered a catastrophe of cataclysmic proportions. East ruffed the club and returned a diamond to his partner’s ace, whereupon West led another club, East ruffing again.
East would now have had a problem as to whether to return a spade or a diamond, except that West’s second club lead had been the four, asking once again for a low-suit return. Had West been void of spades, he would have asked for that return by leading the queen of clubs instead of the four.
So East led a diamond at trick four, ruffed by West, who continued the onslaught by giving his partner a third club ruff. East returned the compliment by giving his partner another diamond ruff, after which the defense finally ran out of steam.
All told, South lost a diamond and five trump tricks to go down 1,400 points on a hand that offered nearly a 100% chance to make six hearts! Into each life some rain — in this case a monsoon — must fall!
Tomorrow: Test your play.
Bridge by Steve Becker
Here is a fine hand from a team-of-four match. At the first table, the bidding went as shown, and West led the king of spades. Declarer ruffed with dummy’s jack and played the king of trump. East took the ace and returned a trump.
Declarer won with the nine and ruffed his last spade with dummy’s last trump. Then, with the contract assured if he could draw East’s remaining trump, he played the A-K of clubs, planning to ruff the next club. Unfortunately, East ruffed the second club, and South later lost a heart finesse to finish down one.
The play started identically at the second table, where the contract was also five diamonds. Here, too, declarer ruffed the spade lead high and led the king of diamonds, East taking the ace and returning a trump. And here also, South ruffed a spade in dummy and cashed the ace of clubs — but then came a parting of the ways.
Declarer realized he would be running an unnecessary risk by continuing with the king of clubs, since there was certainly a possibility that East might ruff it. So he led a low club from dummy at this point, being perfectly willing to lose a club trick in order to ensure the contract.
West won the club with the six and returned the queen, but South was now in full control. He ruffed the club, drew East’s last trump and then discarded his heart loser on the king of clubs to finish with 11 tricks.
South’s well-thought-out safety play paid exceptionally fine dividends.
Tomorrow: He shoulda stood in bed.
Bridge by Steve Becker
The outcome of most contracts depends largely on how the defender’s cards are distributed. This refers not only to how the suits are divided, but also to the location of the missing high cards.
Nevertheless, a thoughtful declarer can sometimes overcome a bad lie of the cards by allowing for the possibility that it may exist and adopting the proper precautionary measures.
Consider this deal where West leads the queen of hearts against four spades. Declarer sees immediately that he will lose at least one trump trick and two or three diamond tricks. He doesn’t know at the outset how he will fare in either suit because he doesn’t know how the opposing cards are divided.
South begins by taking the heart queen with the ace and cashes the ace of spades. As it happens, West’s king falls. Declarer now knows he will eventually have to lose a trump trick to East’s jack.
With the trump situation clarified, declarer now turns his attention to the question of how many diamond tricks he will lose. If the diamond ace is on his right, he is in good shape, but if it is on his left, he is in danger of losing three diamond tricks and the contract.
The challenge at this point is to make the contract even if West has the ace. To guard against this contingency, declarer first cashes the king of hearts and queen of spades. He then plays the K-Q-A of clubs, followed by dummy’s ten of hearts. But instead of ruffing the ten, South discards a diamond!
West takes the ten with the jack but unhappily has no safe exit card. He must either lead a diamond or hand declarer a ruff-and-discard, and whichever he chooses, South makes four spades.
Tomorrow: The 100% solution.
Bridge by Steve Becker
Your left-hand opponent deals and bids Three Clubs, both sides vulnerable, and your partner doubles. After your right-hand opponent passes, what would you bid with each of the following four hands?
1. Three hearts. Partner’s double is for takeout, so you cannot pass merely because you have a poor hand. The only real problem is whether to bid three hearts or three spades.
Three hearts is better even though your spades are slightly stronger. Bidding three hearts increases your chances of finding the best trump suit because it leaves partner room to bid three spades if he is so inclined, while three spades does not allow partner to bid hearts on the three-level. Occasionally that might result in losing a superior heart fit.
2. Four clubs. You have a game-going hand opposite a partner who almost surely has at least 14 points.
But rather than guess whether the best game (or slam) contract lies in hearts or spades, you force partner to choose the trump suit by cuebidding the enemy suit.
The four-club bid does not guarantee first-round control of clubs, but is better used in these circumstances to show game-going values with uncertainty as to which suit should be trump.
3. Three spades. The primary purpose of a pre-emptive bid is to make it difficult for the opponents to find their best contract. That is the case here, where you must choose whether to bid three diamonds or three spades.
Either bid could turn out right or wrong, so all you can do is try to judge which is more likely to prove successful in the long run. Most experts would probably bid three spades, contending that their partner is more apt to consider whether to carry on to game in spades (10 tricks) than in diamonds (11 tricks).
4. Four spades. Here you should bid what you think you can make. It would be dead wrong to bid only three spades, which is what you’d do with a hand containing much less — possibly even no values whatsoever. Your hand is certainly much better than that.
Furthermore, jumping to four spades might stir partner into bidding a slam if he has extra values. With something like
he would certainly act over a four-spade bid, but might even consider passing a three-spade response.
Tomorrow: How to capture a king.
Lifestyles
TO YOUR GOOD HEALTH: Man, 77, baffled by ‘poop sweats’
DEAR DR. ROACH: I have such a minor question that I do not think you would want to publish it, but I’ve been ...
Keep Your Move in the Tube
Just in time for heart month, St. Elizabeth Youngstown Hospital has announced the successful implementation of Keep ...

Colorectal cancer is rising in younger adults
Bridge by Steve Becker
It did not take North-South very long to arrive at their best contract. South’s five-notrump bid was the Grand ...
HINTS FROM HELOISE: Keeping dust at bay
DEAR HELOISE: When cleaning small or hard-to-reach areas, I rely on a handheld vacuum with a brush attachment. ...
Price of Paxlovid to treat COVID-19 is shocking
Q. My husband got COVID-19 last fall. He has had great success with Paxlovid in the past, when he got it for free ...