
Trending
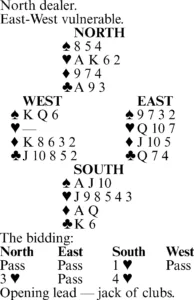
Assume you're in four hearts and West leads a club. The contract looks easy to make, but when you win the club with the king and play a heart to the ace, you get a rude shock when West shows out, discarding a diamond.
You switch to a spade at trick three, finessing the jack and losing to West's queen. Back comes a club to dummy's ace, but when you next lead a second spade and finesse the ten, West wins with the king and leads another club, which you ruff.
The situation, which looked so promising at the start, has deteriorated rapidly — you've run into an unlucky 3-0 trump division and lost two spade finesses. However, you still have a diamond finesse in reserve.
So you cross to the king of trump and lead a diamond to the queen, but that finesse also loses, and you go down one. Mighty tough luck, you could say, since the odds at the start of play were about 40-to-1 in your favor.
Yet, if you consider the matter objectively, you realize you would have made the contract had you played a bit better. After West showed out on the ace of trump at trick two, it would have been wiser to cash the ace of clubs and then ruff a club at trick four.
Now a trump to the king followed by a spade to the jack would have put West in an untenable position. He'd win with the queen, but whatever he played next would cost him a trick. A spade return would go into your A-10, a diamond return into your A-Q, while a club return would allow you to discard a diamond or a spade from your hand as you ruffed in dummy.
Tomorrow: Test your defensive play.