×

Bridge by Steve Becker

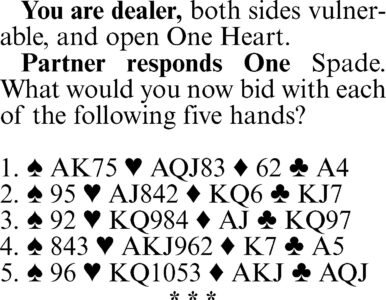
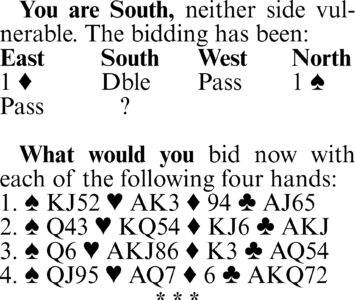
1. Two spades. Generally speaking, the double of one diamond shows at least an opening bid and implies support for the unbid suits. If the double is based on minimum values, the doubler should not bid again after his partner responds at the lowest level in his chosen suit.

Thus, if the doubler has 13 to 15 points, he should pass partner’s forced response. If he raises partner’s suit, he shows more than 15 points.

In this hand, the raise to two spades is justified by the 16 high-card points plus the doubleton diamond. Three spades would be a distinct overbid, since partner’s one-spade response could be based on virtually nothing. Change the five of clubs to the king, and a raise to three spades would be justified.

2. One notrump. The rebid of one notrump after doubling indicates a hand that was too strong to overcall with one notrump initially. If partner — who has thus far not promised anything — does not act over this invitational rebid, the chances are there is no game.

3. Two hearts. Bidding a new suit after partner makes a minimal response to your takeout double shows a very good hand, usually 17-plus points as well as a strong suit. It urges partner to bid again but also allows him to pass with a bad hand. Unless partner can act voluntarily, game is unlikely.

4. Four spades. This is not the type of hand where partner should be consulted about the possibility of making game. It is not a question of how many points partner has, because even with a poor hand, he is likely to eke out 10 tricks.

Thus, if partner had just five spades to the ten and nothing else, he would probably lose only three tricks. To play him for less than that would be unduly pessimistic.

Tomorrow: Basic card-reading.

Bridge by Steve Becker

Declarer is sometimes so certain he’s spotted the best approach to his contract that he often begins to play without stopping to double-check his plan. It is in such situations that a disciplined player restrains his impulses until he first makes sure he’s really following the right path.

For example, take this deal where West led the diamond four against six hearts. South took East’s king with the ace and quickly formulated an endplay. He drew two rounds of trump, then cashed four club tricks, discarding the jack of diamonds. Next, he ruffed dummy’s last diamond and re-entered dummy with a trump to lead a spade toward his hand.

Had East followed low, there would indeed have been a very rapid conclusion after South played the eight to force West to win the trick and concede the contract. But East rudely upset the apple cart when he inserted the nine of spades, after which South had to go down one.

Declarer had essentially the right idea at the start, but he chose the wrong way to achieve his goal. A far better approach — one that is virtually certain to succeed — is to discard the eight of spades on dummy’s fourth club and then play a diamond to the jack.

After West wins with the queen, there is no escape. He must either return a spade into the A-Q or yield a ruff-and-discard by returning a diamond. Either way, the contract is made.

By discarding a spade rather than a diamond on the fourth club, South guarantees a successful outcome if West — as seems highly likely from the play to the first trick — has the queen of diamonds. Even if East unexpectedly turns up with the queen, South still has the spade finesse to fall back on.

Tomorrow: Bidding quiz.

Bridge by Steve Becker

All things considered, there is practically no such thing as a blind guess in bridge, for there is nearly always some clue a zealous player can uncover. Some of the clues he might lean on are, admittedly, very thin, but they are better than no clue at all.

Take this deal from the Canada-France match in the 1968 World Bridge Olympiad. When the French held the North-South cards, they reached three notrump as shown, and West led the six of hearts. East took the ace and returned the jack, South (Gerard Bourchtoff) contributing the four and West the eight. East continued with the five, West dropping his queen under South’s king in order to unblock the suit.

Had Bourchtoff now led a low club to the king — which seems the normal thing to do — he would have gone down one because of the 4-0 club division. But having observed how purposefully the defenders had played their hearts, he concluded that West had fewer hearts than East and was therefore more likely to have all four missing clubs than East — if indeed there was a 4-0 club division.

Accordingly, at trick four Bourchtoff played the queen of clubs rather than dummy’s king. This proved to be an inspired move when East showed out.

Bourchtoff was then able to trap West’s J-9-4 by successive club leads toward dummy to finish with 10 tricks — an outcome attributable solely to the delicate inference he drew from the manner in which the Canadian East-West pair had played their hearts.

Tomorrow: Make haste slowly.

Bridge by Steve Becker

There is obviously a big difference between a bidding sequence that goes 1 [S]-1 NT-3 [S], and one that goes 1 [S]-1 NT-4 [S].

The one-trump response indicates six to 10 points. Therefore, if opener rebids three spades, he is asking responder to continue bidding if he is in the upper half of the range for his notrump bid, and to pass if he is not.

Expressed pointwise, responder is being urged to bid on with eight, nine or 10 points, and to pass with six or seven. The three-spade bid is thus an invitation — not a command –to responder to bid again.

A four-spade bid is made by opener when he feels he will have a good chance for game even if responder has only six or seven points. Today’s South hand, for example, is so promising for game that South should not risk being dropped at three spades.

Declarer makes the contract if he chooses the right finesse to take after his only entry to dummy is knocked out on the opening lead. If he finesses the queen of clubs, he makes the contract; if he takes the trump finesse, he goes down against best defense.

Granting that either finesse has a 50% chance of winning, the club finesse is clearly the better play. This is not because it succeeds in the actual deal, but because there is a better chance for the contract if the club finesse wins than if the spade finesse wins.

For practical purposes, the hand is over if the club finesse wins. But if South tries the trump finesse instead, he will still have to lose a trump trick if East was dealt three or more spades including the king.

Because a successful club finesse will make the contract about half the time, while a successful trump finesse won’t, it is the correct play at trick two. It is the percentage play.

Tomorrow: A slender reed to lean on.

(c)2026 King Features Syndicate Inc.

Bridge by Steve Becker

1. Four spades. Once partner responds with one spade, game must be reached. Only an avowed pessimist would think that the combined hands might not provide a satisfactory play for 10 tricks. Whether the basis for this evaluation is point count — you have 18 high-card points plus two doubletons — or simply that it is not likely that you could lose four tricks, game must be undertaken.

A raise to three spades would be wrong, as this would merely invite partner to go on.

2. One notrump. This tells partner that you have a minimum opening bid with balanced distribution, which is exactly what you have.

3. Two clubs. Hands with 5-4-2-2 distribution usually play better in a suit, so you should show your second suit rather than rebid one notrump. Although the two-club rebid is not forcing, and might even be made with a minimum hand, it can be more than a minimum and is therefore to be preferred to one notrump, which is a limited rebid. This hand should not be treated as though it were a weak opening bid.

4. Three hearts. Your additional values above a minimum opening bid can be shown by jumping to three hearts, indicating 16 to 18 points and a six-card or longer suit. Partner is not required to bid again and may pass with six or seven points.

It is important to recognize that this 15-high-card-point hand is worth substantially more because of the length and strength of the heart suit and because partner’s spade response helps cover your weakest suit. But it is not worth more than a three-heart bid because game is not likely opposite a very weak hand.

5. Three notrump. You should assume that partner has at least six points for his one-spade response. Since this brings the combined point count to at least 26, a game contract must be undertaken. The only question is how best to tell partner about the size and shape of your hand.

The jump-rebid to three notrump fills the bill perfectly. It indicates balanced distribution, about 20 points and strength in the unbid suits. It lays the foundation for a slam if partner has the type of hand that could produce a slam opposite this one.

Tomorrow: The visualization factor.

Bridge by Steve Becker

It’s funny how some players get mad at their partners. An acquaintance of mine, Abernethy C. Growler, is a member of this school. Just put 13 cards in his hand, good or bad, and he acquires the wisdom of Solomon and the autocracy of a sergeant with new stripes.

Abernethy was playing at the club one day with Aloysius Meek, and he got to four hearts on the deal shown. No sooner had dummy hit the table than Abernethy hit the ceiling. He couldn’t understand how Meek could stop short of a small slam, let alone a grand slam. And he said so in no uncertain terms.

After Abernethy calmed down a bit, he ruffed the club lead in dummy and played the K-A of hearts. When East showed out, South was in trouble. He cashed the queen of hearts and tried to run the diamonds, but West trumped the third one, and South wound up losing a trump, a club and two spades to go down one.

Mr. Meek, who is no dope, saw how South could have made the contract. After cashing the K-A-Q of trump, he could have given West his trump trick then and there and lost only a heart and two clubs.

Or Abernethy could have led dummy’s nine of hearts at trick two and let it ride as a safety measure against either opponent holding the J-x-x-x. This play would have produced 12 tricks. But all Mr. Meek said was: “I wish I had passed two hearts. Then we’d have gone plus instead of minus.”

Tomorrow: Bidding quiz.

Bridge by Steve Becker

A fine declarer plays many hands as if he can see every card in the defender’s hands. This knack of playing as if all the cards are exposed can be attributed to inferences declarer draws from either the bidding or early plays by the defense.

Consider this deal where declarer should make five diamonds even though he seems certain to lose a club and two hearts. Assume West leads the nine of spades in response to East’s opening spade bid. Since the nine is obviously West’s highest spade, declarer knows that East holds the K-10, and he should put this knowledge to good use by covering the nine with the jack. Failure to do so would cost declarer the contract after East followed low to West’s nine.

After South takes East’s king of spades with the ace, he crosses to dummy with a trump, leads a spade, and finesses the eight. Next he cashes the queen of spades, discarding a club from dummy, and then ruffs his last spade.

The stage is now set for the kill. Declarer plays dummy’s now-singleton king of clubs, saddling East with the lead, and East has no recourse. He can return a heart to dummy’s K-J, or he can lead a club or a spade, allowing South to discard one of his hearts as he ruffs in dummy. Either way, East’s goose is cooked.

Declarer’s line of play is clearly indicated from the outset. East’s opening bid virtually marks him with the ace of clubs, and West’s nine-of-spades lead tells declarer that East has the K-10 of spades. All South has to do is to put this information to good use.

Tomorrow: Bon appetit!

Bridge by Steve Becker

You lead the five of hearts, dummy plays the nine, East the three and declarer the queen. South leads a diamond, which you win with the ace. What do you play next and why?

*

1. To try to ruff a club in dummy by playing the K-A and another club would subject you to a possible overruff if South started with a doubleton (or singleton) club.

A much safer method of play is to cash the K-Q of hearts. Once you get by this hurdle (the chance of South having one or no hearts is relatively small), you lead a club to the king and start to run dummy’s hearts. If South ruffs at any point, you overruff and draw his remaining trumps to score the rest of the tricks. If South discards as dummy’s hearts are led, you finish by taking a trump finesse to make the slam.

2. The only play that has any chance to defeat the contract is the jack of spades. You know from the play to the first trick, where partner could not beat dummy’s nine, that declarer has the A-K-Q of hearts. You therefore can’t afford to play another heart, because declarer will then score three hearts, four diamonds and three clubs to finish with 10 tricks. What you hope is that South has something like:

[S] 8 5 2

[H] A K Q

[D] 7 4 2

[C] 10 9 6 5

It is known from the bidding that South does not have the ace or queen of spades, since he would not have bid one notrump (six to 10 points) if he had either of those cards plus the A-K-Q of hearts. Your only real hope, therefore, is that partner has four or five spades headed by the A-Q-10. Note that a low spade return would not succeed in that case, since declarer would play low from dummy to safeguard his contract.

Tomorrow: One up from down under.

Bridge by Steve Becker

Card-reading is the art of deducing how the opponents’ cards are divided. Each bid made and each card played by the defenders tells a story. The trick is to read the story, interpret it correctly, and then find a way, if possible, to take advantage of the knowledge gained.

Take this case where South wound up in four hearts after West had overcalled with one spade. West led the queen of spades, and East took dummy’s king with the ace. East returned a spade, taken by West, who then led his singleton diamond to dummy’s jack. Declarer’s problem now was to avoid the loss of more than one trump trick.

South realized that in order to lose only one trump trick, the missing trumps would have to be divided 3-2. But this alone would not do the job. The player with the doubleton heart would have to have the ace if the contract was to be made. Furthermore, the first heart lead would have to come from the correct hand to have any chance of success.

Since West had made a vulnerable overcall on a queen-high suit, it seemed likely that he had the ace of hearts. The first heart play therefore would have to come from the South hand.

Accordingly, declarer crossed to his hand with a club at trick four and led a low heart. West played low, and dummy’s queen won. On the next heart, East produced the ten and, with fingers crossed, South played low. West was forced to win with the ace, and the contract was home.

The key to the winning play was West’s one-spade overcall after East had turned up with the ace of spades at trick one. All that remained was to work out how to take advantage of the knowledge that West had the ace of hearts.

Tomorrow: Test your play.

Bridge by Steve Becker

Assume you’re East and partner leads a heart against three notrump. You take the ace and realize that a heart return would be pointless, since it is impossible for partner to have a holding where a heart return would be beneficial. Your best chance, therefore, is to shift to your own suit, spades.

But it is also clear that in returning a spade you should not make the normal lead of your fourth-best card. There is too good a chance that declarer has three to the king, in which case he would play low from his hand and acquire an extra spade trick.

The best way to try to beat the contract is to lead the queen of spades at trick two. You hope South has K-x-x or K-x of spades and partner has an entry card, in which case he can eventually return a spade through dummy’s J-9 after South has taken the queen with the king.

In the actual case, this approach would succeed if declarer went along with your scheme by playing his king at trick two. He could cash eight tricks in a row but would then run out of steam and finish down one.

But South can defuse your scheme by ducking the queen of spades when you lead it. He might see what you are trying to do and apply the suitable countermeasure by allowing your queen to win the trick.

Once declarer does this, he will inevitably prevail, but you should nevertheless feel satisfied that you gave your all to stop the contract and unfortunately met a foreman worthy of your steel.

Tomorrow: The science of card-reading.

Bridge by Steve Becker

Some of the most sophisticated plays in bridge are forced upon declarer by the set of circumstances he encounters. Here is a case where South had to resort to special measures to overcome a seemingly certain trump loser.

South opened the bidding with three spades, to which North responded five notrump. This was the Grand Slam Force, directing South to bid seven spades if he held two of the three top spade honors. South had no choice but to obey and so bid the grand slam.

Ordinarily, South would have made 13 tricks easily. But after he took the ace of hearts and ace of spades, ruffed a heart and cashed the king of spades, he learned that East had started with the J-9-8-2 of trump.

Declarer was now compelled to try for a trump coup, which offered the only chance to escape a trump loser. This meant he had to reduce his trump length to that of East by ruffing two of dummy’s diamonds.

So South led a diamond to the king and ruffed a diamond, then led a club to the king and ruffed another diamond, reducing his trump holding to the Q-10, while East had the J-9.

When South next led a club to dummy’s ace and started to run dummy’s remaining diamonds, East found himself in a hopeless position. Declarer was certain to win the rest of the tricks regardless of how East chose to defend, and the grand slam was home.

Tomorrow: Measures and countermeasures.

Bridge by Steve Becker

1. Six clubs. Partner’s four-notrump bid is the equivalent of a strong takeout double, so you should assume that he has adequate trump support for at least two suits.

When he next bids five spades, you should assume that he is void of spades and that diamonds is not one of his suits, as otherwise he would either pass five diamonds or bid six diamonds if his hand was strong enough. It follows that partner wants you to choose between the two remaining suits, hearts and clubs, so you should accommodate him by bidding six clubs. He might have any of the following hands to justify his bidding:

[S] — [H] AKQ83 [D] A5 [C] AKJ972

[S] — [H] KQJ95 [D] AK4 [C] AKJ85

[S] — [H] AKQ752 [D] AJ [C] AK986

2. Three diamonds. The presumption is that partner is not keen about notrump and is suggesting that the hand be played in a minor-suit game or slam. There is no good reason to suppress your diamond support at this point, so you should now bid three diamonds. Partner might have any of these hands:

[S] K3 [H] 7 [D] KQ8652 [C] KJ84

[S] — [H] Q85 [D] K9843 [C] KQ742

[S] K975 [H] 4 [D] KQ64 [C] KQ84

in which case the best contract would be a minor-suit slam.

3. Three hearts. Despite partner’s previous pass, you have a good chance for game, and you should pursue it by bidding three hearts. True, you have only two-card trump support, but that should not stop you from raising partner, who is sure to have either six or seven hearts or five very good ones. Partner might have any of these hands:

[S] J6 [H] QJ8752 [D] AJ4 [C] 93

[S] A9 [H] A876432 [D] 85 [C] J4

[S] 83 [H] AQJ84 [D] QJ9 [C] 532

and you belong in four hearts with each of them.

Tomorrow: Never give up.

Bridge by Steve Becker

No declarer worth his salt should deliberately jeopardize making a game in order to try for a 30-point overtrick. To do so — even when the overtrick seems highly probable — would mean risking the hundreds of bonus points awarded for making a game.

Consider this deal where West leads a spade against three notrump. Let’s say declarer wins with the queen, cashes the K-Q of hearts, crosses to the ace of clubs and plays the ace of hearts, on which West shows out. South must now go down one, regardless of what he does next.

It is certainly easy to blame the outcome on the unlucky division in hearts — the suit could have been divided 3-3, or either defender might have been dealt the singleton or doubleton jack.

But the fact is that, from the word “go,” South can absolutely guarantee nine tricks by means of a perfectly simple play. All he has to do is to cash the king of hearts at trick two and overtake the queen with the ace at trick three.

He then plays the ten of hearts to force out the jack, and in that way assures himself of nine tricks comprised of three spades, four hearts and the two minor-suit aces.

While it is granted that there is a natural reluctance to spend the queen and ace of hearts on the same trick, that is scarcely a good excuse for failing to make the play, which guarantees the contract against any division of the opposing cards. The overtrick that might be lost by this seemingly extravagant expenditure is well worth the price. Indeed, the failure to overtake the queen of hearts amounts to being penny-wise and pound-foolish.

Tomorrow: Positive and negative signals.

Bridge by Steve Becker

Assume you’re in four spades and West leads a club. The first thing you do when dummy appears is to count your losers, and this tells you that at most you will lose a club, a diamond and two hearts. You note further that if West has the king of hearts, you can eliminate a heart loser by finessing the queen. However, it’s more realistic to assume that East has the king since he was the one who opened the bidding.

If you’re a conscientious declarer, you immediately begin to look for a way to avoid the heart finesse. Long experience shows that many contracts can be made by avoiding finesses rather than by taking them, so you should make every effort to find a satisfactory alternative. And, if you give the matter serious thought, a possible solution emerges.

So, you cover West’s eight-of-clubs lead with the ten, won by East with the jack. East then plays the ace of clubs, and you take the first step in the plan you have formulated. Instead of ruffing the ace of clubs, you discard the ten of diamonds!

This play assures the contract. When East continues with a low club, you ruff high, cash the ace of diamonds, lead a trump to dummy’s queen and ruff the nine of diamonds. You then return to dummy with a trump and lead dummy’s last club, the queen. East covers with the king, but instead of ruffing it, you discard a heart!

This leaves East with no recourse. He is forced to lead a heart into dummy’s A-Q-5 or yield a ruff-and-discard by returning a diamond or a club. Either way, you wind up with 10 tricks.

Tomorrow: It pays to be extravagant.

Bridge by Steve Becker

1. One notrump. This hand meets all the requirements for an opening one-notrump bid: 15 to 17 high-card points, balanced distribution (4-3-3-3, 4-4-3-2 or 5-3-3-2) and stoppers in at least three suits.

It is far better to open with one notrump than one heart. Perhaps the most important reason is that the bid immediately pinpoints the type of hand you hold. As opposed to this, an opening one-heart bid could be based on many different distributions and a wide range of high card points.

In addition, a one-heart opening would present a difficult rebid problem if partner responded with one spade, which would make an accurate rebid impossible. The way to avoid this problem is to open one notrump initially and let partner take it from there.

2. One diamond. Balanced hands containing 18 or 19 points do not fall into the category of a one- or two-notrump opening bid. Such hands are opened with one of a suit followed by a jump in notrump at the next opportunity.

3. One club. Here you have no legitimate suit with which to open the bidding, since your spades and hearts are not long enough or strong enough to mention, and you have only three clubs. But since a 14-point hand must be opened, something must be done. One club is easily the best choice, since it keeps the bidding low and allows for the discovery of a major-suit fit if there is one.

4. One club. Here also, the best initial bid is one club. This allows you to bid spades at your next turn if partner responds with a diamond or a heart and also serves to keep the bidding low. You plan to bid your spades again at your third turn, if necessary, to identify your 5-5 distribution. An opening one-spade bid would create an impossible rebid problem if partner responded with two of either red suit, as you do not have the extra points that would be implied by a three-club rebid.

5. Four spades. This bid serves a dual purpose. It is an offensive effort that might easily succeed if partner has as little as an ace.

But even more important in the long run is the defensive value of the bid. If partner has a poor hand, it is odds-on that the opponents can make a game. However, because of the high level at which they must begin their search to find a game (or even a slam), there is a good chance they will miss their best contract.

Tomorrow: Solution to a predicament.

Starting at $3.85/week.

Subscribe Today