Bridge by Steve Becker
1. Win the trump in dummy, ruff a diamond, cash the K-A of clubs and ruff a club. Then ruff a diamond, a club and another diamond, at which point you are out of diamonds and clubs in both hands. Having successfully crossruffed the hand, you wind up losing only three tricks — a diamond and two spades.
You proceed as though you were declarer with the East cards and West were the dummy. It would be natural, if you were East, to ruff your diamond losers in dummy — and almost any East who got to four hearts would automatically do so. The line of play should not change merely because West is declarer but should be the same regardless of where the declarer happens to be physically located.
2. You start with eight tricks and should look for the best way to acquire a ninth. There are two possible lines of play. One is to cross to your hand with a club and lead a spade toward dummy. If North follows low, you must guess whether to play the jack or the king. Mathematically, you have a 50% chance of guessing right.
The alternate approach is to attack hearts instead of spades by cashing dummy’s A-K. If the ten or queen appears, you can clinch the contract by leading another heart. If neither of them appears, you continue with a third heart and make three notrump unless North started with four hearts headed by the Q-10.
The second line of play is far better than the first. You have about an 85% chance of developing a third heart trick by playing as described. Indeed, even if neither the queen or ten appears when you cash the A-K, you are still about a 4-1 favorite to make a third heart trick by leading another heart from dummy.
Tomorrow: The pressure principle.
Bridge by Steve Becker
The principle of not looking a gift horse in the mouth can easily be extended to contract bridge. Essentially, if the opponents give you a chance to make a contract you’re not entitled to make, you grab it with open arms.
First, a word about the bidding. North was obviously not a product of the scientific school of bidding. He certainly had good support for diamonds, but the leap to six enormously overstated his values. He would have done better to suggest a slam by jump-shifting in clubs and supporting diamonds later, or, for those who play it, via a splinter bid in spades, but neither of these would have engendered much interest from South.
North’s optimism was rewarded, however, when West chose a heart as his opening lead. With any other lead, the slam would have failed.
Declarer had a critical problem to solve at trick one. The question was whether to play the ten or the queen from dummy. He chose the queen and made the contract, but the reasoning behind the play of the queen is worthy of study.
Obviously, the card played is immaterial if either defender holds the K-J. If West has both honors, either play is successful; if East has both honors, either play fails.
South’s choice matters only when West has the king and East the jack, in which case the queen is the winning play, or when West has the jack and East the king, in which case playing the ten wins. The only tangible clues to guide declarer are the bidding and the opening lead.
South can reasonably assume that if West held the A-K of spades, he would have led one of them. Declarer should therefore conclude that West has only one of the top spades and so is a strong favorite to have the king of hearts for his overcall. So, South plays the queen and makes the slam.
Tomorrow: When to violate a sacred rule.
Bridge by Steve Becker
A popular way of describing how badly a person plays bridge is to say that he sometimes trumps his partner’s ace. While it’s not our purpose to encourage players to trump their partner’s trick, the fact is that doing so may not always be a cardinal sin.
Take this deal where West led the heart king against four spades and continued with the ace. At this point, East, our hero, trumped his partner’s ace and returned a club. As a result, West was able to score his A-Q of clubs, and declarer went down one. If East had not ruffed, South would have made four spades.
East’s play might not have been deserving of a Distinguished Service medal, even though it did violate the injunction against trumping partner’s trick. But to his credit, East knew that this basic principle should not be followed blindly. He knew that when the situation demands it, a player is allowed to deviate from the norm as his judgment dictates.
In this case, East’s action was clearly correct. He could see from looking at dummy that the defense could not realistically hope to win four tricks if West was allowed to remain on lead with the ace of hearts. Dummy’s diamonds were much too powerful to rely on passive defense to produce a favorable outcome. No harm could come from ruffing partner’s trick, and much good might accrue if West had the requisite club strength.
The situation would have been far different if East had held the Q-6 of trump instead of the 9-6, in which case a third round of hearts from West might prove very beneficial. But lacking the ability to overruff dummy, East was well-advised to take matters into his own hands by trumping his partner’s ace.
Tomorrow: Test your play.
Bridge by Steve Becker
There is no denying that in some deals, declarer must guess what to do because he doesn’t know how the adverse cards are divided. Any clues might be disturbingly sparse, or the defense might be exceptionally sharp.
Fortunately, such deals are rare. On most occasions, declarer can find a way to improve his chances of guessing correctly, or can avoid guessing altogether.
Take this case where South went wrong. He ruffed the second club lead, drew trump and led a diamond to dummy’s queen. East played low, realizing that if he took the ace, his partner’s jack (if he had it) would be subject to a later finesse.
Declarer then led a low spade to his jack. West won with the king and returned a club. South ruffed, cashed the ace of spades and played another diamond, West following low.
South was now in a quandary. If West had started with the J-7-4, the winning play was the ten; if West had started with the A-7-4, the winning play was the king. Either play could turn out right or wrong. In practice, South guessed wrong. He played the king and eventually lost another diamond to go down one.
It is true that South ran into sturdy defense, as well as bad luck. However, his difficulties were self-imposed. He missed a surefire way to make the contract without exposing himself to a guess.
After ruffing the second club and drawing trump, South should have played the A-J of spades, deliberately spurning the spade finesse. This would have assured that when he subsequently got to dummy with the king or queen of diamonds, he could discard his third diamond on the queen of spades, and his only losers would have been a spade, a diamond and a club.
Tomorrow: A critical choice of plays.
Bridge by Steve Becker
Even the best players often disagree on how to bid or play a hand. But that is perhaps all to the good, since this lack of unanimity adds zest to the game.
Consider this deal played by France and the United States in 1971. When Mike Lawrence and Bobby Goldman were North-South for the U.S., the bidding went as shown, and West led a club.
Goldman played dummy’s queen, which won, and tried a diamond finesse, which succeeded. He then returned to dummy with a heart, led another diamond and so scored nine tricks consisting of five hearts, three diamonds and a club.
When Pierre Jais and Roger Trezel held the North-South cards for France, the bidding and play were totally different. This time the bidding went:
Again, a club was led by West and won with the queen, but here declarer played a low spade from dummy at trick two. Bobby Wolff (East) rushed up with the ace and returned a club, and South quickly went down one for a combined loss to France of 700 points.
It seems clear that the French declarer misplayed the hand. True, he would have succeeded had West held the ace of spades instead of East — essentially a 50-50 chance. But Goldman’s line of play gave him two chances to succeed instead of one: if East had the king of diamonds or, failing that, if West had the ace of spades, making him a 3-1 favorite to get home safely.
Tomorrow: Caught in a quandary.
King Features Syndicate Inc.
Bridge by Steve Becker
1. Two notrump. The only bids that can seriously be considered are one spade and two notrump. There are several objections to a one-spade bid. First, there is the danger that partner might pass with four or five points, and a good game contract might be missed. Then there is the possibility that partner might respond one notrump, which you would have to raise to three notrump — a contract that would probably be better placed with the strong hand as declarer rather than as dummy.
Also, there is the natural ambiguity of any opening of one of a suit, a bid that can run the gamut of high-card values and distribution.
As opposed to this, the two-notrump opening delivers a very precise message. It shows 20 or 21 points, balanced distribution and usually stoppers in all four suits — which is exactly what you have.
2. One spade. After opening with one spade, you intend to bid your hearts twice, thereby describing at least a 5-5 distribution. You do this even though the hearts are much stronger than the spades.
If you were to bid hearts first and then follow up by bidding spades twice, you would mislead partner on two counts: First, he would assume that you had six hearts and five spades. Secondly, because such a sequence would constitute a “reverse,” indicating 17 points or more, partner would assume you had a much stronger hand.
3. One club. While it is true that the higher ranking of two five-card suits is ordinarily named first when opening the bidding, as in the previous problem, an exception is often made when the two suits are spades and clubs.
The reason for the exception becomes apparent when the rebid problem is considered. If you opened one spade, you would have to go into the three-level to show your clubs if partner responded two hearts or two diamonds, bid which normally implies extra strength.
Opening one club allows you to bid spades next on the one-level if partner makes the expected response of one diamond or one heart. It is true that at that moment, partner will think you have only four spades, but you plan to bid spades again at your next turn, thereby informing him that you have five spades rather than four. At the same time, this will tell him that you have five or six clubs, since you would not have opened one club with five spades and only four clubs.
Tomorrow: A synthetic trump finesse.
(c)2025 King Features Syndicate Inc.
Bridge by Steve Becker
This deal occurred many years ago in a match between Cadbury’s and Waddington’s, two English bridge clubs. The deal could be regarded as more amusing than instructive, but it is published here so that our readers will have some idea of how the other half lives.
North was Tony Priday, partnered by G.C.H. Fox, both well-known international players. As to what happened on the deal, we couldn’t possibly do better to describe it than did Ewart Kempson, whose witty account appeared in the British Bridge Magazine, of which he was the editor.
“Sitting North and playing Acol, Mr. Priday opened the bidding smartly with one heart. Maybe I’m a bit old-fashioned, but to my way of thinking, one club is a better bid. It is true that the club suit is not as good as the heart suit — this is probably what influenced Mr. Priday — but I always think one should prepare for a rebid when opening, and if South responds one diamond, North is free to rebid one heart if the other inmates don’t mind.
“East had the temerity to bid one notrump, which South doubled. It seemed to the deafened spectators that Mr. Fox was not doubling for takeout. A swift redouble by West allowed Mr. Priday to show his other suit with a corking bid of two clubs. This infuriated Mr. Fox into bidding two notrump, which was defeated by three tricks undoubled.
“Why Mr. Fox bid only two notrump on his 17-point hand after Mr. Priday had opened vulnerable is one of those unsolved and unsavoury crimes which will remain in the open files at Scotland Yard probably forever.
“Mr. Priday described it as a gross overbid. ‘It should have been obvious, even to Foxy, that I had made one of my very fine psychs,’ said Mr. Priday.
“‘Nothing about your bidding is ever obvious to me,’ riposted Mr. Fox.”
Tomorrow: Bidding quiz.
Bridge by Steve Becker
The suit-preference signal is one of the more effective weapons available to the defenders. The signal can be utilized in many different situations, depending on the circumstances of that particular deal.
Consider this case where South wound up in five diamonds after his Blackwood inquiry disclosed that the opponents held two aces. West led the four of clubs, which East had no trouble diagnosing as a singleton, not only because West had led dummy’s suit, but also because the four was the lowest missing club. Had West started with, say, the 7-4, he would have led the seven initially.
When South played the queen from dummy, East played his jack on it! This was intended to show that East had an entry card in spades. Accordingly, when declarer next led a diamond from dummy, West took the ace and returned a spade. East won and led a club, and South went down one.
Note that without the suit-preference signal, West would have been hard-pressed to guess the right suit to return at trick three. As can be seen, a heart return would have handed South the contract.
The signal is easy enough to use. In a potential ruffing situation, the play of an unnecessarily high card is a signal indicating an entry in the higher ranking of the two side suits. (There are ordinarily only two suits to choose from, since the trump suit and the suit to be ruffed are not considered.)
Conversely, the play of a low card indicates a preference for the lower-ranking side suit. Here, if East had held the ace of hearts instead of the ace of spades, he would have played the deuce of clubs at trick one to suggest a heart return.
Tomorrow: How the other half lives.
(c)2025 King Features Syndicate Inc.
Bridge by Steve Becker
Before proceeding with the play, declarer should formulate a general plan that makes allowance for the various ways in which the opposing cards might be divided. He might not be able to come up with a plan that guarantees success against every possible distribution, but he should try to find the line of play that offers him the best chance to succeed.
Consider this deal where West led a diamond against South’s four-heart contract. Declarer won East’s nine with the queen and could count 12 tricks if the diamonds were divided 3-2. West’s opening lead, however, had all the earmarks of a singleton, and if it was, the contract was in jeopardy.
Declarer’s task, therefore, was to formulate a line of play that would succeed against a 4-1 diamond break as well as a normal 3-2 division. Accordingly, he cashed the A-K of hearts and was gratified to see both opponents follow suit. He then abandoned further trump leads, leaving a heart at large and the jack in dummy as a later entry, and led the eight of diamonds.
This gave West a chance to ruff, but if he did, dummy would follow low, and declarer would wind up with 11 tricks — five hearts, five diamonds and a club. And if West discarded instead, South would win in dummy, ruff a low diamond high, cross to the jack of hearts and again finish with 11 tricks. West’s play was therefore immaterial.
Note that if declarer had not taken the trouble to assess the situation and had instead blithely drawn three rounds of trump at the outset, he would have gone down. The 4-1 diamond break plus the unfavorable location of the ace of spades would have limited him to nine tricks.
Tomorrow: A very valuable signal.
(c)2025 King Features Syndicate Inc.
Bridge by Steve Becker
This deal occurred in the final of the 2025 Vanderbilt Teams. South was Marty Fleischer, captain of the winning team.
Fleischer was off to a good start when West led the ace of clubs, the suit East had preempted in. When East played the club queen on the ace, West shifted to a low heart, dummy’s queen losing to East’s ace. East then returned the nine of hearts to dummy’s king.
Despite the helpful opening club lead, it appeared that South was still certain to lose a heart and a diamond for down one. But Fleischer found the way to make one of the losers disappear, and there was nothing the defenders could do about it.
After winning the heart return, declarer drew the opposing trumps, cashed the diamond ace, crossed to the king of clubs and led a diamond. When West followed low, Fleischer played the nine, losing to East’s queen. Since East had no more diamonds or hearts, he had to return a club, allowing South to discard a heart from one hand while ruffing in the other, and the contract was home.
Note that it would not have helped either defender to play their diamonds any differently, as declarer could counter any move they made in an attempt to mislead him.
At the other table, North wound up as declarer in four spades and finished down two after West led the club queen, resulting in a 13-IMP gain for the Fleischer team.
Tomorrow: Plan ahead.
Bridge by Steve Becker
1. Three notrump. Before discussing the proper action, it might be best to define the meaning of a non-jump overcall on the two-level. Generally, this shows not only a very good suit but also the values for an opening bid.
Once this definition is accepted, it becomes clear that this is a game-going hand, and the most likely game is in notrump. Two notrump, which would be invitational and not forcing, would be totally inadequate.
2. Three diamonds. A partner who overcalls is usually much more interested in learning if you have support for his suit and the values for a forward-going bid than to learn whether you have a suit of your own and a hand of indeterminate strength. It is therefore better to raise diamonds with the given hand than to bid two hearts, which you could also do with
You are hoping, after you raise diamonds, that partner will be able to bid three notrump.
3. Four diamonds. Here you want to invite game in a suit rather than notrump. True, you have only 10 high-card points, but your distributional features more than make up for your lack of high-card strength. Another way of implying strong interest in game in diamonds would be to cuebid two spades, a method currently popular with many players.
4. Pass. Chances for game are poor, considering your lack of support for partner’s suit. To bid two hearts with a four-card suit is out of the question, and two notrump is likewise not feasible because partner’s diamonds might prove useless as a significant source of tricks in notrump. Despite your singleton diamond, partner is a favorite to make two diamonds, so you should get out of the bidding while you still have a chance for a plus score.
5. Four hearts. Given partner’s two-level overcall, you should be a heavy favorite to make four hearts, and you should bid it directly. It would be wrong to bid only three hearts, which is highly invitational but not forcing.
Tomorrow: It’s almost magic.
Bridge by Steve Becker
Finding the solution to an entry problem is often the critical factor in the play of a hand.
Consider this case where the defense starts off with two rounds of diamonds. South ruffs and would like to take two heart finesses, as well as lead a club toward his king. But since he has only two entries to dummy to attempt these three plays, South has a logistical problem to solve.
The best way to proceed is to lead a trump to the king at trick three and return a low heart, finessing the jack after East follows low.
West wins with the queen and can do no better than return a diamond. South ruffs, crosses to dummy with a trump and leads the ten of hearts, finessing again after East plays low.
This is declarer’s second lead from dummy, and when the finesse succeeds, he discontinues hearts and leads a club to the king. Since East, as expected, has the ace, South accomplishes his mission, losing only a heart, a diamond and a club.
Note that if East covers the ten of hearts with the king on the second round of the suit, South can then return to dummy’s nine to make the critical club lead toward the king.
Note also that if South starts playing the hearts by leading the ten from dummy, instead of the deuce, he later runs into a dead end. The next time he gets to dummy with a trump, he can lead a heart or club — but he can’t do both, and as a result, he will finish down one.
Tomorrow: Bidding quiz.
Bridge by Steve Becker
The primary goal of a defending pair is to make the most of their combined partnership resources. It follows from this that top-notch defense depends heavily on partnership cooperation.
Consider this deal where West led a diamond against three notrump. Declarer won with dummy’s queen and played the ace and another club, hoping to catch a singleton honor or find the suit divided 2-2.
But West showed out on the second club, discarding a low diamond on East’s queen of clubs. This informative discard indicated that West had lost interest in diamonds, the suit East might otherwise have returned. So East shifted to the six of hearts, ducked by South and won by West with the queen. West then returned a heart, forcing the ace.
Declarer realized that continuing clubs at this point would surely lead to defeat, so he turned his attention to spades, leading the nine. South planned to let the nine ride, and, if the finesse succeeded, he intended to lead the ten next and overtake it with dummy’s jack.
Had everything gone as South planned, he would have finished with 10 tricks. But West threw a spanner into the works by covering the nine of spades with the queen! As a result of this inspired play, declarer was able to score only the A-K-J of spades and so finished with just eight tricks.
It is true that South could have and should have settled the issue at the outset by attacking spades instead of clubs, but this does not diminish the credit due East-West for a fine defensive performance from start to finish.
Tomorrow: A problem of logistics.
Bridge by Steve Becker
In many deals, it is more dangerous for declarer to have one defender on lead rather than the other. In such cases, declarer should try to organize the play so that the dangerous opponent cannot gain the lead. Today’s deal features an unusual application of this strategy.
West led the king of clubs against four hearts, and South saw immediately that there was a possibility he could lose three spades and a diamond. Given the bidding, it was highly likely that West had the ace of spades, so it was imperative to keep East from gaining the lead and returning a spade through the king.
The most obvious way to avoid three spade losers was to establish dummy’s diamond suit, but if East had the guarded diamond queen, declarer might lose four tricks before the diamonds could be utilized.
After pondering his options, South found the solution: He allowed West’s king of clubs to hold the first trick! West could do no better than lead another club to dummy’s ace at trick two, on which South discarded a diamond. Two rounds of trump were followed by the A-K of diamonds and a diamond ruff, establishing dummy’s two remaining diamonds. Declarer then crossed to dummy with a trump and discarded two spades on the J-5 of diamonds to finish with an overtrick.
Note that the same line of play would succeed against a 3-1 trump break, declarer simply ruffing the third diamond high before crossing to dummy with a trump to cash the established diamonds.
By ducking the opening club lead, South substantially increased his chances of making the contract. In effect, he substituted a nonexistent club loser for a potential diamond loser. It was an application of the avoidance principle carried to an extreme.
Tomorrow: Top-notch defense.
(c)2025 King Features Syndicate Inc.
Bridge by Steve Becker
A deal containing two voids, a nine-card suit, an eight-card suit and a seven-card suit is rare indeed. But such deals do occur, and this one popped up in the 1982 Vanderbilt Teams when two of the top entries in the field met head-on.
At the first table, the bidding went as shown. Norman Kay opened one spade, and Kyle Larsen leaped to five diamonds. Edgar Kaplan doubled, and after Ron Von der Porten passed, Kay overruled the double by bidding five spades. Certain that Kay would not have rejected the double unless he was void of diamonds, Kaplan raised Kay to six.
Looking at only the North-South cards, Kay’s judgment in overriding the double and Kaplan’s decision to bid a slam were surely right. But, unfortunately, they ran into bad luck and exceptionally fine defense.
Larsen led the heart three to East’s ace, catching South’s singleton king. It did not take Von der Porten long to find the winning defense. Realizing that his partner probably had nine diamonds for his vulnerable five-diamond bid, as well as the 6-4-3 of hearts, Von der Porten decided that his best chance was to find West with a club void. Accordingly, he returned a club, Larsen ruffed, and the excellent slam contract bit the dust.
There was nothing to the play at the second table, where Sidney Lazard and his son Sid Lazard Jr. were North-South. Their final contract was six clubs, which could not be beaten by any defense and, in fact, made seven when the defense did not lead a heart. As a result, their team gained 990 points on the deal.
Tomorrow: Insurance policy.
Bridge by Steve Becker
Declarer ruffs the heart lead, cashes the A-K-Q-J of trump and ruffs another heart. He then plays the ten of spades, and West, who cannot afford to discard a heart, discards a diamond. (The outcome is the same if he parts with a club.) Dummy also discards a diamond, and let’s say East discards a heart.
Declarer next leads a diamond to the ace, cashes the ace of hearts, discards a club and ruffs a heart to produce this position:
South now plays the spade nine, forcing West to discard a club. Declarer discards the now-useless heart from dummy, whereupon East finds himself in serious trouble. If he discards his diamond, South scores the last two tricks with the four of diamonds and ace of clubs, while if East discards a club, dummy takes the last two tricks with the A-2 of clubs.
Tomorrow: All roads lead to Rome.
Bridge by Steve Becker
Most errors in the play of the cards can be attributed to laziness rather than ignorance or limited ability. This observation applies equally to the offense and the defense.
Today’s deal illustrates the type of error that can easily be avoided with the proper mental approach. West led the king of spades and continued with the queen after East signaled with the seven. West then shifted to a diamond. Declarer won with the ace and conceded a trump to East’s ace. South later took a successful club finesse, and the contract was home.
Nothing startling occurred during the play, and it might appear that the par result was achieved by both sides. But closer examination reveals that the contract should have been defeated.
The culprit was East, who missed a golden opportunity at trick one when he should have overtaken West’s king of spades with the ace and shifted to his singleton club.
From then on, declarer would have been fighting a losing battle. Whenever he led a trump, East would grab the ace, lead a spade to West and obtain a club ruff to defeat the contract.
It would not have been difficult for West to read the situation if East had done his part at tricks one and two. The combination of the overtake and the club return would have made the defense crystal clear.
For East’s part, finding the winning defense should be easy if he considers the hand as a whole and does not play mechanically to the first trick. He knows from the opening lead that his partner has the K-Q of spades, so unless South has a singleton spade, East can count three defensive tricks. The search for a fourth is ended as soon as it occurs to him that a club ruff can upset declarer’s apple cart.
Tomorrow: Double-dummy problem.
Bridge by Steve Becker
One of the hardest words in bridge to say, it seems, is “pass.” There is no way of knowing how many thouzsands of points are lost, hand after hand, as a result of the injudicious use of bids other than pass when the latter action is called for.
Consider this deal, from a tournament, where West failed to utter the magic word. The bidding began when East, taking advantage of the favorable vulnerability, opened with four spades.
This posed a difficult problem for South. Certainly, he had to bid something with his fine hand, but the question of what to bid was not easy to answer. He didn’t need much from his partner to make a slam, but he was afraid to jump to six hearts or six diamonds for fear he might choose the wrong suit.
So, he overcalled with five hearts, hoping he’d get a chance to name diamonds later. This turned out to be the case when West bid five spades, and South then properly overrode his partner’s double to bid six diamonds. West passed, and North, seeking the maximum score, corrected to six hearts. When this rolled around to West, he chose to double instead of pass.
West led the ace of clubs and continued with the queen. Declarer ruffed and led a low heart. After West played low, South, mindful of the double, finessed the eight, correctly deciding that West had all five missing trumps. The rest was easy, and South made the slam after drawing West’s remaining trumps.
It is possible that declarer would have finessed the eight anyway, but the double drew a diagram for South that could hardly be misread. West should have been satisfied with defending the six-heart contract and maintained a stoic silence.
Tomorrow: Taking the long view.
Bridge by Steve Becker
Most contracts, particularly those where the outcome is uncertain at the start, are won or lost in the early stages of the play. This is largely because the lines of battle are usually drawn by the play to the first two or three tricks. The later plays merely reflect the early preparations.
Consider this deal where West led a diamond against three notrump, and South was immediately faced with a crucial test. Had he played the three or the ten from dummy, he would have gone down.
After the play of the three, for example, East’s eight would have forced the queen and established a tenace over dummy’s K-10. This would have proved fatal when West eventually gained the lead with the king of hearts and returned a diamond.
To defuse the potential threat posed by East’s diamonds, South should play dummy’s king at trick one! This forces East to win the trick in order to prevent declarer from later scoring a second diamond trick. More importantly, the presence of the ten in dummy then stops East from returning a diamond at trick two. East is therefore forced to shift to another suit, so let’s assume he leads a heart.
Once again South must be careful. He should reject the tempting finesse because he can assure the contract by winning the heart with the ace and leading a club. East takes the club ace, but the battle is over. South already has eight tricks established and cannot be stopped from scoring his ninth trick in hearts.
Note that if declarer plays low on East’s heart return at trick two, he goes down. West can win and lead a second diamond, and the contract eventually fails. The first two tricks tell the tale.
Tomorrow: The hidden power of a pass.
Bridge by Steve Becker
This spectacular deal arose in the 1993 playoff between Mexico and Canada to determine which of the two countries would play in the Venice Cup world women’s teams later that year. Canada won the match by a comfortable margin despite being on the wrong end of the deal at both tables.
When Mexico’s Luisa Grinberg and Laura Mariscal held the North-South cards, the bidding went as shown. The Canadian West elected not to act initially with her 7-5 distribution, no doubt planning to enter the auction at her next turn.
This strategy backfired, however, when her next chance to bid came over five diamonds, at which point she decided to leave well enough alone. With the club queen falling singleton, Mariscal had no trouble making her contract, losing only the two red aces for plus 600.
At the other table, with Elena Brucilovsky and Bronia Nosnik of Mexico sitting East-West, Nosnik opened the West hand with one spade, leading to this auction:
South could have saved the day by removing her partner’s second double to five diamonds or four notrump (asking North to choose a minor), but she elected to pass. The contract could have been defeated, but North led the king of diamonds rather than a top club. Nosnik discarded her losing club on the diamond ace and lost only the A-Q of spades and king of hearts to finish with ten tricks.
Plus 590 at this table gave Mexico a total gain of 1,190 points, or 15 IMPs, on the deal.
Tomorrow: A tale of two tricks.
Lifestyles

Tri-County Heart Ball raises $250K
DEAR ANNIE: She can’t catch a break over spring break stress
DEAR ANNIE: Spring break is coming, and instead of feeling excited, I feel like I’m bracing for impact. We have ...
HINTS FROM HELOISE: Marker can make bed easy, quick to make
DEAR HELOISE: Regarding the widower who doesn’t like walking around the bed to center the top sheet, here’s a ...
Many adults are overdue for three screenings
YOUNGSTOWN — Mercy Health primary care physicians are reminding patients to prioritize preventive care this year ...
TO YOUR GOOD HEALTH: COVID can lead to sinus infection
DEAR DR. ROACH: I am a 49-year-old woman who recently had COVID. When I was sick with it, I lost my sense of taste ...
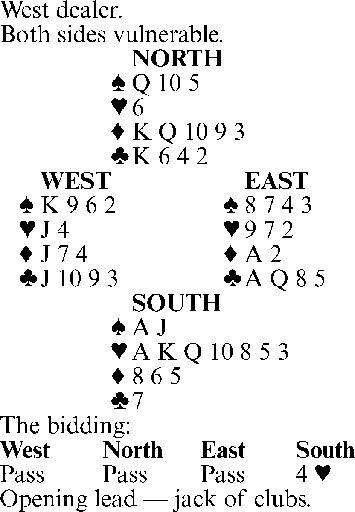
Bridge by Steve Becker
Anyone can take tricks with aces and kings; the real challenge lies in taking tricks with lower-ranking cards. ...