Breaking News
Life

Bridge by Steve Becker

2 min read

There are times when declarer's best chance lies in attempting to deceive the opponents. Usually, this takes the form of trying to camouflage the strengths and weaknesses of particular holdings. When the ruse works, it can turn a seemingly certain defeat into an unexpected victory.

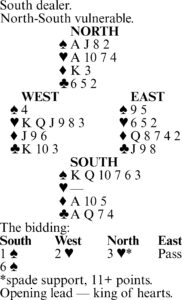
Consider this deal where South got to five diamonds and was shocked to find himself saddled with three apparently unavoidable losers -- a diamond and two clubs. While West's opening spade lead provided a momentary respite, there still didn't seem to be a way to avoid losing two clubs, since discarding two clubs from dummy on the A-K of spades wouldn't alter the situation.

There was, however, the possibility of diverting the opponents' attention from the winning defense. And so, at trick one, declarer slyly discarded a heart from dummy instead of a club!

After taking East's queen with the ace, South next led a diamond to East's ace, and East then had to decide whether to return a club or a heart. Reluctant to make the risky-looking lead of a club away from the king, and with declarer's heart discard at trick one firmly implanted in his mind, he chose the heart return.

There was not much to the play after that. The J-Q-K-A of hearts and king of spades quickly followed, with three of dummy's clubs discarded in the process. A club trick was conceded, and that was that.

Whether East should have shifted to a club at trick three, or whether he would have found the winning return had declarer adopted a less deceptive approach, is not really the issue here. What matters is that South, by focusing the opponents' attention on an apparent weak spot in hearts, enhanced his chances of inducing a defensive misplay, and he succeeded.

Tomorrow: Fortune favors Fred.
Lifestyles

Bridge by Steve Becker

2 min read

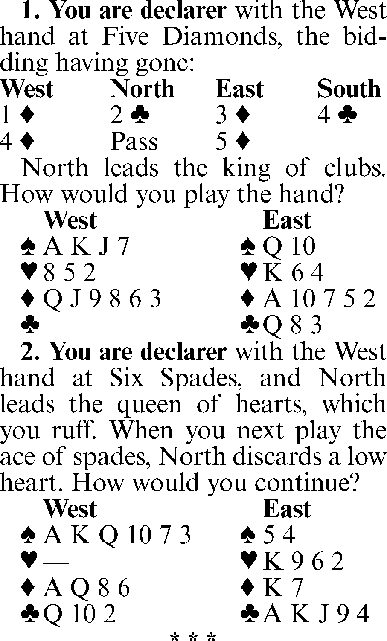
1. Ruff the club, lead the queen of diamonds and finesse if North follows low. If the finesse succeeds, you score 12 tricks by playing another trump and cashing four spades, discarding two hearts from dummy.

If the diamond finesse fails, losing to the singleton king, you're still on firm ground since the only tricks you can lose are a diamond and a heart. (If North shows out on the queen-of-diamonds lead, you put up dummy's ace and run your spades to assure 11 tricks.)

If you did not take the diamond finesse, you would go down if North started with the K-x of trump and fewer than three spades, and South had the ace of hearts.

2. Cross to dummy with a club, finesse the ten of spades, cash the K-Q and run the clubs until South ruffs with the last trump. That is the only trick you will lose. Played this way, you are certain of the slam, come what may.

Even if South had no clubs and ruffed the first club lead, you would still prevail by later leading a diamond to the king and taking the marked trump finesse.

The trap to avoid is entering dummy with a diamond at trick three instead of a club. If South had [S]J9862 [H]Axxx [D]xx [C]xx, you would lose the slam by crossing to dummy with a diamond first since South could then prevent you from ever discarding your fourth diamond on a club.

Tomorrow: A 20-point investment.

Life

Bridge by Steve Becker

2 min read

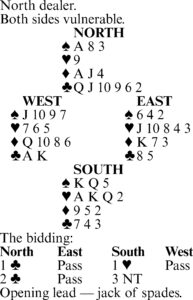
Suppose you're declarer at three notrump and West leads a spade. You duck East's queen at trick one and take the ten return with the ace. How would you continue?

When the deal occurred, declarer cashed the K-Q-A of clubs, hoping dummy's ten would become his ninth trick. After the jack failed to fall, South led a heart to the nine, losing to the ten.

West cashed his two spades and exited with a diamond to dummy's jack. Declarer then led a heart to his queen, but when the finesse failed, the contract was down one.

It is true that declarer was unlucky to go down on the line of play he chose, which offered better than an 80% chance of success. Nevertheless, the fact remains that a different approach was available that was almost 100% certain to succeed.

Once West shows out on the third round of clubs, all of South's attention should be focused on the best way to try to score a trick with the queen of hearts. One way of going about this is to do exactly what declarer did, first finessing the nine and later the queen. A much better way, though, is to try to force West to lead a heart into the A-Q.

Since it is known after the first two tricks that West has at most four spades, and since he presumably has no longer suit, there is a sure way to compel him to lead a heart without losing five tricks first. After taking the three top clubs, declarer simply cashes the A-K-Q of diamonds and exits with a spade.

In the actual deal, West takes two spade tricks before he has to return a heart into the A-Q. Even if West has the 13th diamond to cash after taking his spades, the heart return on his next play is certain to hand South his ninth trick.

Tomorrow: Test your play.

Life

Bridge by Steve Becker

2 min read

Situations occasionally arise during the play where your only hope of making or defeating a contract lies in convincing an opponent that a condition exists which, in fact, does not exist.

It doesn't matter what you call this type of warfare -- deception, deviousness, chicanery; what matters is whether you succeed in selling your adversary a bill of goods.

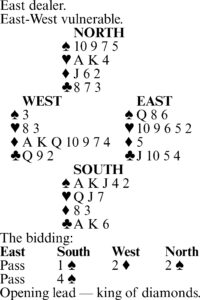
Take this unusual case where West defeated a contract that declarer, against normal defense, would very likely have made. It seemed to West that a heart lead offered very little chance of eventually collecting four tricks, so he started by leading his singleton club.

East took the A-K and returned a club, which West ruffed with the king! As a result of this extraordinary play, South went down one.

Declarer won West's heart return with dummy's ace, led a spade and finessed the nine after East followed low. West took the setting trick with the ten, and that was that.

If West had ruffed the third club with the ten, as any less imaginative defender would have done, declarer would probably have made the contract. South would almost surely have placed West with the spade king for his opening bid after East had shown up with the A-K of clubs and would presumably have played the ace and caught the king instead of attempting the finesse.

Ruffing with the king was an inspired attempt to sell declarer the idea that West could not have the jack or ten. Perhaps South should not have fallen into the trap, but who can argue with success?

Tomorrow: Choosing between alternatives.

Life

Bridge by Steve Becker

2 min read

How should declarer go about planning the play of this hand? At the start, he sees a sure loser in spades, a very likely loser in diamonds, and none in clubs, provided he can successfully ruff two clubs in dummy. In the trump suit, he might lose one, two or no tricks, depending on how the defenders' cards are divided.

South should start by taking the spade lead with the ace and promptly return a spade.

There are two reasons for this play. One is that it is not a bad idea, when you don't know what to do, to hand the ball to the opponents -- they might not know what to do either, and might make a helpful play.

The other reason is that it may be possible to establish dummy's spades, and that could come in handy later in the play.

East wins the spade with the king and returns a diamond. South plays the queen hopefully, but West covers with the king and dummy takes the ace. A spade is next led, East showing out, and declarer ruffs. Then, after playing a club to the king, South ruffs dummy's fourth spade, finally establishing the ten as a trick.

South next plays the ace of hearts, then cashes the ace of clubs and leads a club, intending to ruff in dummy.

If West elects to ruff with the jack at this point, declarer can discard dummy's diamond, so let's say West discards a diamond. South ruffs the club and discards his diamond on the ten of spades.

Thus, all West can score is his K-J of trump. It would have made no difference if East had held the K-J instead, or if the trump honors had been split.

The long-term view taken at the start of the hand -- that an extra spade trick might prove very useful -- pays off at the end.

Tomorrow: Psychological warfare.

(c)2025 King Features Syndicate Inc.

Lifestyles

Bridge by Steve Becker

2 min read

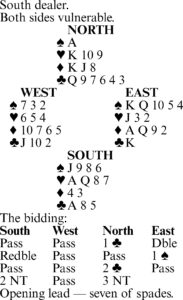
This hand was devised many years ago for the then annual Intercollegiate Par Bridge Championship. Par for North-South was to bid and make seven notrump. South should surely undertake the grand slam after learning that North has the only missing ace. Thirteen tricks in notrump seem virtually certain.

But if South becomes careless during the play, he fails in his mission, and that's what happened to many of the declarers who got to seven notrump.

The first test comes at trick one when declarer must win the spade lead with dummy's ace. He then cashes the queen of spades, discarding the ace of hearts! This is followed by the K-Q-J of hearts, discarding the A-K-Q of clubs!

When declarer next cashes the jack of clubs and East's ten appears, dummy's clubs all become tricks, and South easily makes the grand slam.

Observe that if declarer plays the hand in less spectacular fashion by winning the spade lead with the king and trying to run his diamonds, he goes down one.

South's first five plays are certainly unusual, but they illustrate an important principle of card play. When dummy appears, South sees that the contract is certain unless the diamonds are divided 4-0.

To guard against this, he plays his cards in the manner described. If the diamonds are divided 2-2 or 3-1, no harm can come from discarding the ace of hearts and A-K-Q of clubs at the start of play.

But if, as in the actual case, it turns out that the diamonds are divided 4-0, South gives himself an extra chance by putting himself in position to utilize dummy's clubs. The fact that East's ten of clubs falls on dummy's jack is merely poetic justice.

Tomorrow: A long-term view.

Lifestyles

Bridge by Steve Becker

2 min read

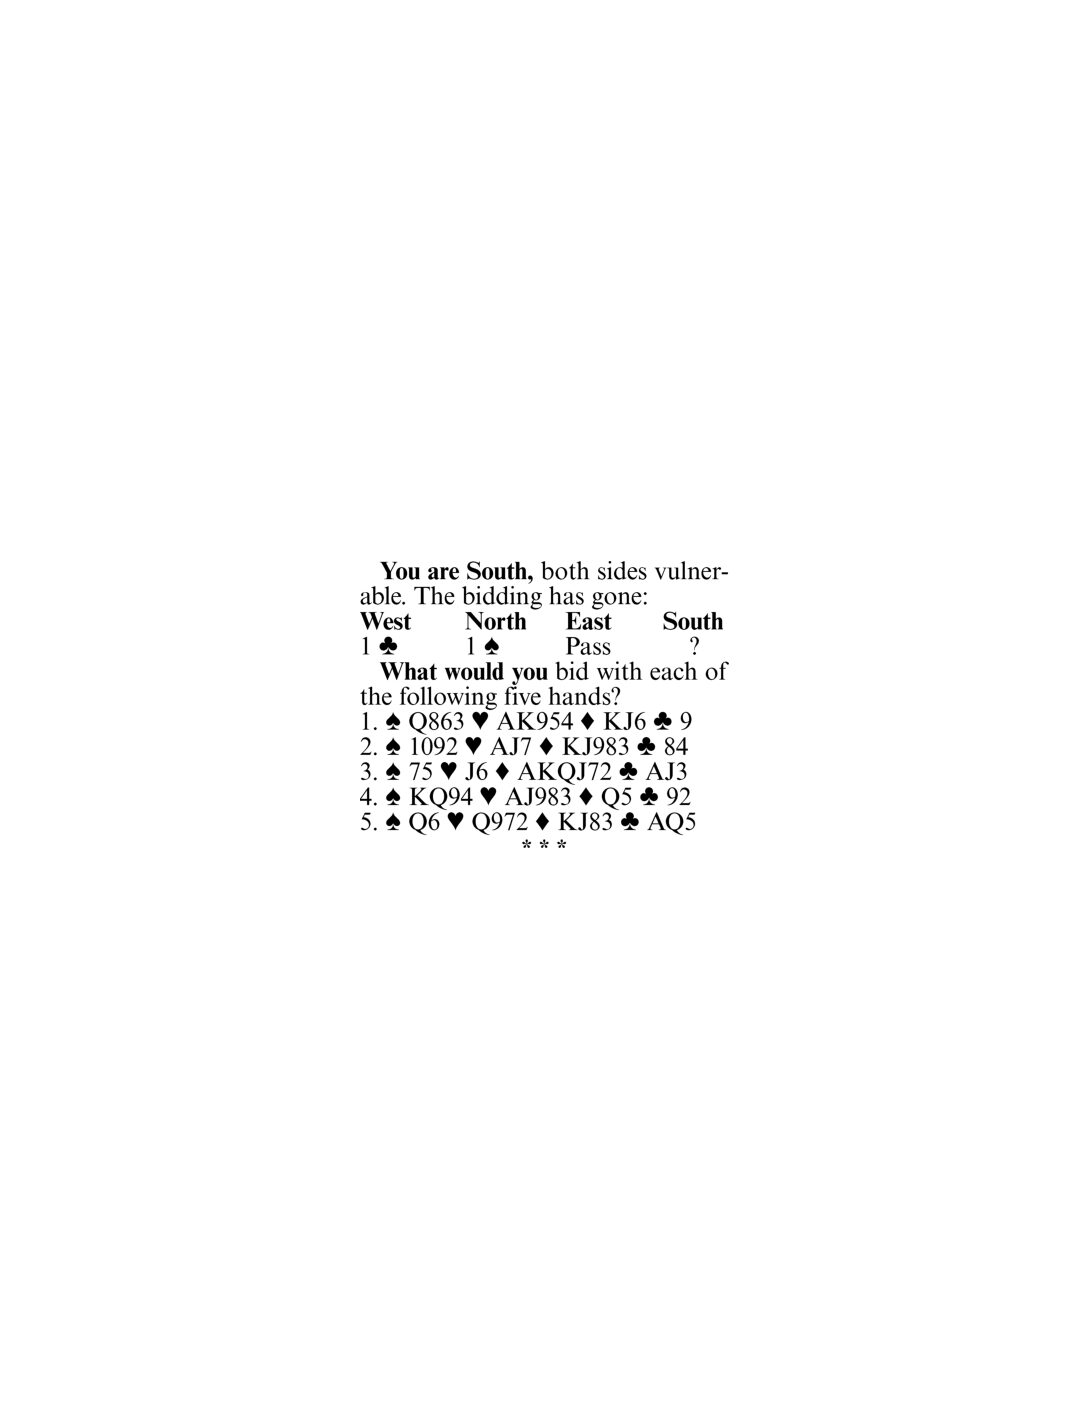
1. Four spades. Partner's one spade bid is an overcall, not an opening bid, and more often than not he will have less than opening-bid values. Generally speaking, an overcall is based more on playing tricks than high-card values.

But even though partner might have as little as 8 or 9 high-card points (and as many as 16) for his one-spade bid, the fact remains that he is unlikely to lose four tricks opposite this hand. A jump-raise to game is therefore clearly indicated -- particularly since a jump to three spades (or even three hearts) would not be forcing.

2. Two spades. Partner might be able to make 10 tricks if he is at the top of his bid, so you must give him some encouragement. If partner passes, then the raise might turn out to have pre-emptive value. It would be incorrect to bid two diamonds, since bidding a new suit in response to an overcall tends to deny support for partner's suit, and, because it is not forcing, you could wind up in the wrong contract.

3. Three notrump. No guarantees go with this bid, as there is an obvious danger in hearts, but three notrump is nevertheless a favorite to make. You don't need a 100% shot for game to bid it. A nonforcing bid such as two or three diamonds would be a mistake when you are so close to making game.

4. Three spades. Whether you can make game depends on the strength of partner's overcall. Since there is no way to judge this without consulting partner, you should invite him to go on to game. Alternatively, you can cuebid two clubs -- the opponent's suit -- to indicate spade support and interest in game, which is a treatment now favored by many players.

5. Two notrump. Here you also must rely on partner to judge the chance for game, since he is looking at his hand and knows whether his overcall was based on minimum, medium or maximum values.

The jump to two notrump indicates roughly 12 to 14 points and merely invites game. It is a picture bid that shows balanced distribution and all-around strength, and it leaves the decision on how far to go up to partner.

Tomorrow: That old black magic.

Life

Bridge by Steve Becker

2 min read

There is only a razor-thin edge between good play and perfect play. For example, consider this deal from a duplicate game where most of the North-South pairs got to six hearts and went down one. West led the K-A of diamonds, declarer ruffing the second round.

The unsuccessful declarers drew two rounds of trump and played the A-K of clubs. After West showed out, South had to go down, since he could not ruff all three of his club losers with only two trumps remaining in dummy.

Several declarers made the slam by adopting a slightly better line of play. They realized that the only real threat to the slam was a 5-1 club division, and they took a small but simple step to cater to that possibility. They drew only one round of trump before playing the A-K of clubs, and when West could not ruff, South was able to trump three clubs in dummy.

It is true that by adopting this method of play, the successful declarers ran the risk of either opponent ruffing the second club lead. But they reasoned that if one opponent actually had a singleton club and two trumps, the slam could not be made by any line of play, so nothing could be gained by drawing a second round of trump.

The best a declarer can do in such situations is to guard against whatever he can do something about and not worry about distributions of the cards that he cannot protect against. One has to be philosophical in matters of this sort.

Tomorrow: Bidding quiz.

Lifestyles

Bridge by Steve Becker

By Steve Becker 2 min read

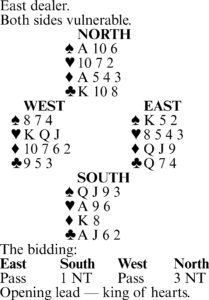
Point count is often just as helpful during the play as it is during the bidding. Take this case where East made an intelligent use of point count to defeat three notrump.

West led the K-Q-J of hearts, East playing the 4-3-8 in that order. Declarer won the third heart with the ace, led the queen of spades and finessed. East took the king and returned a spade, intentionally not cashing his last heart. He was trying to convince declarer that West had the missing five of hearts.

South had eight sure tricks at this point and had to decide which way to take the two-way club finesse for his ninth trick. Convinced by East's play that West had the missing heart, he won the spade return with the jack and led a club to the ten. This approach would have assured the contract, even if the finesse lost, had West held the 13th heart.

But when East showed up with the queen of clubs and the missing heart, South went down one. True, he might have gone down anyway had East cashed his heart earlier, but East's subtle defense virtually guaranteed South would misguess the club finesse.

East's play was well-founded. He knew, after West had shown up with the K-Q-J of hearts, that South had every missing honor card for his 15- to 17-point one-notrump opening. West had six points, dummy 11 and East eight to account for 25 points, leaving South with exactly 15 points, which had to include the A-J of clubs.

Luring declarer into taking the club finesse the wrong way involved high-level thinking by East -- and it paid off very well indeed.

Tomorrow: The philosophical approach.

Life

Bridge by Steve Becker

2 min read

On some deals, the outcome is a forgone conclusion. Declarer takes his tricks, loses what he has to lose, and that's that. On other deals, the outcome might hinge solely on the lie of the adverse cards. The opposing distribution or the location of a particular card determines the result, and there is nothing that can be done about it.

On both types of hands, declarer has little or no chance to demonstrate his skill. But on a third type of hand -- more common than the other two -- declarer is presented with an opportunity for skillful play. It is on these occasions that he must consider various options and then choose the one that offers either the greatest chance of success or that is designed to overcome an unlucky lie of the cards. Today's hand illustrates the latter case.

In four spades, South can count four potential losers -- a diamond and three hearts. Declarer sees that by leading twice toward dummy's K-J-3 of hearts, he can avoid losing three heart tricks if West has either the ace or queen of hearts, or both. His only real concern, therefore, is how to make the contract if East has the ace and queen. This is where skill enters the picture.

To assure the contract, South wins the diamond lead with the ace, draws trump, then cashes the A-K of clubs and ruffs dummy's last club. He then plays the king of diamonds and exits with a diamond.

He does not care one whit which opponent actually takes the trick. If East wins, he must play a heart to dummy's K-J-3 or yield a ruff-and-discard by leading his remaining club. If West wins the diamond, he can return a heart, but dummy simply plays the jack or king, forcing East to win and concede the game-going trick as before.

Tomorrow: High-level thinking.

Lifestyles

Bridge by Steve Becker

2 min read

This deal occurred in the quarter-final match between Italy and the United States at the 2004 world team championship. The Italians defeated their longtime rivals by the slender margin of 12 IMPs in the 80-deal clash in which the lead changed hands many times.

Today's hand helped put the Americans into the lead early in the match. The bidding shown took place when Norberto Bocchi and Giorgio Duboin were North-South for Italy. Duboin ruffed the opening spade lead and had to decide how to broach the trump suit.

West's four-spade bid indicated a distributional hand with few high cards, so it would seem that declarer would do best by leading a low diamond from his hand to see whether West had a singleton honor. In the actual case, this would have resolved the issue immediately. If an honor did not appear, declarer would play the king, and if it lost to the ace, he would have to decide whether to finesse East for the jack when the suit was next led from dummy.

Instead, Duboin crossed to dummy with a club at trick two and led a diamond to the queen. When this lost to the singleton ace, he had to go down one.

At the other table, Bobby Levin and Steve Weinstein of the U.S. also reached six diamonds and got a spade lead. Here, too, the Italian West had bid four spades at his first turn.

Weinstein considered his first play in the trump suit very carefully and found the winning line by leading low from his hand at trick two. The appearance of West's ace gave the Americans a 16-IMP pickup on the deal.

Tomorrow: The sure way is the best way.

Lifestyles

Bridge by Steve Becker

2 min read

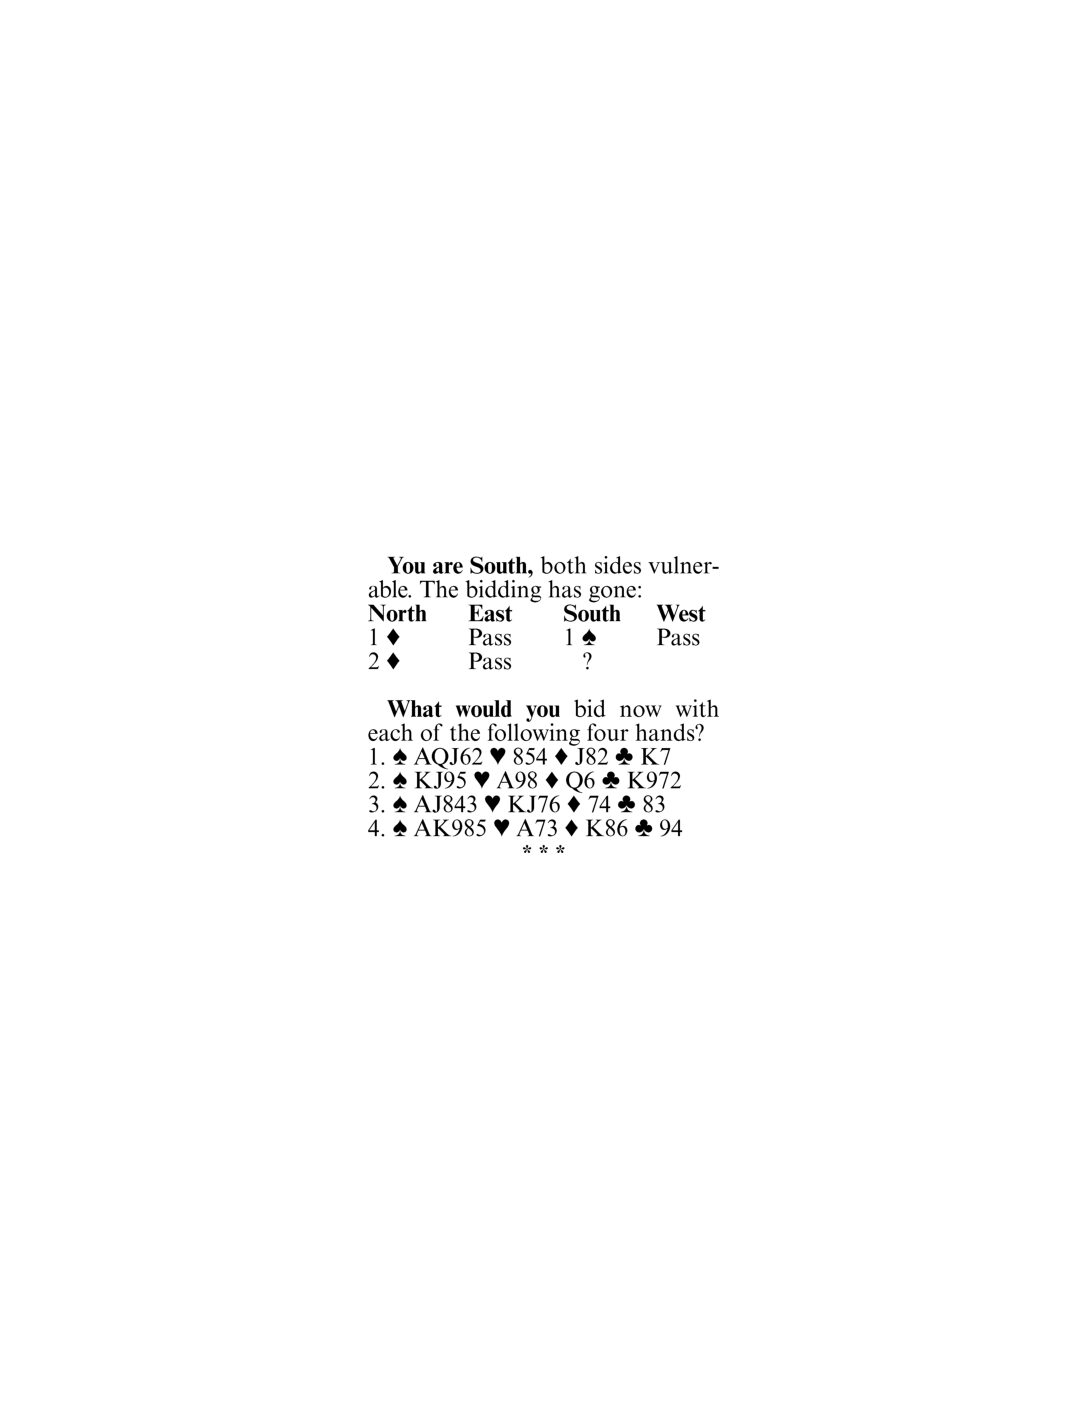
1. Three diamonds. Partner's rebid indicates a hand in the minimum range, but game possibilities cannot be dismissed when you have 11 high-card points and partner might have as many as 15. To indicate mild interest in game, you raise partner to three diamonds, saying that game in spades, diamonds or notrump is possible if partner is in the upper half of the range for his two previous bids.

It is far better to show your diamond support than it is to rebid your five-card spade suit. If partner has three-card support for spades and better than a minimum for his two-diamond bid, he will bid three spades over three diamonds.

2. Three notrump. It would be wrong to bid only two notrump, which would merely invite partner to bid game and allow him to pass with minimum values. Since you have a full opening bid, you must make sure of reaching game and everything points to notrump as the best spot.

3. Pass. Partner has between 13 and 15 points, so it is hardly likely that your nine-point hand combined with his can produce a game. Once you reach this conclusion, the only problem remaining is where the best partscore lies. There is no good reason to think that a two-heart or two-spade bid would help improve matters, especially when a bid of two hearts would force partner to bid again. Partner is very likely to have a six-card diamond suit and should be able to make two diamonds opposite your hand.

4. Two hearts. This unorthodox bid with a three-card suit is the best answer to a difficult situation. Obviously, there's a game somewhere, but you have no way of knowing whether it's in spades, diamonds or notrump.

Since you are naming a new suit as responder, partner is forced to bid again, even with a minimum opening bid. His next action -- the most likely being another diamond bid, a spade preference or a notrump bid -- should clear up the question of which game to bid. If partner should happen to raise hearts, you will show your diamond support next.

Tomorrow: The numbers game.

Life

Bridge by Steve Becker

2 min read

The great advantage of playing a hand in a suit contract, rather than notrump, is that the opponents can't run off a long suit. Declarer can ruff in one hand or the other to put a halt to the procession of winners. But this advantage can sometimes be lost if declarer mismanages his trump suit.

Consider this case where South was in four spades and West led a heart. East took dummy's jack with the queen, and, in an effort to stop heart ruffs in dummy, returned the ten of trump. South won with the ace and returned a heart, still hoping to negotiate a heart ruff in dummy.

East took dummy's king with the ace and led the nine of trump. South had no choice but to win with the king and attempt to run dummy's diamonds. But when he played the A-K-Q, discarding a heart, West ruffed with the queen and cashed the nine of hearts to put the contract down one.

The outcome was traceable not only to East's defense, but also to South's mismanagement of his trump suit. He should have realized, at trick two, the futility of trying to ruff a heart in dummy. It was clear that East was determined to prevent this. To win the trump return and play a heart was an idle gesture.

Instead, South should have ducked the ten of spades lead at trick two. Had he done this, he would have coasted home. If East played another trump, South would cash the A-K, run the diamonds and finish with 11 tricks.

Indeed, the best East could do if South ducked the first spade would be to cash the ace of hearts to hold declarer to 10 tricks.

Tomorrow: Bidding quiz.

Lifestyles

Bridge by Steve Becker

By Steve Becker 2 min read

Assume you're West, defending against three notrump, and that you can see only dummy's hand and your own. Declarer wins your spade lead with the king, partner playing the deuce, and returns a club, which you win with the king. What would you play now?

Actually, there's only one right play -- the ten of diamonds! If you lead it, South goes down; if you don't, South makes the contract.

If declarer goes up with the ace, you score three diamond tricks and the A-K of clubs. If declarer covers the ten with the jack, East wins with the king and returns the seven, allowing you to force out the ace. If declarer ducks the ten, so does East, and a low diamond continuation (on which partner plays the king regardless of what declarer plays from dummy) establishes the two additional diamond tricks you need to set the contract.

Note, however, that if you lead the six of diamonds at trick three, South plays low from dummy and makes four notrump.

How can you know that the ten of diamonds is the right play? Well, look at it this way: After studying dummy, you can count eight tricks for declarer -- three spades, a diamond and four clubs -- and, considering the bidding, he is sure to have a ninth trick somewhere in his hand if you simply stand pat and allow him to finish establishing dummy's clubs.

Thus, if you make the "safe" lead of the ten of spades, you will almost surely hand South the contract. Instead, you must attack immediately to have any chance of success, and declarer's only possible weak spot is diamonds. You therefore exploit this possibility, hoping to find partner with the king, while at the same time taking care to lead the ten in case South has the nine.

Tomorrow: Trump mismanagement.

Lifestyles

Bridge by Steve Becker

By Steve Becker 2 min read

There's a lot of luck in all forms of bridge, but there's also a lot of skill. The luck, especially in Chicago or rubber bridge, consists mostly of holding good cards -- a matter over which you have no control -- but the skill is another matter altogether. Here you do have control, and how you exercise that control has a tremendous bearing on how you fare.

Take a case like this one. South's leap to six spades is not scientific; it is simply a good general-direction shot. The odds favor making a slam after North bids three hearts, so South is right to bid it.

But when dummy comes down, South's chances appear to plummet considerably. West is likely to have the king of clubs for his two-heart overcall, increasing the possibility that declarer might lose two club tricks.

Situations like this demand special attention. You'd rather not bank everything on a club finesse that's a favorite to lose, so you look for an alternative line of play.

Accordingly, you win the heart lead with the ace, discarding a club, and ruff a heart. After drawing trump, you ruff another heart. A diamond to the king and a diamond to the ace are followed by a diamond ruff in dummy, setting the stage for a loser-on-loser play. You next lead the ten of hearts and on it discard the seven of clubs!

West wins but has no safe return. He must either lead a club into your A-Q or return a heart, allowing you to discard the queen of clubs as you ruff in dummy. Either way, the slam is in the bag.

Tomorrow: Only one right play.

Lifestyles

Bridge by Steve Becker

By Steve Becker 2 min read

This deal occurred in a preliminary round match at the 1990 world team championship in Geneva. The declarer missed the winning and correct line of play, which is not easy to spot even with all 52 cards exposed.

East's two-club opening promised a sound pre-empt in clubs, and West's optimistic double of three diamonds at his second turn ended the auction.

South won West's ten-of-clubs lead with the queen and could see only four potential losers -- two spades (if East had the ace), a diamond and a club. In fact, if declarer could ruff his third club in dummy or West had the spade ace, he might even make an overtrick.

So, at trick two, South played the club ace, planning to ruff a club next. But West ruffed and returned the ace and another diamond. This left South with a club and two spades to lose, so he finished down one.

Observe that it wouldn't have helped South to try to draw trump immediately and settle for nine tricks. West can win the second diamond and put his partner on lead with a spade. East's king-of-clubs return then brings declarer to the same sorry fate, West ruffing the ace whenever South plays it.

However, declarer can guarantee the contract by means of an unusual safety play. All he has to do to assure nine tricks is to lead the nine of clubs at trick two! This leaves the defenders helpless.

If East wins the club and continues clubs to allow West to ruff the ace, declarer can overruff with one of dummy's high trumps. And if instead West ruffs the nine of clubs in order to play the ace and another trump, South eventually scores the club ace for his ninth trick.

Tomorrow: Any port in a storm.

Lifestyles

Bridge by Steve Becker

2 min read

Let's first try to work out South's distribution. To begin with, you consider the suit your partner led. Since there is no reason to think West chose an irregular lead, you assume the deuce was his fourth-best diamond. This means that South started with precisely two diamonds.

Next, let's turn to the suit declarer bid — clubs. He can't very well have six of them, since he would almost surely have rebid his clubs rather than bid one notrump. It is therefore reasonable to assume that South started with four or five clubs in addition to his two diamonds.

Now, taking the bidding one step further, let's examine South's one notrump rebid, which denied four spades as well as four-card heart support. Since South can't have four cards in either major, his distribution must be exactly 3-3-2-5.

The quality of declarer's suits is also subject to partial analysis. He is unlikely to have three hearts to the king because he might have raised his partner to two hearts with K-x-x and a doubleton diamond. South is therefore likely to have a hand similar to one of these two:

[S] A K 7[S] A 10 2

[H] 6 5 4 [H] 6 5 4

[D] A 10 [D] A 10

[C] Q J 10 9 2 [C] A J 9 5 2

So, though we are still only at trick one, it seems probable that West will shortly win a club trick and play three rounds of diamonds, leaving you on lead with the nine. At that point, you plan to lead a low heart to partner's king and win the next two hearts with the A-J to put the contract down one.

Tomorrow: The best-laid plans may go awry.

Life

Bridge by Steve Becker

2 min read

This deal occurred in a team-of-four contest. At both tables South wound up in five hearts, and at both tables West led the king of spades. But at one table the contract was made, while at the other it went down one.

At the first table, West's king of spades held the first trick, and West then shifted to the jack of clubs. Declarer won with dummy's ace, discarding a spade, and returned a trump to the king and West's ace. There was nothing the defenders could now do to defeat the contract, and South easily took the rest of the tricks.

At the second table, East-West found a much better defense. Here, East alertly overtook the king of spades lead with the ace and shifted to his singleton diamond.

South could not recover from this blow. He won the diamond in dummy and led a trump to his king. West won with the ace and returned a diamond for East to ruff, and the contract went down one.

Not a difficult defense, you may say, but the fact is that most of the players in East's shoes at the other tables could not bring themselves to play the ace of spades on their partner's king at trick one. The thought might not even have occurred to them, which is one of the reasons why defense is generally regarded as the most difficult part of the game.

Of course, West could have shifted to a diamond at trick two at the other table and then led a second diamond later to defeat the contract. Nevertheless, East must bear the main responsibility for West's failure to find this defense. He should not have allowed West the opportunity to go wrong.

Tomorrow: Test your defensive play.

Lifestyles

Bridge by Steve Becker

By Steve Becker 2 min read

A problem frequently encountered by declarer is whether to finesse or play for the drop when missing the Q-x-x-x of a suit.

To illustrate, consider only the North-South spade holding in today's hand and assume that the opponents have never bid. In the long run, the winning approach is to cash the ace and, if both opponents follow low, continue with the king. Mathematically, this is slightly better than taking a finesse against the queen.

But the advantage of playing for the drop is so slight that declarer should prefer the finesse whenever there are sound clues or good tactical reasons that make it a better play percentage-wise.

In the present deal, for example, after West leads the K-A-Q of diamonds, declarer should ruff the queen, cash the ace of spades, cross to dummy with a heart and take a trump finesse.

The finesse is correct here because of the highly significant information South obtained at trick two. On that trick East showed out, revealing that West started with seven diamonds and East with only one.

West therefore has just six unknown cards that might include the queen of spades, while East has 12 unknown cards that might include the queen.

On this basis alone, the odds are 2-to-1 that East was dealt the queen, so South should take the finesse on the second round of the suit. He should not bet the proverbial homestead on its success, as West might have started with the Q-x, but, all factors considered, it is clearly the better play.

Tomorrow: The first step tells the tale.

Lifestyles

Bridge by Steve Becker

2 min read

Bridge is a game of probabilities. A player makes a particular bid or play because he thinks that, percentage-wise, it is the bid or play that will work out best.

He does not necessarily make these bids or plays because he is certain they will succeed, since if a genuine choice exists, it is possible the less-likely choice will prove to be the winner.

Take this deal where South is in six hearts and West leads a club. Declarer's only possible losers are a spade and a diamond, so he must try to avoid losing one or the other.

There are two ways to proceed. After drawing trump, declarer can play the A-K and another spade, hoping the opposing spades are divided 3-3, in which case his diamond loser can be discarded on dummy's fourth spade.

Alternatively, declarer can try to develop an extra diamond trick by taking two finesses in the suit. This approach succeeds if West has the king or queen of diamonds, or both, in which case South's spade loser can eventually be discarded on one of dummy's diamonds.

Any experienced player, whether familiar with the exact percentages or not, would choose the latter line of play. He would instinctively know that this offered by far the better chance of success.

In terms of actual percentages, the 3-3 division offers only a 36% chance of succeeding, while the probability of finding West with one or both diamond honors is about 75%. Consequently, the prospect of developing a 12th trick in diamonds rather than spades is more than twice as promising. Even so, it is important to remember that this is merely a percentage play, so that on a bad day, the inferior play might win while the superior play might lose.

Tomorrow: When to break a general rule.

Lifestyles

Bridge by Steve Becker

By Steve Becker 2 min read

There are inspired plays one might never have an opportunity to make in a lifetime of bridge. Most such plays would not be difficult to execute if someone rang a bell at the critical moment to warn a player that his chance to rise and shine had arrived. Unfortunately, these moments occur so rarely and unexpectedly that for ordinary mortals, the opportunity for brilliance goes unnoticed and quietly passes by.

But here is a case where the player in the saddle rose to the occasion. The deal occurred in a team-of-four championship, and the hero was Billy Eisenberg, well-known Los Angeles star. He got to three notrump as shown, and West led the seven of spades.

Eisenberg won with dummy's ace and made the obvious lead of a low club from dummy. When East produced the king, Eisenberg played the five! This highly unusual play was well-rewarded, since East could now do no better than cash his K-Q of spades and ace of diamonds to hold Eisenberg to three notrump.

Now let's suppose declarer had taken East's king of clubs with the ace, which almost anyone else in his shoes would have done. In that case, the contract would have failed. When South continued with another club to the queen, East would signal with the nine of diamonds, asking West to return a diamond if he gained the lead.

Declarer could not now prevail, whatever he did next. If he continued with a club, West would win and shift to a diamond, and East would cash two diamonds and two spades to put the contract down one. And if declarer abandoned clubs, he would not be able to come to nine tricks.

Tomorrow: A question of percentages.

(c)2025 King Features Syndicate Inc.

Starting at /week.