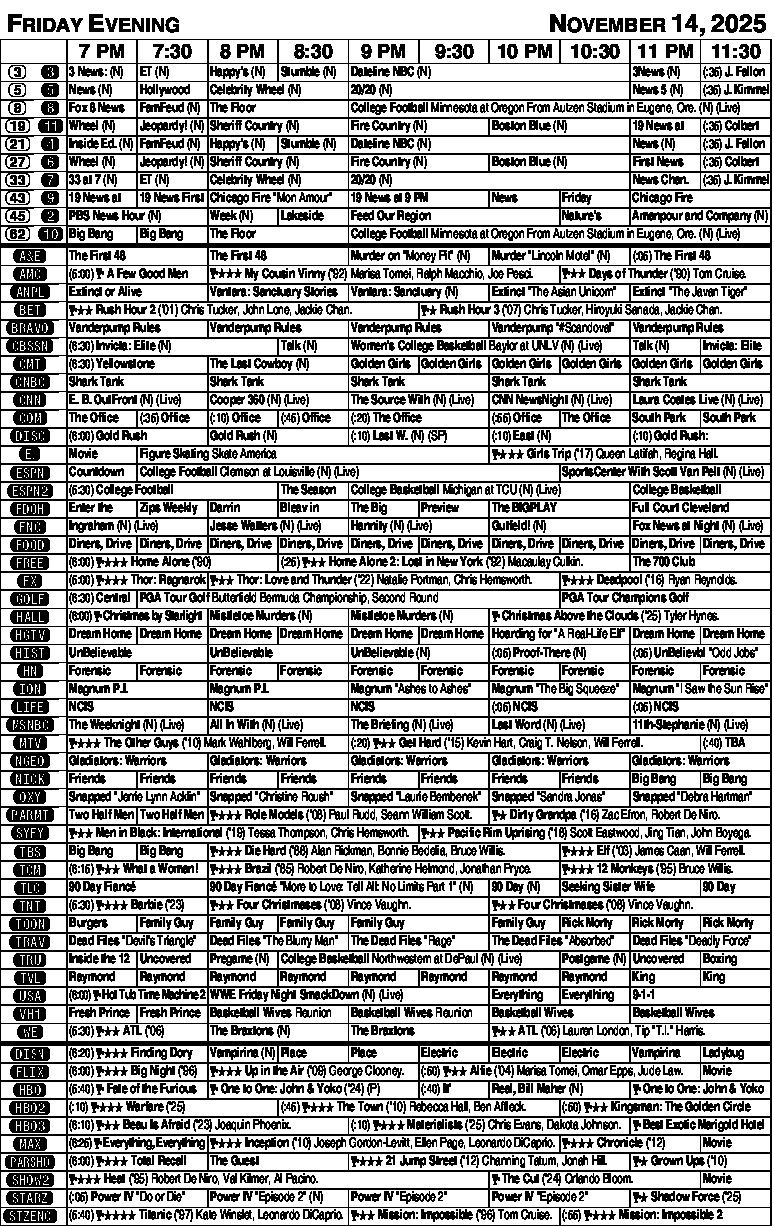
Bridge by Steve Becker
1. Two hearts. Judgment is said to be the name of the game, and you are certainly put to the test in this case, which poses a difficult choice between two reasonable rebids.
You could bid two clubs because you think it important to identify your good club suit and at the same time avoid an immediate raise in hearts with only three-card trump support. Or you could bid two hearts because it comes closer to describing the nature of your hand than a two-club bid would.
While it is true that a direct raise of partner’s suit is usually based on four cards rather than three, over the long haul the single raise in a major on three to an honor and an unbalanced hand will produce a better result than rebidding a five-card minor suit.
For those who might have considered two diamonds as a possible rebid, see No.3 below.
2. One spade. No other bid should seriously be considered. The search for a 4-4 major suit fit — partner might have four spades and four hearts, or four spades and five hearts — takes precedence over a two-club bid or a direct raise in hearts with only three-card support. There is a good chance you will get to show your three-card heart support at your next turn, depending on what partner does in response to your one-spade bid.
3. Two diamonds. This is a “reverse,” indicating 17 or more points as well as at least five clubs and four diamonds. You plan to show your heart support next to identify your shortness in spades.
As opener, whenever you bid a new suit on the two-level that ranks higher than the suit you opened with, you indicate well above a minimum opening bid and also imply that you hold greater length in the first-bid suit. One advantage of a “reverse” bid is that you can show a strong hand without making a jump-rebid.
4. Two notrump. This rebid shows 18 or 19 high-card points and balanced distribution (no singleton or void, and not more than one doubleton). It describes a hand that was too strong for an opening one-notrump bid and not strong enough to open two notrump. Responder is then in an ideal position to judge what is likely to be the best final contract. Two notrump is not forcing, but in practice the responder seldom passes.
Tomorrow: Extraordinary foresight.
(c)2025 King Features Syndicate Inc.
Bridge by Steve Becker
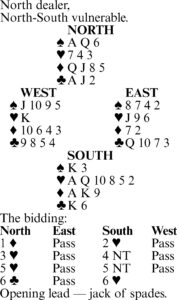
Assume you reach seven hearts on the bidding shown and West leads the ace of clubs, which you ruff. The contract seems very easy to make; the only conceivable complication is the possibility that one defender might have all four missing diamonds.
You begin by drawing trump, West turning up with three and East only one. You then have to decide whether it’s better to start the diamond suit by first cashing the king or the ace. (Remember, you are assuming a 4-0 division because if the suit is divided 3-1 or 2-2, the grand slam is cold.)
To settle the question beyond the shadow of a doubt, you next cash the ace of spades, and when everyone follows suit, you know that playing a low diamond to the ace is certain to bring home the grand slam.
This is because West cannot have less than a six-card suit for his vulnerable three-club bid, and since he has already shown up with three hearts and a spade, he cannot hold four diamonds.
Sure enough, when you lead the diamond six to the ace, West shows out. You then continue with the deuce and trap East’s J-9-5, whatever he does. If he plays the five, you finesse the seven; if he plays the nine instead, you win with the king, cross to the queen of spades and return the four of diamonds, gobbling up East’s J-5 with your Q-7.
Ordinarily, when you hold K-Q-x-x opposite A-10-x-x-x, you would cash the king first — and it would be easy to make that mistake here from force of habit. But in the present case — where you hold the seven and eight in the two hands and also have the benefit of West’s three-club bid — cashing the ace first is clearly the correct play.
Tomorrow: Bidding quiz.
Bridge by Steve Becker
Assume you’re declarer at three notrump and West leads a heart. You win East’s jack with the queen, and the question is how to continue.
There is a strong temptation to try a club finesse at this point, hoping to find West with the king. If he has it, you’re sure to wind up with at least 10 tricks.
But since the contract is certain to make whenever West has the king of clubs, you should start thinking about what you can do if East has the king.
In that case, if you lost an early club finesse, you could duck East’s heart return, but a third heart would then drive out your ace. Since you would have only eight sure tricks at that point, you would eventually have to try a diamond finesse. If it lost and West started with five hearts — as in the actual deal –you’d go down one.
For this reason, the correct play — strange as it may seem — is to lead the diamond jack at trick two! This insures the contract against any distribution of the adverse cards (assuming West started with at least four hearts).
If the jack holds, you next try the club finesse, guaranteeing nine tricks even if the finesse fails. If the diamond jack loses, you duck the heart return before taking the ace and then attempt the club finesse.
If the finesse wins, you have at least 10 tricks. If it loses and East has no more hearts, you’re also home. And if East has a heart, which means the suit was originally divided 4-4, nine tricks are again assured.
The recommended approach to the play defuses the lone danger to the contract — the possibility that West has a long heart suit and a side entry. Since that entry can only be the king of diamonds, you must deprive him of that card before it can be used to defeat you.
Tomorrow: Discovery play.
(c)2025 King Features Syndicate Inc.
Bridge by Steve Becker
Safety plays come in all shapes and sizes, and are necessary in many deals. Sometimes, though, declarer must not get so carried away with guarding against an unfavorable division that he winds up more sorry than safe.
Take this case where South was in four spades and West led the king of hearts. Declarer won with dummy’s ace and, intent on guarding against a 4-1 trump division — the only real threat to his contract — led the nine of spades and let it ride after East followed low. West won with the jack, cashed the heart queen and continued with the jack. Declarer ruffed and mulled over how to handle the remaining trumps.
One possibility was to cross to dummy with a diamond, lead a trump and repeat the finesse. This would succeed if East had all the remaining spades but would lose if West had started with two or three spades including a second honor card. In that case, South would lose two spades, a heart and a club for down one.
South decided that the remaining spades were much more likely to be divided 2-1 than 3-0, so he cashed the ace. When West showed out, declarer had to lose a second trump trick, and he finished down one.
South had the right idea about protecting against a 4-1 trump break, but he went about it the wrong way. A superior approach is to cash the spade ace first and then lead a low spade to dummy’s nine. In the actual deal, East wins with the ten, but declarer later picks up East’s queen via a finesse.
The suggested play has more to recommend it than the obvious advantage of averting a guess on the second round of trump. It is also the correct play mathematically. Cashing the ace first guards against West’s having started with the singleton ten, jack or queen, while the first-round finesse wins only when West started with the singleton two or three. The odds are therefore 3-to-2 in favor of playing the ace first.
Tomorrow: Resist that impulse.
Bridge by Steve Becker
If you look at all four hands, you might wonder how declarer managed to go down one at four hearts. But the fact is that he did, and, furthermore, it’s likely that most declarers playing the hand would have suffered the same fate.
The bidding was normal, and so was the opening lead of the king of diamonds. But something unusual occurred when East played the nine on the king at trick one, and then the deuce on the ace at trick two. When West next led the six of diamonds, declarer, having observed East’s high-low signal, presumably indicating a doubleton, naturally ruffed with dummy’s ten to avoid the possibility of East overruffing dummy with a low trump.
But to everyone’s surprise, including his partner’s, East unexpectedly produced the four of diamonds at trick three. When declarer next led the heart deuce from dummy, East showed out, and South, to his chagrin, found that he had to lose two trump tricks and go down one.
East was Ira G. Corn, highly successful Dallas industrialist and financier who also distinguished himself in the world of bridge during the ’60s and ’70s. He certainly had no high cards to work with against four hearts, and yet there is no doubt that he single-handedly defeated the contract without taking a trick!
Without Corn’s imaginative high-low play in diamonds, declarer would have lost only one trump trick and so would have made four hearts. Aside from the K-9-8-4 West actually had, there were several other trump holdings he might have had that would have brought about South’s defeat if he could be induced to ruff high in dummy on the third diamond lead. The little white lie told by Corn thus had everything to gain and almost nothing to lose.
Tomorrow: The better way.
Bridge by Steve Becker
1. Four spades. You don’t have much of a hand, and partner’s three-spade bid is not forcing, but you should nevertheless bid four spades. Partner is essentially saying that all he needs from you for game is one trick in the form of a high card and/or distribution. Your five spades to the king are more than enough to justify a four-spade bid. Partner could easily have something like:
Seven hearts. Partner is trying for a grand slam, since he could have ended the auction by bidding six hearts over five diamonds. His five-notrump bid, asking for kings, guarantees that your side has all the aces. It would be a mistake to mechanically respond six hearts, announcing two kings, since partner might pass and easily wind up with 13 tricks with the aid of your solid club suit. A typical hand for partner would be:
3. Four diamonds. Partner’s double is, of course, for takeout. Considering your previous pass, you have a far better hand than he has a right to expect. You should therefore feel confident that there’s a game somewhere (possibly even a slam), but you’re not in a good position to judge whether the best contract lies in hearts, spades or clubs.
Instead of guessing, you can force your partner to make the choice by cuebidding the opponents’ suit. This asks him to bid a four-card major if he has one — he almost surely has — but even if he lacks a four-card major, he’ll be able to rebid his clubs, and you’ll thus wind up in game in that suit. A typical hand for partner would be:
in which case you would certainly want to be in four hearts.
Tomorrow: David versus Goliath.
Bridge by Steve Becker
The term “endplay” refers to a situation where a defender on lead is forced to hand declarer an extra trick whatever he returns. Despite its name, an endplay does not necessarily occur at or near the end of a hand. Quite often it comes in the middle of the play, and there are even cases where it occurs on the opening lead!
Although an endplay may come about by accident, most of the time declarer consciously creates the setting that gains him a trick he might not otherwise make.
Take this case where South is in danger of losing two spade tricks and two diamond tricks at four hearts if the opposing cards are unfavorably situated. But if he is a competent declarer, he recognizes that there are certain steps he can take to overcome a potentially unfavorable lie of the cards.
He begins by winning the club lead with the ace, continues with a club to dummy’s king and ruffs a club with the heart nine. The A-K of trump are then played, creating a position where South can assure the contract regardless of how the defenders’ cards are divided.
Declarer next leads a diamond from dummy and inserts the nine after East follows low. West wins with the ten but is endplayed. If he returns a diamond, it goes into South’s A-Q, while if he returns a spade, South’s king becomes a trick.
If West returns a club instead, declarer ruffs in dummy and discards a spade from his hand. West eventually scores another diamond and the ace of spades, but South ends up with 10 tricks and the contract.
Observe that even if East plays the jack on the first diamond lead from dummy, South simply covers with the queen to produce the same ending. With careful play, all roads lead to 10 tricks for declarer.
Tomorrow: Bidding quiz.
Bridge by Steve Becker
It is obviously better to give yourself two chances to make a contract instead of just one. It is important to keep this in mind before settling for the most straightforward line of play.
Take this case where you’re in five diamonds and West leads the queen of hearts. You certainly can’t relax when dummy appears, since you have only 10 sure tricks. You note that you can easily score an eleventh if East has the ace of clubs.
However, you should not pin all your hopes solely on the 50% chance that East has the club ace. Instead, you should seek an approach that might give you a better chance than that.
One possibility is to win the heart lead, draw trump, cash the A-K of spades and exit with a spade. If the suit is divided 3-3 and West wins the third spade, you are home free.
This line of play is better than relying exclusively on the location of the ace of clubs, but it is still not the best approach. A superior play is to let West’s queen of hearts hold the first trick!
This unusual maneuver offers you by far the best chance to make 11 tricks. It is clearly better than playing the A-K and another spade, because it avoids the risk of East winning the third spade lead when the suit is divided 3-3.
In the actual case, once you let West win the queen of hearts at trick one, nothing can stop you from making five diamonds, whatever West does next. You win any return, draw trump, discard a spade on one of dummy’s high hearts and establish an extra spade trick by cashing the K-A of spades and ruffing a spade. If the spades don’t divide 3-3, you can still fall back on the possibility that East has the ace of clubs.
Tomorrow: Steppingstone to success.
Bridge by Steve Becker
Bridge would be a much easier game if, whenever the critical point of the play arrived, some kind soul would come along and tell you to be very careful at this juncture.
The trouble is that such moments sneak up on you without warning, and the first thing you know, an opportunity to shine has passed you by, and it is too late to do anything about it.
Assume you’re East in today’s deal and partner leads a heart against three notrump. After dummy follows low, you win with the queen and return a heart to the ace.
From this point on, it doesn’t matter what you, or your partner, do, as there is no way to prevent declarer from establishing his diamonds and making the contract. The only tricks your side can score are two hearts and two diamonds.
Now let’s go back to trick one and assume that the kind soul we mentioned earlier gently tugged your sleeve the moment declarer played the nine of hearts from dummy. In that case it might occur to you to play the eight on the nine rather than take the trick. If partner has the king of diamonds, this would make it possible to establish your hearts before your one and only entry — the ace of diamonds — is forced out.
If you made this unusual play, declarer would go down regardless of how he continued. He would not be able to avoid losing three heart tricks and two diamonds, assuming partner won the first diamond lead and returned a heart, and South would have no one to blame for his downfall except your old friend, the sleeve-tugger.
But, of course, if you made this play without any outside intervention, that would be even better.
Tomorrow: Hidden chance.
(c)2025 King Features Syndicate Inc.
Bridge by Steve Becker
This hand was played in an international tournament some years ago by Polish star Janusz Polec, who got to six spades as shown.
West led the queen of hearts, and Polec could see at once that the slam depended upon losing only one club trick. The normal way of playing the club combination shown is to lead a low club to dummy’s queen and finesse the ten on the way back.
But Polec decided that West was more likely to have the jack of clubs than East, so he adopted an entirely different line of play. He ruffed the heart lead and drew three rounds of trump, discarding a club from dummy after West discarded a heart.
Polec then played the A-Q-J of diamonds, overtaking the jack with the king. He next ruffed a heart in his hand, returned the four of diamonds to dummy’s seven, West discarding a club, and ruffed dummy’s last heart.
This brought Polec to the end position he had envisioned from the start. Having played all his trumps and diamonds, he was left with only three cards, the K-10-2 of clubs. West, in the meantime, had been reduced to the A-J-8 of clubs, while dummy had the Q-7-6.
Polec now led the king of clubs. If West ducked the king, declarer would simply lead another club toward the queen to make the slam. In practice, West took the king with the ace and returned a low club, hoping his partner had the ten. But this hope did not materialize, and Polec won the last two tricks with the ten and queen of clubs.
It might seem that if West hadn’t discarded his fourth heart earlier in the play, declarer would not have made the slam. But if West had discarded two clubs rather than a heart and a club, Polec would then have started the clubs before using his last trump and would still have gotten home safely.
Tomorrow: Outside help.
Bridge by Steve Becker
If you have faith in partner, you should return a low club. You should assume that East read your diamond lead as a singleton and expected you to ruff the diamond return at trick two.
In these circumstances, East’s lead of the four — his lowest diamond — has a special meaning. It is a suit-preference signal telling you to return a club rather than a spade at trick three. Had partner wanted a spade return, he would have led a high diamond instead. (If partner had no preference, he would return a medium-sized diamond.)
Declarer’s hand probably looks something like:
in which case South goes down one if you return a club, but makes the contract if you return a spade.
It is true that leading a club away from the king at trick three, with dummy holding Q-J-7-3, looks very unappetizing. But, assuming that East is familiar with standard suit preference signals and does not play his cards idly, it is clearly the right play.
If it turns out that partner has the spade ace and not the club ace — or neither ace — and declarer makes the contract as a result of your club return, you can show your partner this column to teach him the error of his ways.
Tomorrow: All roads lead to Rome.
Bridge by Steve Becker
Most players have set notions as to what constitutes an opening bid. Sometimes these notions work well, but sometimes they can boomerang and prove expensive.
Consider this deal from the final of a national team-of-four championship. The players involved were first-rate, but they came to opposite conclusions on whether or not to open the bidding with the West hand. As it turned out, this difference of opinion proved critical.
At the first table, West ended up in two diamonds as shown, going down one for a loss of 100 points. It was dangerous for either North or South to enter the bidding at any stage, and they passed throughout.
At the second table, however, the bidding went:
Here, according to West’s way of thinking, he did not have an opening bid, so he passed. North-South quickly reached three notrump, which declarer easily made after winning the king-of-spades lead and losing a club finesse to East. Score — 600 points.
The North-South pair at the second table thus gained 500 points on the deal — largely because West failed to open the bidding. It is true that one swallow doesn’t make a summer, and one hand doesn’t make a theory, but insofar as this writer is concerned, West had a clear-cut opening bid and should have made it.
An opening one-spade bid has considerable pre-emptive value, in that it makes it more difficult for the opponents to get into the bidding. This should always be taken into account when considering whether to open a marginal hand with a decent spade suit.
Tomorrow: Test your defensive play.
Bridge by Steve Becker
The Blackwood Convention is valuable chiefly because it pinpoints specific rather than general values. Consider this deal where, after North opens the bidding and then supports South’s jump-shift in hearts, all South really needs to know is whether his partner has specifically two aces and a king. If he does, South plans to bid a grand slam.
After learning via Blackwood that North has two aces and no kings, South settles for a small slam, since it would be poor policy to bid a grand slam lacking the king of trump.
West leads a spade, and South sees that even a small slam is not certain. If West has the K-J-x-(x) of hearts, the contract will fail.
But declarer cannot afford to play on that basis. He must assume that the slam is makeable and address himself exclusively to maximizing his chances to make 12 tricks.
Accordingly, he wins the spade lead with the king and plays the ace of trump! This catches West’s king, and declarer finishes with an overtrick after subsequently finessing against East’s jack.
The ace play is not just a lucky shot. It is a safety play that assures making the slam if it can be made. It protects against East holding all four trumps, any two- or three-card holdings, and any singleton honor.
If South were to start the suit incorrectly by finessing the queen and losing to the king, he would run into a harrowing guess later on when he led another trump from dummy and East followed with the nine. South would then have to decide whether West originally had the K-J doubleton or the singleton king, and a vulnerable slam would hang in the balance. This unpleasant possibility can be circumvented by adopting the recommended safety play.
Tomorrow: Strike while the iron is hot.
Bridge by Steve Becker
Just as declarer must assume there is a lie of the cards that will allow him to make his contract, the defenders must likewise assume that there is a way to defeat the contract. Without this mindset, the defenders may all too often permit declarer to make a contract that could have been defeated.
Consider this case where East takes the first two heart tricks against four spades and must then ask himself how the defense might score two more tricks. To begin with, East knows from his partner’s lead of the heart ten followed by the deuce that West started with only two hearts. He also knows from the bidding that South must have nearly all of the missing high cards as well as a rebiddable spade suit.
Starting with this as a base, East should conclude that if South has all three missing aces, the contract cannot be stopped. East must therefore credit his partner with either the ace of clubs or ace of diamonds.
However, this assumption accounts for only the third defensive trick. The next step is to look for a way to score a fourth trick, since the king of spades — apparently the only remaining hope — seems certain to fall prey to South’s ace of spades.
The solution to the problem lies in East’s knowledge that West started with a doubleton heart. So at trick three East continues with a heart — a low one is best to make sure West understands what is expected of him. After South follows with the jack, West ruffs with the four, forcing dummy to overruff with the jack.
East now has a guaranteed trump trick whatever South does next, and this, together with West’s hoped-for-ace, spells inevitable defeat for declarer. Surprisingly, West’s lowly four of spades proves to be the straw that breaks the contract’s back.
Tomorrow: Avoiding a harrowing guess.
King Features Syndicate Inc.
Bridge by Steve Becker
The opponents’ bidding sometimes draws a road map for declarer to follow that he would be unlikely to find had the opponents remained silent. For example, take this deal played by multitime world champion Bob Hamman in a U.S. national championship.
Hamman’s opening one-club bid was artificial and forcing, promising at least 17 high-card points with almost any distribution. West’s four notrump announced a strong two-suiter in the minors. The double by North indicated at least moderate values, and South’s five-heart bid closed the auction.
Without a club lead, Hamman would have had no trouble collecting 11 tricks. But West’s king-of-clubs lead cut South off from dummy’s king of spades. As a result, declarer was faced with the possibility of losing three diamond tricks. However, Hamman utilized his knowledge of West’s hand to bring the contract home.
After taking the club ace, he led a diamond to his nine, losing to the ten. As expected, West shifted to a trump. After winning the eight with the nine, Hamman now made his second key play in the diamond suit by returning the king!
West took the king with the ace, but, just as Hamman hoped, he did not have another trump to lead. Hamman ruffed the queen-of-clubs return, trumped his last diamond in dummy and so made the contract.
By playing the diamonds as he did, Hamman prevented East — the player far more likely to hold two or three trumps — from ever gaining the lead. Had Hamman put up the king of diamonds at trick two, or led the eight of diamonds instead of the king at trick four, East would have won the second diamond with the jack and returned a trump to sink the contract.
Tomorrow: A straw worth grasping.
King Features Syndicate Inc.
Bridge by Steve Becker
Pass. In addition to showing 20 or 21 points, partner’s bid indicates a balanced hand with strength in all suits. It could therefore be argued that since the combined hands might contain 26 points, you should raise partner to three notrump.
However, another factor must also be considered, namely that partner will have trouble reaching dummy to take whatever finesses he might need. This lack of communication with dummy is apt to prove troublesome even if partner has a 21-point hand. While it is true that a combined holding of 26 points usually produces a satisfactory play for game, this is rarely the case when one player holds practically all the high cards.
2. Six notrump. This is simply a matter of arithmetic. Partner’s 20 or 21 points added to your 13 bring the combined holding to at least 33, the amount ordinarily required for a small slam with two balanced hands. You should therefore bid six without further ado.
3. Four spades. High-card points are of course not the only criterion in judging the probability of game. Here you have only four points in high cards, but your six-card suit is worth several points more. Five or six tricks are likely to be taken with this hand if spades are trump. There is no point in bidding three spades, since you don’t plan to pass a three-notrump bid by partner. Similarly, if you play Jacoby Transfers, you would bid three hearts to force partner to bid three spades, and then raise him to game.
4. Four notrump. This bid is simply a raise in notrump suggesting the possibility of a slam, and has nothing whatever to do with Blackwood. Partner should pass with a minimum and bid six with a maximum. Holding 12 points, you can’t tell whether the combined point count is 32 or 33, and the four-notrump bid expresses that uncertainty.
5. Three clubs. Even though you have a hand suitable for notrump play and enough points to make a game in notrump, you should check via Stayman to see if partner has four hearts. Your doubleton small club is a concern, and if partner has a weak holding in that suit and four hearts, you are almost surely better off playing in game in that suit. If partner bids three spades or three diamonds (no four-card major), you will of course retreat to three notrump.
Tomorrow: Death of a monarch.
(c)2025 King Features Syndicate Inc.
Bridge by Steve Becker
When a player makes a takeout double of a suit — as West did in this case — he announces the values for an opening bid and asks his partner to respond in one of the other three suits.
However, the responder has the option of passing the double when he has a very strong holding — three tricks or more — in the opener’s suit. In such a case, he can elect to convert the takeout double into a penalty double by passing.
That is exactly what happened here when East decided that one diamond doubled, played by South, was the best contract for his side.
It is nearly always right to lead a trump when a one-level takeout double is passed by the responder, and West saw no reason to deviate from that principle. Declarer won East’s nine of diamonds with the king and returned a low heart to dummy’s king.
East took the ace and led the queen of trump to South’s ace. Declarer could now have saved a trick by cashing the club ace, but he not unreasonably continued with the jack of hearts, hoping to secure a heart ruff in dummy. West took the jack with the queen and cashed the king of spades, on which East played the queen. West then led a low spade to East’s jack.
East continued the devastating defense when he drew both of South’s remaining trumps and returned the nine of spades. West cashed the A-10 of spades, East discarding his only club, and East then won the remaining tricks with his fifth trump and the 10-9 of hearts.
So South went down five — 1,400 points — as a result of East’s propitious pass and the subsequent flawless defense. Had West started out by leading the K-A and another spade instead of a trump, South might have held the loss to 500 points. West’s trump lead turned out to be worth an additional 800 points.
Tomorrow: The obligatory finesse.
Bridge by Steve Becker
It doesn’t matter to declarer whether he makes a contract because his side has overwhelming high-card strength, because of his skillful play, or because an opponent makes a mistake.
What counts above all else is making the contract, and whatever can be done to bring this about is all to the good. While declarer has no objection to succeeding on merit, he also doesn’t mind succeeding by inducing an opponent to commit an error.
Take this deal from a team match where the contract was four spades at both tables. At the first table, West led a club to dummy’s ace, and declarer played a low spade to the ace, on which West showed out. South eventually went down one, losing a trump, two hearts and a club.
At the second table, West also led a club to dummy’s ace, but here declarer played the jack of spades instead of a low spade from dummy at trick two. East covered the jack with the queen, which proved to be a fatal error. After taking the ace and seeing West show out, it was easy for declarer to avoid a trump loser by subsequently taking a finesse against East’s ten, and he wound up with 10 tricks.
Obviously, leading the jack of spades from dummy proved more successful than leading the five. More importantly, leading the jack couldn’t hurt South regardless of how the missing trumps were divided. The play therefore offered a chance to gain a trick if East had all three trumps and made the mistake of covering with the queen.
The second declarer, of course, had no intention of finessing if East followed low, but leading the jack gave East a chance to err, and to that extent increased the chance of making the contract.
Tomorrow: Blitzkrieg!
Bridge by Steve Becker
This deal occurred during the 1972 World Bridge Olympiad in the match between Poland and Taiwan. The play presented points of interest at both tables, with the Poles getting the best of the battle against their more experienced opponents.
When Patrick Huang and M.F. Tai were North-South for Taiwan, the bidding went as shown, and Andrzej Wilkosz, West for Poland, led a club. Declarer played low from dummy, and East (Lukasz Lebioda) ruffed. East thereupon made the sparkling return of a low diamond! West won with the ten and led another club, ruffed by East for the defense’s third trick.
East now attempted to take the ace of diamonds for the setting trick, but Tai ruffed. He then decided that if he drew the missing trumps at this point, he would eventually lose a club trick to West and go down one. So, hoping East had no more trumps, he next led a club to dummy’s ace, but East ruffed, and Tai later lost another club to West’s queen to finish down two.
At the second table, the Polish North-South pair wound up in five clubs, and West, trying to stop a potential crossruff, made the peculiar lead of a low trump. South won the club with the seven, finessed dummy’s jack, cashed the ace, led a heart to the ace, cashed the king of trump and then played winning hearts until West ruffed. He thus lost only a trump and a diamond and so made five clubs.
One of the more unusual aspects of the deal was the fact that at the first table, East-West scored four club tricks (three of them ruffs) to defeat the contract, while at the second table, North-South scored four club tricks to make the contract.
Tomorrow: A little rope
Bridge by Steve Becker
1. One Club. Despite your 16 points and 4-4-3-2 distribution, which suggest opening one notrump, it is better to bid a suit when you have two suits unstopped.
2. One spade. Game is certain, but that doesn’t mean you should jump to two spades. A jump-shift would indicate a probable slam, and this hand is not in that class. Change one of your hearts into a spade, and you would have an acceptable two-spade response. One spade is 100% forcing.
3. Double. This shows the values for an opening bid and support for the two unbid suits. It would be wrong to bid one spade, which would suggest greater spade length and less high-card strength.
4. Redouble. This promises 10 points or more in high cards and says nothing about support for partner’s hearts. Your plan is to get to a game eventually or double the opponents for penalties.
5. Four clubs. A small slam is certain, since partner’s jump-shift indicates at least 19 points in high cards and distribution. Your real goal at this point is a grand slam. Four clubs is a waiting bid that forces partner to reveal the nature of his jump-shift. He might have:
or similar holdings. You’ll have to wait to see what partner does over four clubs.
6. Pass. The value of a hand nearly always changes as the bidding progresses. Before the bidding started, you were hoping to find partner with spade or club length, but that possibility is now greatly reduced. The best strategy is to play possum and hope the opponents climb too high.
Tomorrow: The one and only chance.
King Features Syndicate Inc.
Bridge by Steve Becker
Assume you’re West and that South gets to three notrump as shown. You have no clear-cut opening lead, but you decide, after considering the bidding, that the only real chance of defeating the contract is to find partner with good hearts.
So you lead a heart, and it immediately becomes apparent that you must have done something right, because when your partner plays the jack, it wins the trick. East returns the eight of hearts (his original fourth-best heart), and you take declarer’s ten with the king.
You might mechanically continue with a third round of hearts at this point, but before you do, you should stop to analyze the situation.
If declarer’s bidding is to be believed, he is virtually certain to have the A-K of spades and ace of hearts for his three-notrump bid. Translating that into tricks, South is sure to score a minimum of nine tricks — four diamonds, at least three spades, a heart and a club — if you return a heart at trick three.
Faced with this prospect, you arrive at the conclusion that the only chance to defeat the contract lies in finding partner with the queen of clubs. So, at trick three, you shift to the seven of clubs!
Declarer cannot cope with this deadly switch. The combination of your heart lead at trick one and your club shift at trick three renders him helpless. He cannot stop you from scoring two hearts, two clubs and a diamond before he can take nine tricks, and there is nothing he can do about it at any point in the play.
It is often said that defense is by far the most difficult part of the game. Undoubtedly it is, but as this deal illustrates so well, it is mostly a logical process. All that’s required is the willingness to expend a little extra effort.
Tomorrow: Bidding quiz.
Bridge by Steve Becker
This hand was reported by Dr. James Parrack in the British Bridge Magazine many years ago. As usual, the doctor casts his favorite character, Ffred, in the role of hero.
Ffred was the dealer and opened one spade. It is true that most players would have opened with a stronger bid, but Ffred was seldom inclined to do what most players would do.
West overcalled with two diamonds, and East raised the ante to five. This development did not faze Ffred, who bid five hearts in what can best be described as a forcing voice.
North thereupon came to life and raised Ffred to six hearts, which West doubled after two passes. West then led the ace of diamonds. Ffred ruffed, of course, and played the king of hearts, on which East showed out. Most declarers at this point would probably have shifted their attention to spades, but this thought did not cross Ffred’s mind.
Instead, he cashed the ace of clubs. When West’s queen fell on it, Ffred’s face lit up like a Christmas tree. Situations of this type were a great source of joy to him, and Ffred proceeded to bring home the slam in his customary slam-bang style.
He led the heart six to dummy’s eight, ruffed the jack of diamonds with the queen of hearts and led the seven of hearts to dummy’s ten. Ffred then cashed the ace of hearts and discarded the king of clubs on it, allowing him to run dummy’s five remaining clubs and so score 12 tricks.
During the post-mortem, when Ffred was asked why he had not tried to establish the spades instead of the clubs, he replied, “What spades?”
Tomorrow: Shifting defense.
Lifestyles
Will we see action on prescription ads?
The United States is distinctive in many ways, but at least one unique characteristic may change in the coming ...
Puzzles? Sports? Birdsong?
Birding. Photography. The great outdoors. Big Macs. Chances are good there’s a nonfiction book out there to ...
TO YOUR GOOD HEALTH: Parsonage syndrome can bring severe pain in shoulder
DEAR DR. ROACH: What is known about Parsonage-Turner syndrome? One of my brothers has severe shoulder pain. He had ...
HINTS FROM HELOISE: Take steps creatively
DEAR HELOISE: After having total knee replacement surgery, I bought a small treadmill that goes under my desk. ...
Senior news
To be included or submit items to be published in the weekly Senior News list, email information to ...